Cheesy Chicken and Mushroom Sliders

These cheesy chicken sliders are loaded with the most irresistible creamy mushroom sauce and couldn’t be more delicious if they tried!

You know what’s crazy? I’ve never uploaded a slider recipe to the blog before. I’ve been biding my time, testing around to try and create the perfect slider. Something off the beaten track too – something you’ve never had before. Well, I’m happy to report that the mission has been accomplished. Follow me…

close up shot of silver fork digging into cheesy chicken mushroom slider

Chicken and Mushroom Sliders

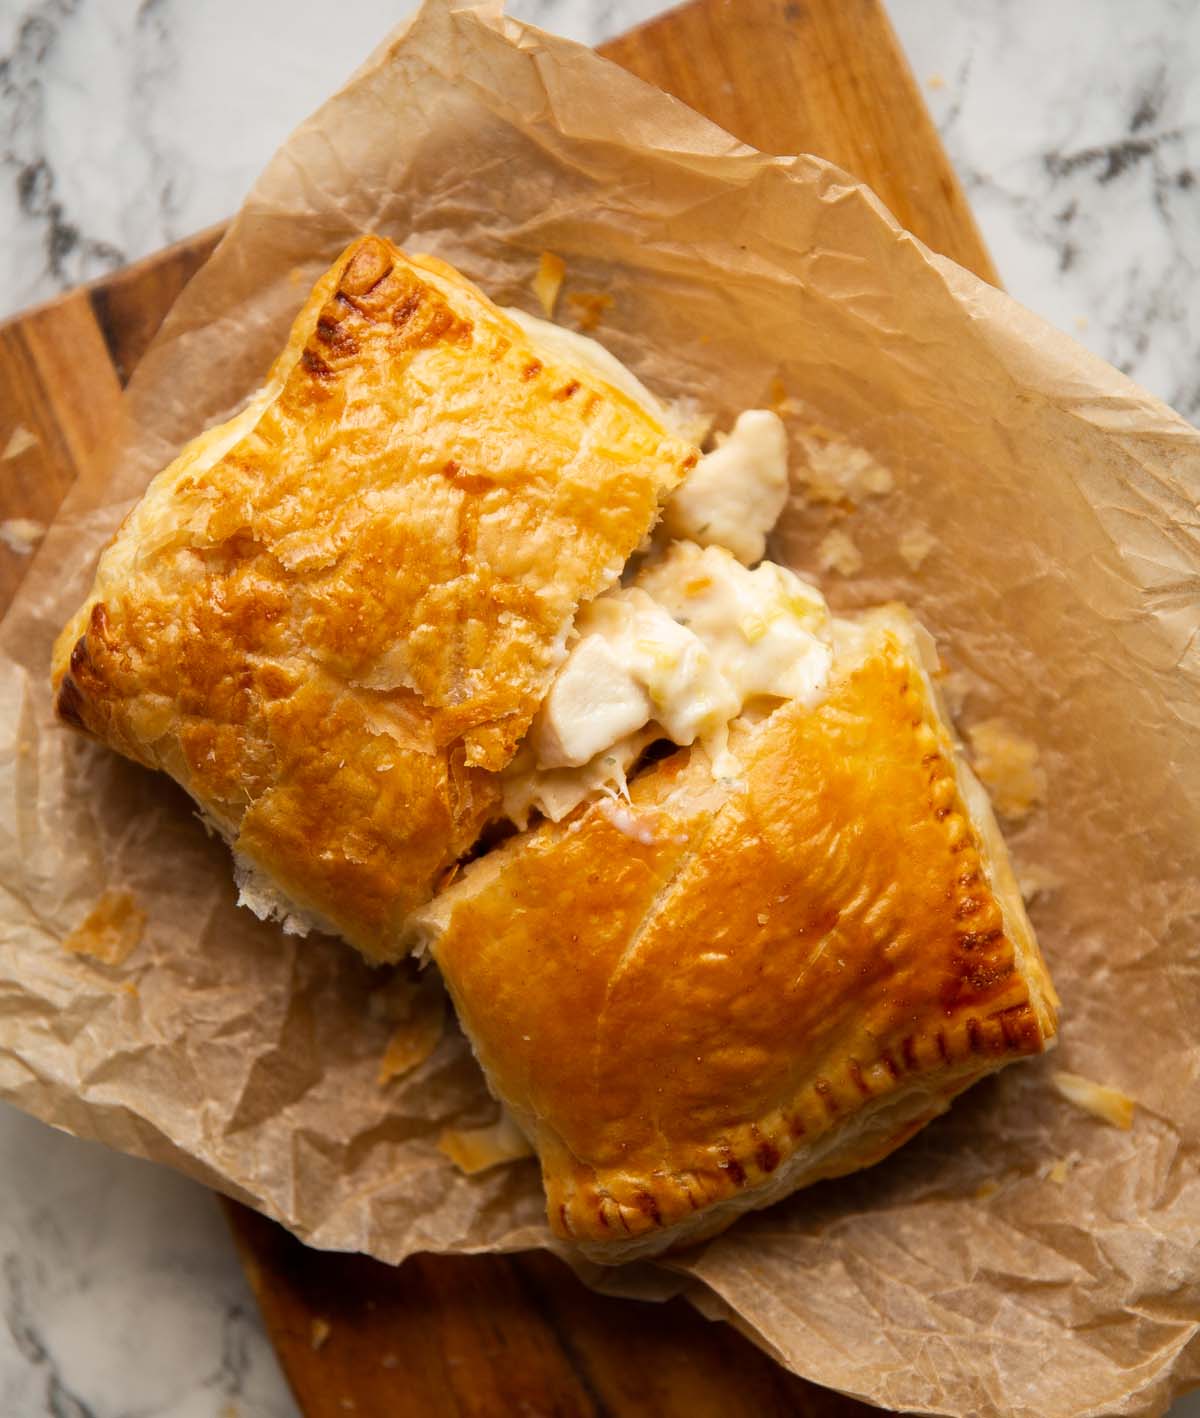
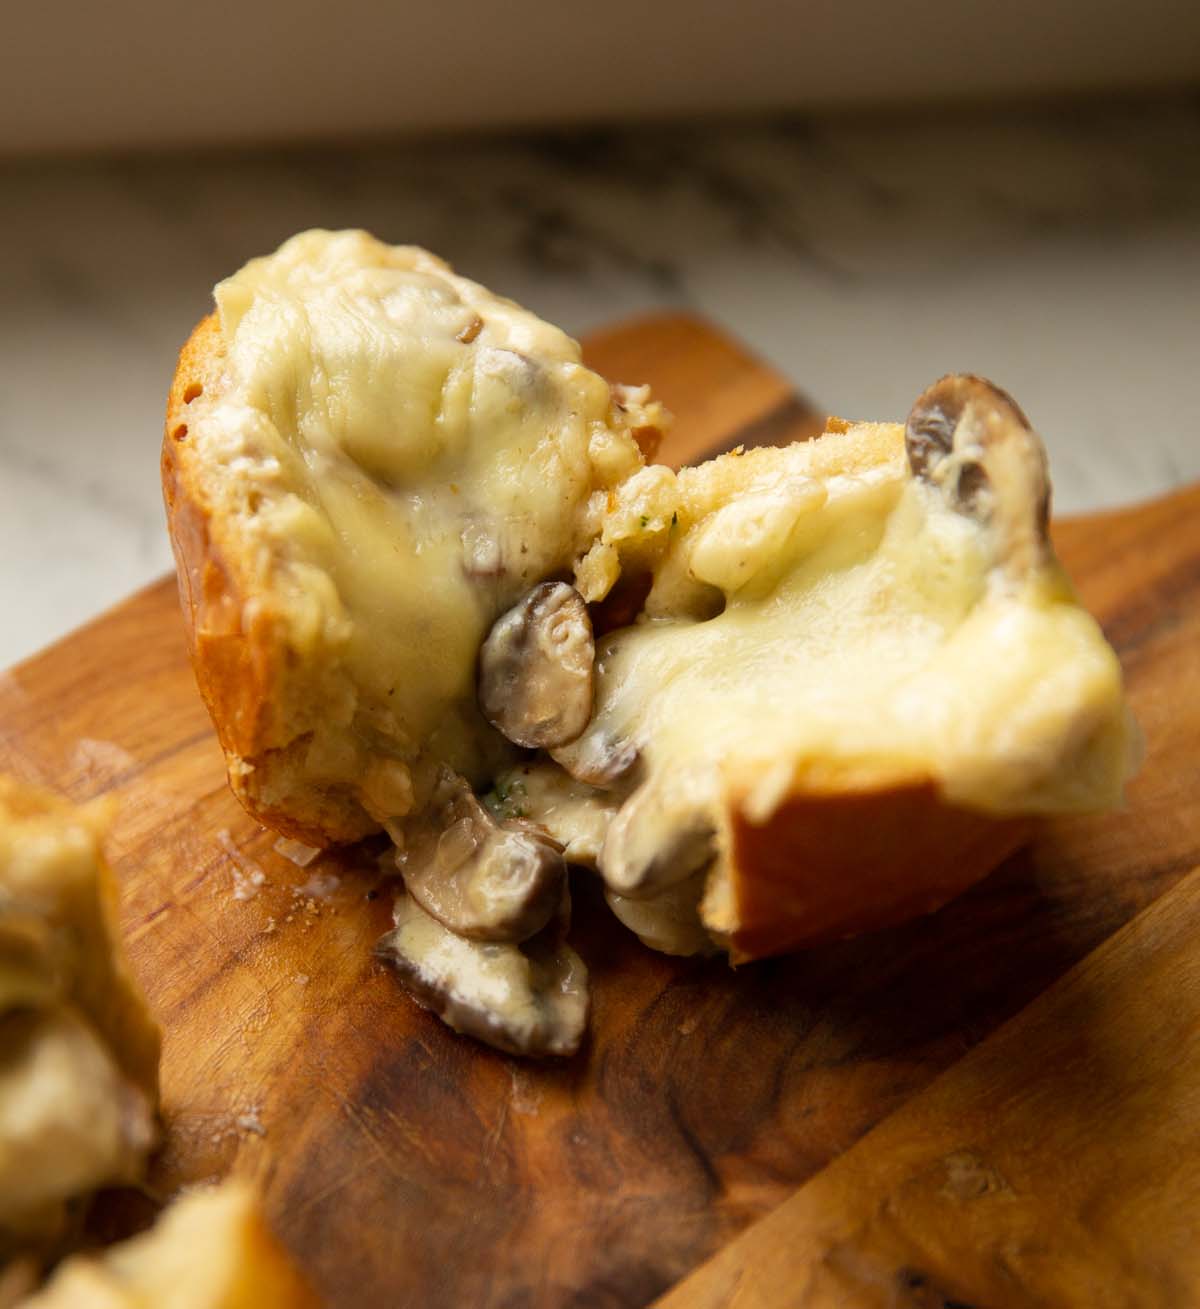
We’re essentially going to whip up a filling that’s similar to a Classic Chicken and Mushroom Pie filling. Just imagine that, stuffed inside crusty garlic bread, then smothered in cheese. Yes, heaven truly is a place on earth.

Layering the flavours

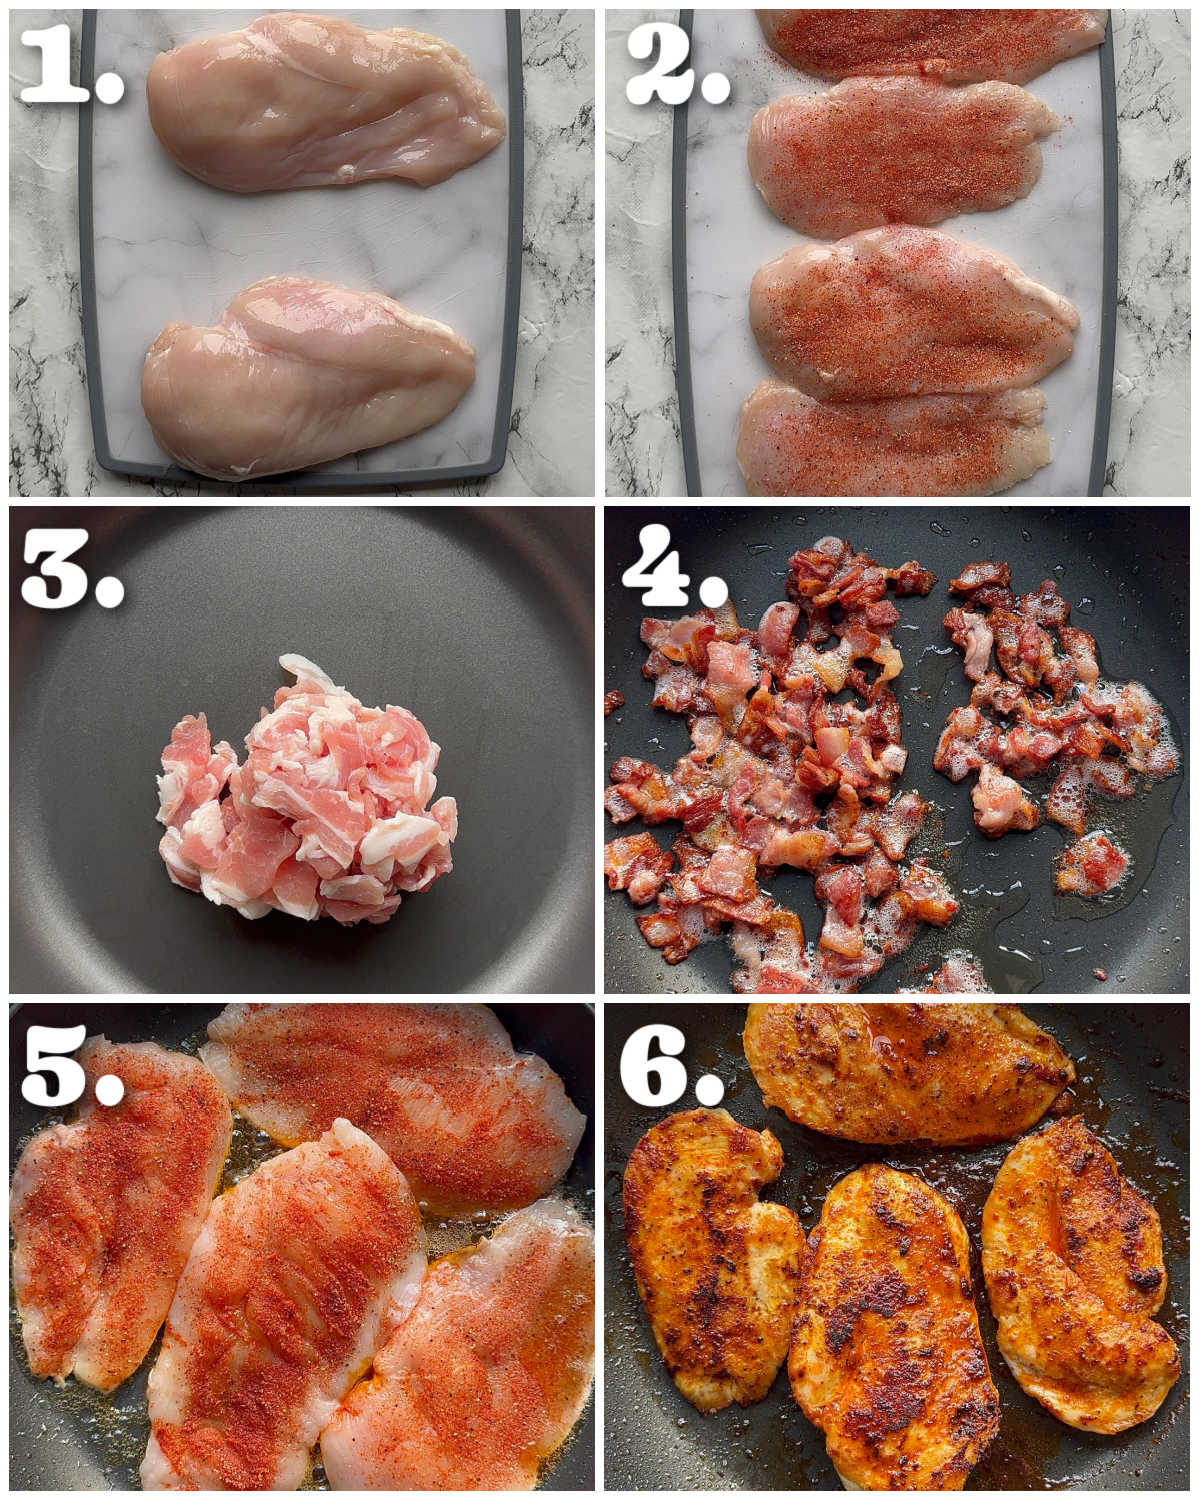
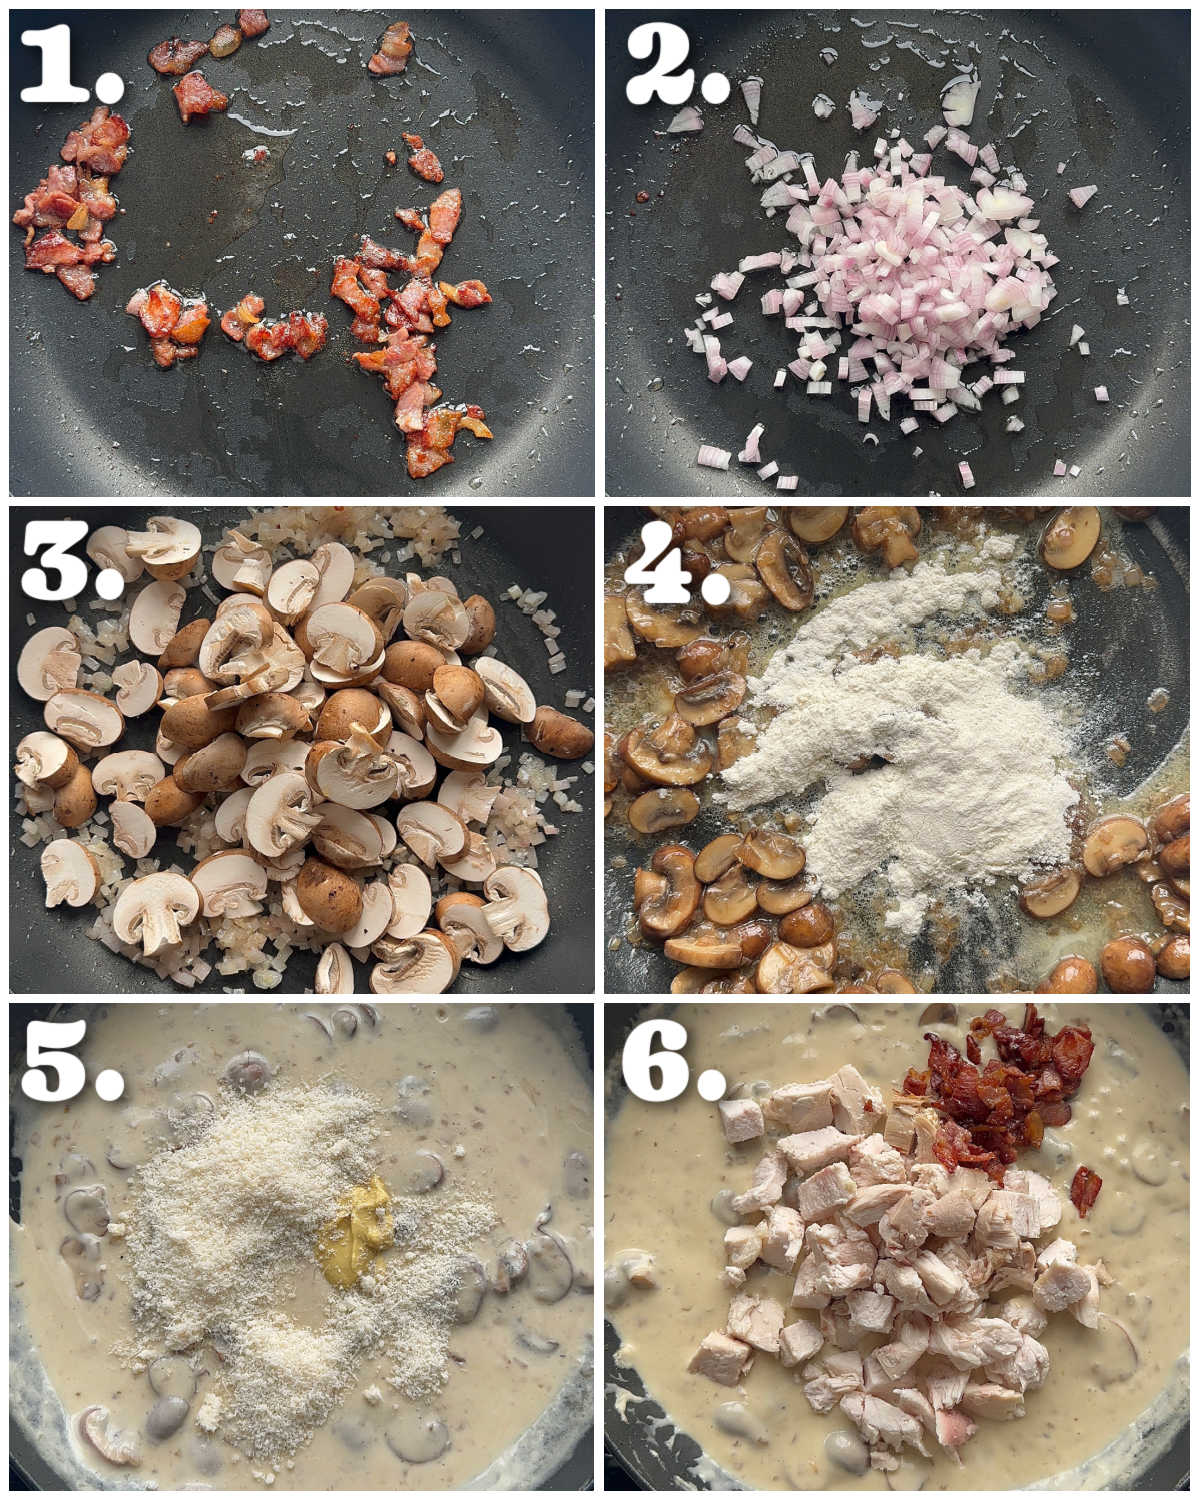
Alongside the obvious chicken and mushroom, we’re going to pack in more flavour with some bacon. This will not only offer a lovely smoky background flavour, but you can also use the excess fat to fry the mushrooms. We’re also going in with shallots, Dijon and Parmesan to really let the filling shine.

Filling consistency

The sauce is made up of stock and cream, but we want it nice and thick before we add it to the sliders. As such, you’ll want to make a roux with flour and butter. You shouldn’t have to simmer it for long until it gets thick, and just keep in mind it gets saucy again as it bakes in the sliders.

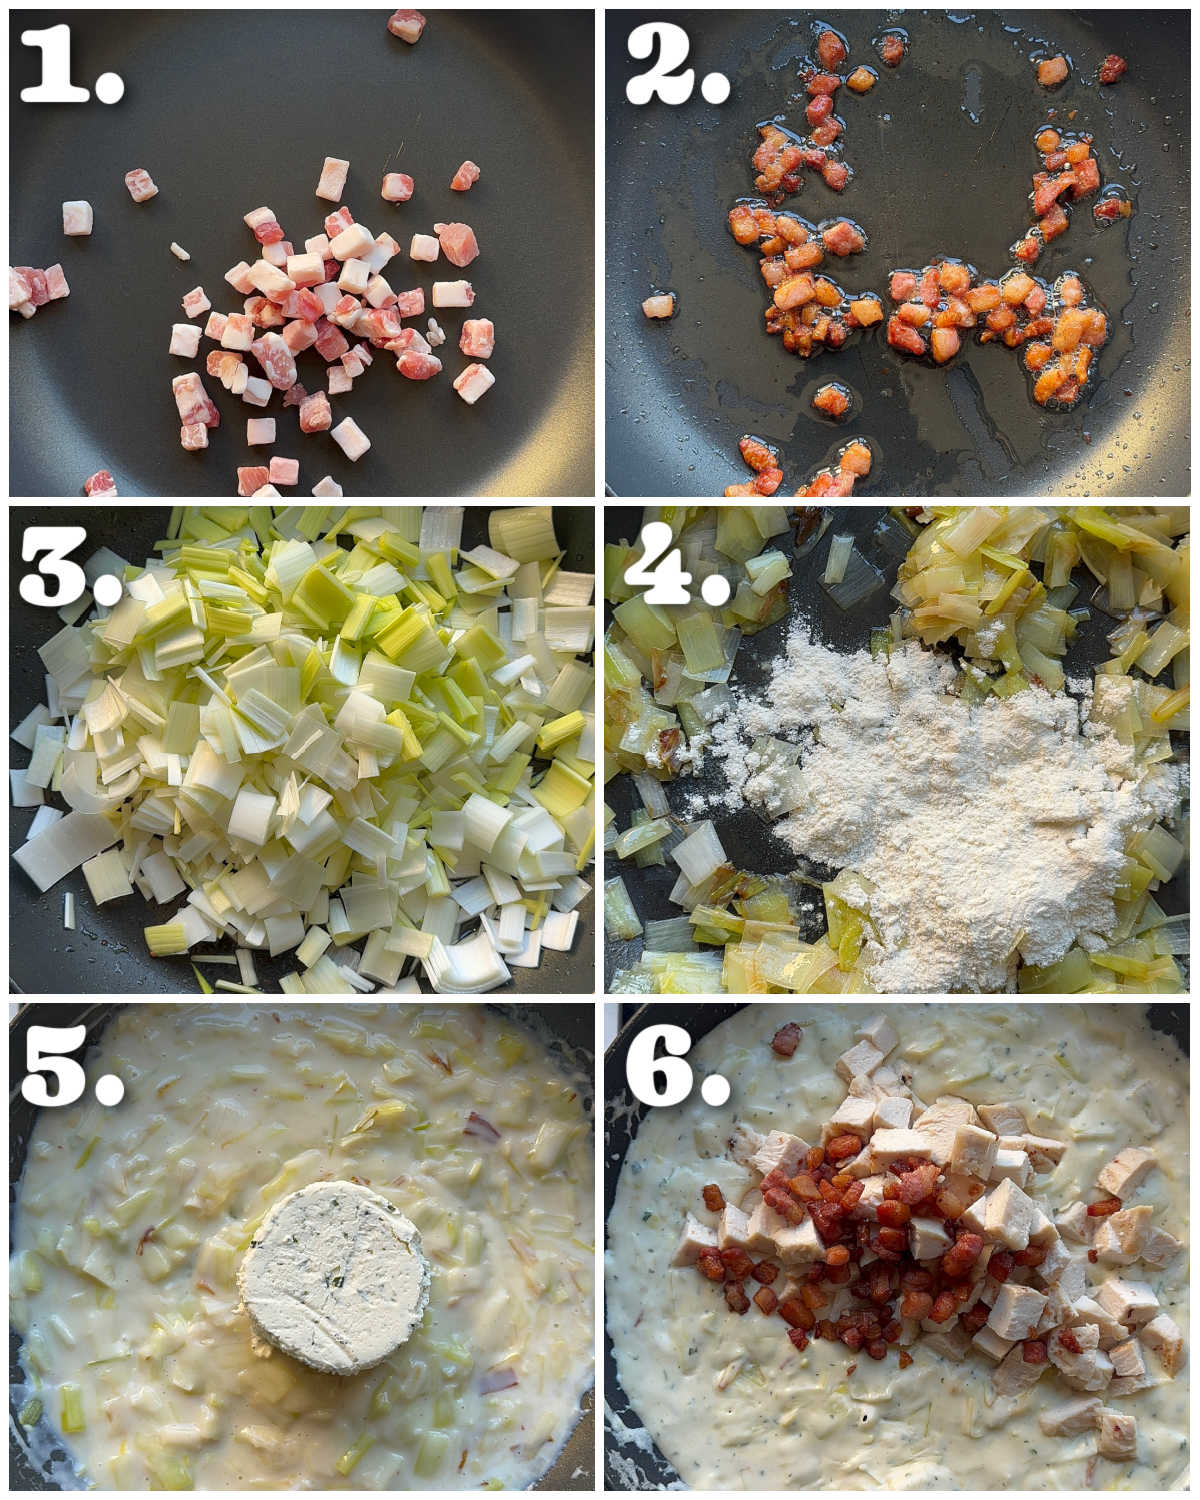
Process shots: fry bacon (photo 1), fry shallot (photo 2), fry mushrooms (photo 3), melt butter then stir in flour (photo 4), whisk in stock and cream then stir in parmesan and mustard (photo 5), stir in bacon and chicken (photo 6).

6 step by step photos showing how to make chicken mushroom filling

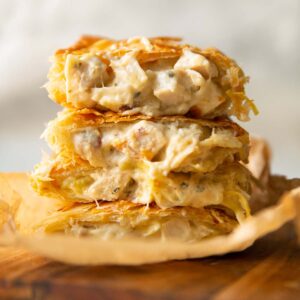
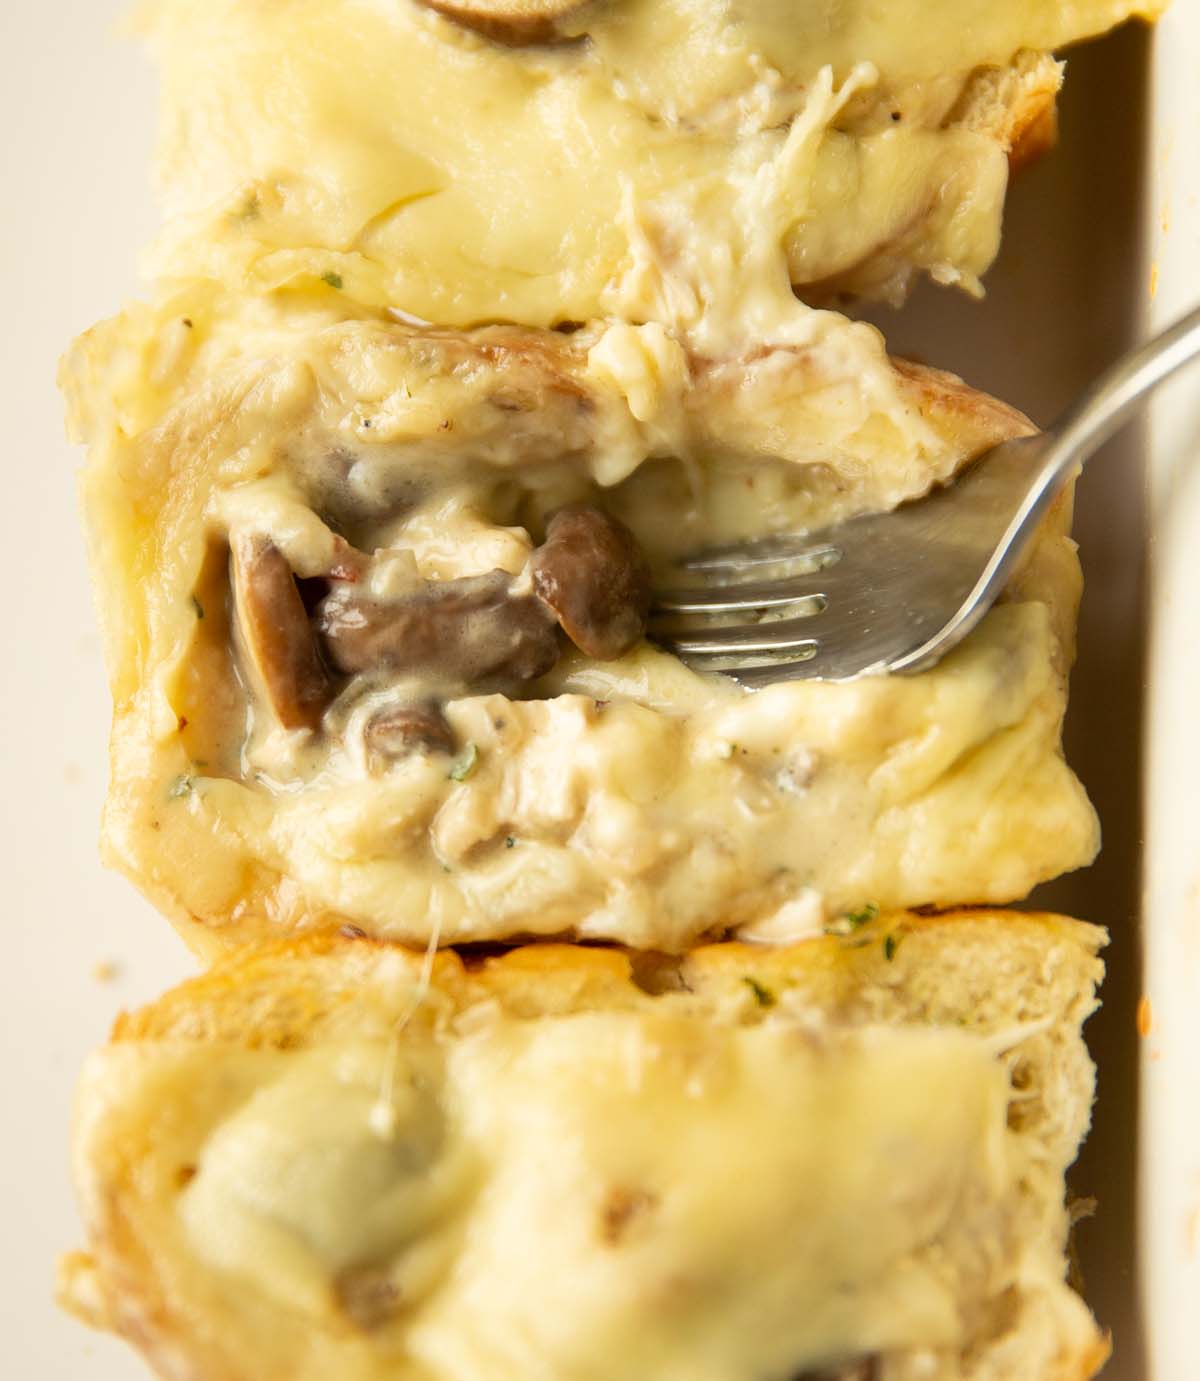
Cheesy Chicken Sliders

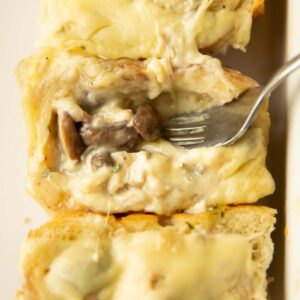
My problem with regular sliders is that there’s only so much saucy filling you can put in the centre without them getting too soggy and literally sliding around.

My solution = use crusty rolls and turn them into mini bowls to contain the filling. This way us folks in the UK can also enjoy the fun without having to fly to the US to buy Hawaiian Rolls.

Garlic bread sliders

When I first tested these, I just plonked the filling straight into the rolls and went from there. Don’t get me wrong, they were nice, but realistically, what isn’t improved by adding garlic bread to the situation? As such, we’ll be brushing the insides of the sliders with a simple garlic butter before we load them up.

What kind of cheese should I use?

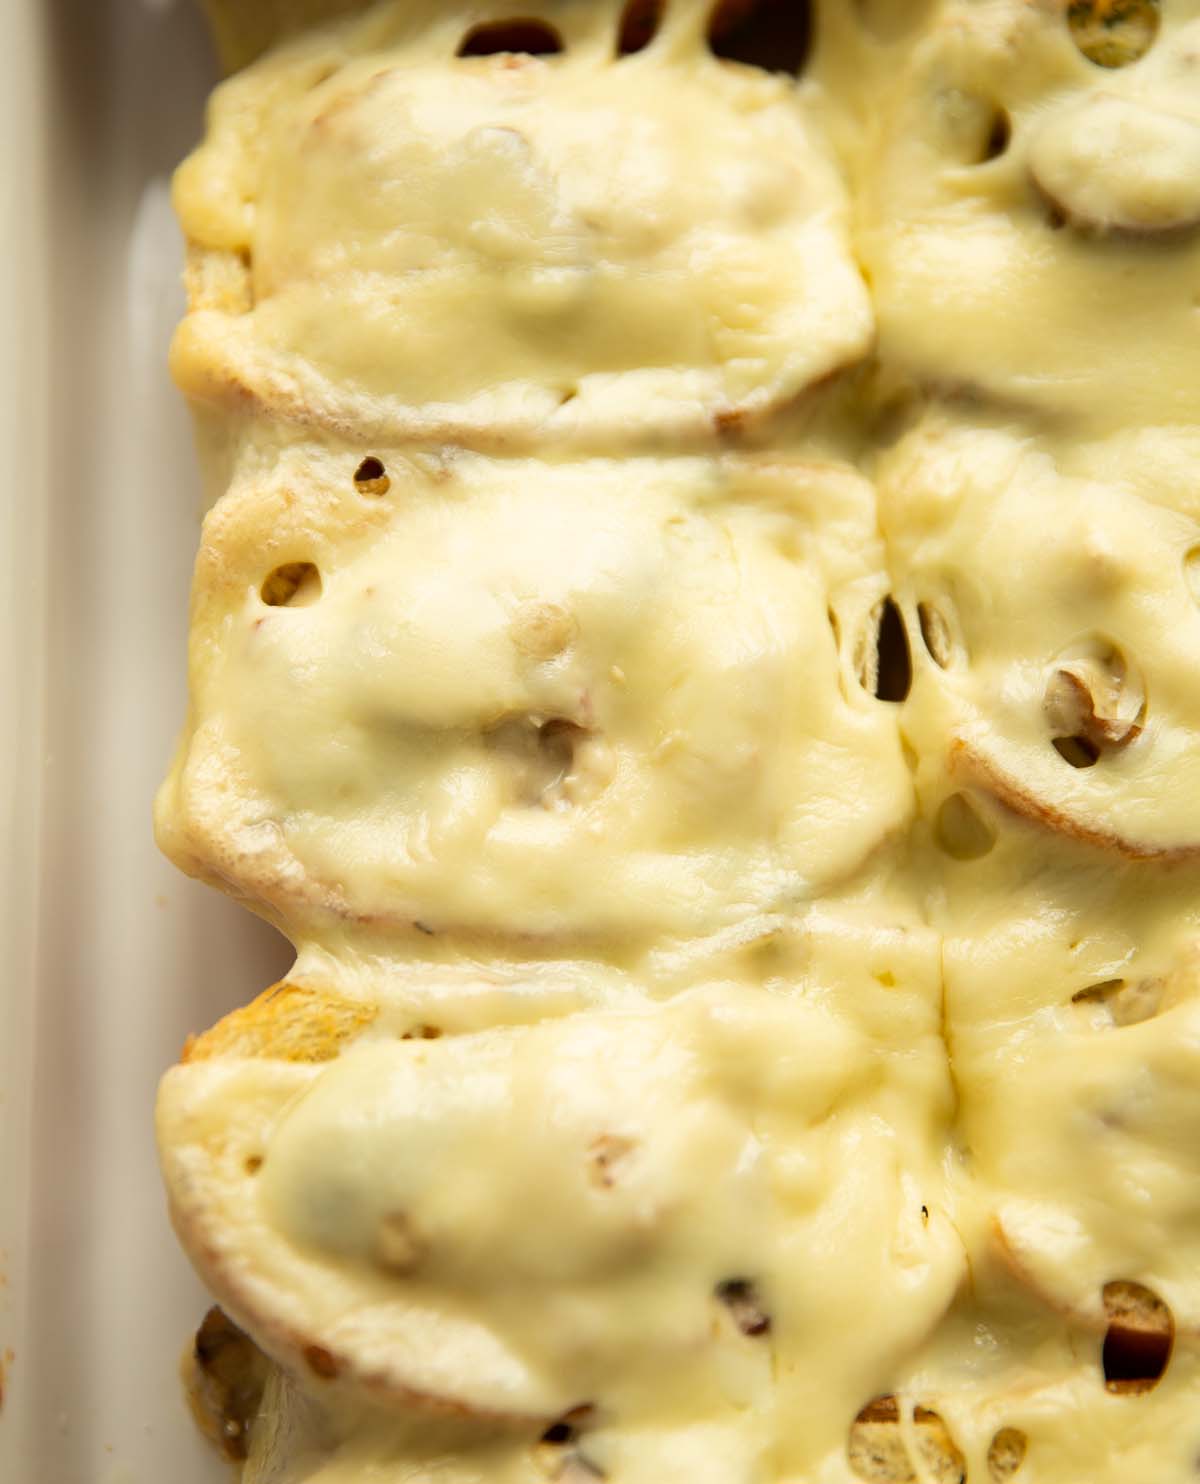
We’ve got parmesan in the filling and in the butter, which are both essential. I love using Swiss for the top – it’s mild and creamy yet melts perfectly. I recommend using that if you can, but Cheddar and/or Gruyere would make great subs.

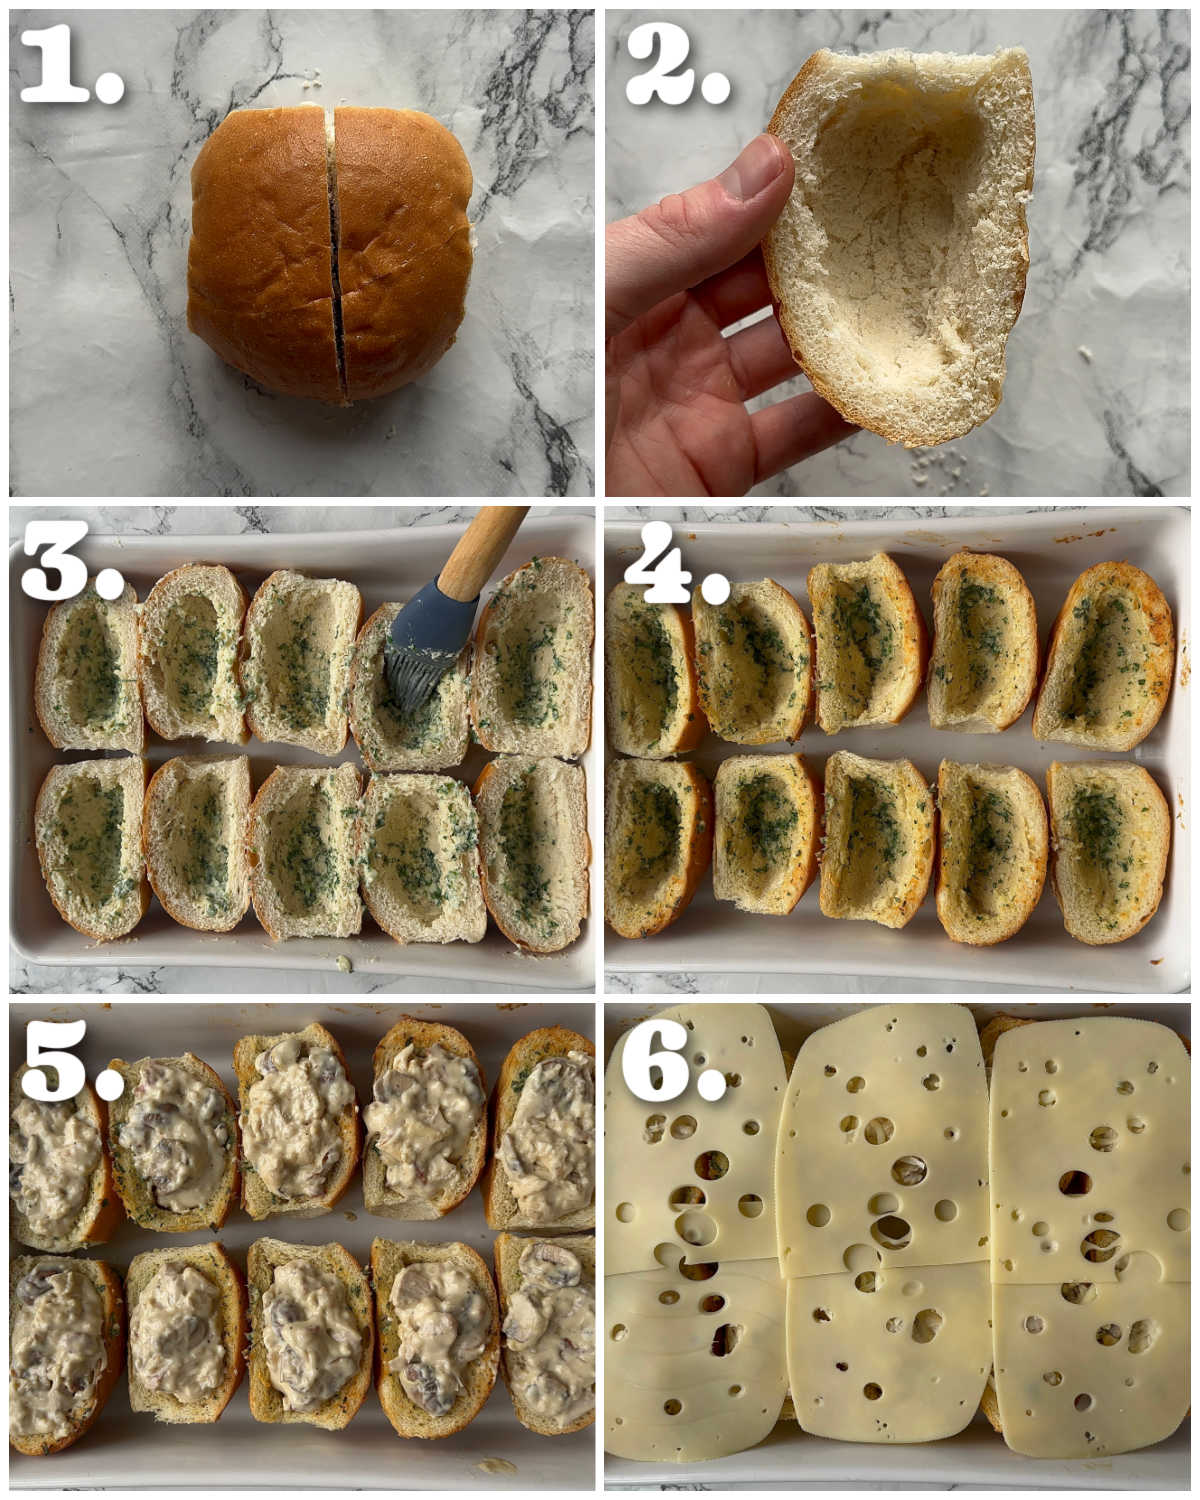
Process shots: halve rolls (photo 1), use your fingers to make a dent (photo 2), add to baking dish then brush with garlic butter (photo 3), bake (photo 4), add filling (photo 5), add cheese then bake (photo 6).

6 step by step photos showing how to make cheesy chicken mushroom sliders
close up overhead shot of cheesy chicken sliders in baking dish fresh out the oven

How to serve Chicken Sliders

Once the cheese has melted and the filling is golden and bubbly, you’re good to go. These are perfect for so many different occasions – think appetizers, game day, potluck, holiday season, lunch.

Alrighty, let’s tuck into the full recipe for these cheesy chicken mushroom sliders shall we?!

close up shot of chicken mushroom slider halved on wooden chopping board

How to make Cheesy Chicken and Mushroom Sliders (Full Recipe & Video)

close up shot of silver fork digging into cheesy chicken mushroom slider

Print

Cheesy Chicken and Mushroom Sliders

These cheesy chicken sliders are loaded with the most irresistible creamy mushroom sauce and couldn't be more delicious if they tried!
Course Appetizer
Cuisine American
Prep Time 20 minutes
35 minutes
Total Time 55 minutes
Servings 10 sliders
Calories 303kcal

Equipment

  • Sharp Knife & Chopping Board
  • Large Pan & Wooden Spoon (for filling)
  • Large Baking Dish (mine is 12×9" / 30x22cm)
  • Small Bowl & Brush (for butter)

Ingredients

Filling

  • Olive Oil, as needed
  • 2 slices of Streaky Bacon, diced
  • 1 Shallot, finely diced
  • 150g / 5.3oz Baby Chestnut or Button Mushrooms, sliced
  • 2 tbsp / 30g Butter
  • 2 tbsp Plain Flour
  • 240ml / 1 cup Chicken Stock
  • 60ml / 1/4 cup Double/Heavy Cream
  • 1 tsp Dijon Mustard
  • 20g / 1/4 cup Parmesan
  • 200g / 7oz Cooked Chicken, diced into small cubes
  • Salt & Black Pepper, to taste

Sliders

  • 5x Crusty Rolls (see notes)
  • 3 tbsp / 45g Butter, melted
  • 15g / 0.5oz Parmesan (the fresh dusty stuff works best)
  • 1 tbsp very finely diced Fresh Parsley
  • 1 large clove of Garlic, finely grated
  • 6 slices of Swiss Cheese, or as needed to cover the sliders

Instructions

Filling

  • Add a drizzle of oil to a large pan over medium heat, then add the diced bacon. Gently fry until crispy with the fat rendered out, then remove and place to one side, leaving the excess oil/fat behind.
  • Top up with oil if needed, then add the shallot and fry for 2 minutes (just until it softens slightly). Add the mushrooms and fry until everything is soft and golden. Melt the butter, then stir in the flour to create a roux. Add the stock, whisking as you go to avoid lumps forming, then stir in the cream. Stir in the mustard and parmesan until it melts, then stir in the chicken and bacon.
  • Gently simmer for a 2-3 minutes to thicken, then check for seasoning and adjust if needed. If the sauce is already very thick, you might not need to reduce too much more (see video for reference on the best consistency).

Rolls

  • Preheat the oven to 180C/350F.
  • Halve the rolls down the centre, then use your fingers to press in the centre of each halve to create little 'cups' for the filling. Place them cup-side-up in the baking dish (they should fit nice and snug).
  • In a bowl, combine the butter, parsley, garlic and parmesan and brush the centre of the rolls. If the butter thickens up, just spread it as best you can (it'll melt in the oven).
  • Bake in the oven (without the filling) for around 12 minutes until they crisp and just start to tinge golden around the top.

Sliders

  • Spoon the filling into the rolls, then cover with Swiss cheese. Bake for a further 10 minutes until the cheese melts and the filling is bubbling.
  • Tuck in and enjoy!

Video

Notes

a) Rolls – For reference, the rolls I used were around 60g/2oz each, 4″ wide and 2″ deep. You’ll find crusty rolls in most supermarket bakeries. If yours are very firm and crusty, you might not need to pre-bake them for as long (just use your best judgment).

b) Make Ahead – These don’t reheat particularly well, but you could make these ahead of time:

  • Filling – just allow to completely cool then tightly store in the fridge until needed.
  • Garlic Butter – tightly cover in the fridge until needed. Microwave in very short burst until creamy (don’t go overboard because of the parmesan).

c) Cheese – The parmesan is a must, but you could swap out the Swiss if you’d like. I just love it because it’s mild, creamy, melty and pairs perfectly with the filling. I imagine Cheddar or Gruyere would work great (don’t use mozzarella, not enough flavour).

d) Calories – Per slider.

Nutrition

Calories: 303kcal | Carbohydrates: 18.77g | Protein: 15.82g | Fat: 18.52g | Saturated Fat: 9.247g | Polyunsaturated Fat: 1.21g | Monounsaturated Fat: 4.67g | Trans Fat: 0.272g | Cholesterol: 61mg | Sodium: 460mg | Potassium: 212mg | Fiber: 1.1g | Sugar: 2.73g | Vitamin A: 485IU | Vitamin C: 1.1mg | Calcium: 228mg | Iron: 1.48mg

The post Cheesy Chicken and Mushroom Sliders appeared first on Don't Go Bacon My Heart.

Madame Crumpet

Inspired by the classic Croque Madame, this Madame Crumpet is the tastiest brunch you’ll ever make!

Just to make sure we’re all on the same wave length, a Croque Madame is essentially a hot toasted ham and cheese sandwich with a fried egg on top. It’s got French origins and was first seen around Cafes in Paris. Today we’re making it crumpet style in the most delicious way possible! Follow me…

6 madame crumpets on baking tray served with fried egg on top

Béchamel Sauce

One of the most iconic layers of a Croque Madame is the béchamel sauce, and this crumpet version is no exception. Here’s what you’ll need:

  • Butter, Flour, Milk – AKA a ‘roux’. This is to form the the base of the béchamel sauce.
  • Gruyere – This has got a sweet nutty flavour which takes this layer through the roof!
  • Nutmeg – This brings out the nutty tones of the gruyere.
  • White Pepper – White pepper is a classic addition to béchamel because it blends in better than black pepper.

You actually want this to be fairly thick, since you’ll be spread it over the crumpets. Too thin and it’ll just drip off!

Process shots: melt butter (photo 1), stir in flour to form paste (photo 2), stir in gruyere (photo 3), stir in seasoning (photo 4).

4 step by step photos showing how to make bechamel sauce with gruyere

Madame Crumpet

Okay, here’s where things get fun. Sure, if we’re talking technically this should really be called a ‘Crumpet Madame’, but ‘Madame Crumpet’ sounds a whole lot sassier and you know it 😂 Also no, this isn’t a sandwich either, but that’s beside the point.

Madame Crumpet Layers

  • Crumpet – Toasted in a toaster or either side under the grill.
  • Butter – Mix butter with dijon mustard. Dijon is a key component of a classic Croque, the butter helps mellow it out and also helps it seep/melt into the crumpet.
  • Ham – Fold/tear it to fit neatly on the crumpet.
  • Béchamel – Plonked straight on top of the ham.
  • Parmesan – This helps it go golden, bubbly and delicious!

Process shots: toast crumpets then spread with dijon butter (photo 1), add ham (photo 2), add béchamel (photo 3), add parmesan then cook under the grill until golden (photo 4).

4 step by step photos showing how to make madame crumpet

Don’t forget the egg!

One of the key ingredients in a Croque Madame is the fried egg on top. You can cook it to preference, but I like mine sunny side up, just for all that yolky goodness.

Do I have to add an egg?

I do recommend it as this crumpet version is pretty brunchy. However you can leave it off like a Croque Monsieur if you’d prefer.

Process shots: melt in butter (photo 1), fry eggs then season with salt and pepper (photo 2).

2 step by step photos showing how to fry eggs in butter

Serving Madame Crumpet

As I mentioned, I usually serve these for Brunch, typically by themselves but you could add some Hash Browns if you wanted to go wild!

If you’re after another fun breakfast recipe with a twist, check out my Breakfast Quiche Stuffed Bagels!

Or check out my Croque Monsieur for the real deal!

Alrighty, let’s tuck into the full recipe for the might Madame Crumpet shall we?!

two madame crumpets on white plate on small wooden board with silver fork

How to make Madame Crumpets (Full Recipe & Video)

two madame crumpets on white plate on small wooden board with silver fork

Print

Madame Crumpet

Inspired by the classic Croque Madame, this Madame Crumpet is the tastiest brunch you'll ever make!
Course Brunch
Cuisine French
Prep Time 10 minutes
Cook Time 20 minutes
Total Time 30 minutes
Servings 6
Calories 342kcal
Cost £2 / $2.50

Equipment

  • Large Baking Tray
  • Medium Non-Stick Pan, Whisk & Wooden Spoon (for bechamel)
  • Large Non-Stick Pan & Spatula/Turner (for eggs)
  • Small Pot (for dijon butter)
  • Fine Cheese Grater
  • Toaster (optional, can use grill)

Ingredients

  • 6 Crumpets
  • 6 Eggs
  • 6 slices of Ham
  • 1 cup / 240ml Milk, at room temp
  • 3/4 cup / 75g Gruyere, finely grated
  • 1/3 cup / 30g Parmesan, finely grated
  • 5 tbsp Butter
  • 2 tbsp Flour
  • 1 tsp Dijon Mustard
  • 1/8 tsp EACH: White Pepper, Nutmeg
  • Salt, to taste

Instructions

  • In a small pot combine 2 tbsp butter with 1 tsp dijon mustard. Place to one side.
  • In a non-stick pan over medium heat melt in 2 tbsp butter. Stir in 2 tbsp flour to form a paste, then gradually add in milk, whisking as you go to ensure no lumps form. Once thickened, turn heat to low and stir in gruyere, then season with nutmeg, white pepper and salt. Remove from heat.
  • Toast crumpets in a toaster or under the grill, then spread with the dijon butter (don't feel like you have to use it all). Top with ham, then spread over the béchamel sauce. Top with parmesan then place under the grill under golden and bubbly.
  • Whilst they're cooking, melt 1 tbsp butter into a pan over medium heat and crack in eggs (you may need to do this in batches). Fry to desired texture then season with salt and pepper.
  • Top crumpets with an egg each then tuck in and enjoy!

Video

Notes

a) Do I have to add an egg? – Nope! You can make a Monsieur Crumpet instead and leave it off. I do recommend it though, just for that yolky goodness 🙂

b) Gruyere – I highly recommend using Gruyere, not only is it most traditional in a Croque Madame, but it’s got a gorgeous nutty flavour that goes amazingly in a bechamel sauce. If you don’t have it, you can sub Cheddar.

c) Calories – Per Madame Crumpet:

Nutrition

Calories: 342kcal | Carbohydrates: 18.13g | Protein: 20.27g | Fat: 20.65g | Saturated Fat: 10.158g | Polyunsaturated Fat: 1.868g | Monounsaturated Fat: 7.151g | Trans Fat: 0.103g | Cholesterol: 230mg | Sodium: 850mg | Potassium: 321mg | Fiber: 0.9g | Sugar: 3.56g | Vitamin A: 733IU | Vitamin C: 0.1mg | Calcium: 288mg | Iron: 2.03mg

If you loved this Madame Crumpet Recipe then be sure to Pin it for later! Already made it or got a question? Give me a shout in the comments and pick up your free ecookbook along the way!

The post Madame Crumpet appeared first on Don't Go Bacon My Heart.

Cheesy Scrambled Eggs

Scrambled eggs are great, but cheesy scrambled eggs are even better. Plus they couldn’t be easier to make!

Looking for an easy and delicious way to level up your scrambled egg game? Look no further. Follow me…

cheesy scrambled eggs served on toast on white plate with bacon, tomatoes and avocado

Scrambled Eggs with Cheese

Eggs and cheese have been happening under our noses since, well, forever. Think Omelettes, think Frittatas, think Breakfast Sandwiches. It’s just this time we’re binding the cheese and eggs together to make a glorious marriage of flavours.

Cheesy Scrambled Eggs Ingredients

  • Eggs – Large and fresh.
  • Cheddar – Make sure this is finely grated, just so it melts into the eggs easier.
  • Cream Cheese – This not only adds another subtle layer of cheesiness, but it also adds a creaminess to the texture of the eggs.
  • Chives – Add a hit of flavour and pop of colour to garnish.
  • Salt and Pepper – To taste.

How many eggs should I use for one serving of scrambled eggs?

3 eggs per person. Here we’re using 6, so this recipe feeds two.

Can I use different types of cheese?

Other than cheddar, I’ve used Monterey Jack in this recipe which worked well. Ideally you want something with a similar melty texture to cheddar, like Swiss or Gouda.

cheesy scrambled eggs ingredients with text labels

Preparing Cheesy Scrambled Eggs

The easiest way to get the smoothest eggs is beating with a whisk. You can use a fork, it just requires a bit more elbow grease.

Next up is seasoning. Firstly, no black pepper at this point, it will discolour the eggs and turn them a little grey. We’ll add this when serving. I like a pinch of salt at this point, then you can adjust with more when serving if needed.

2 step by step photos showing how to beat eggs

Making Cheesy Scrambled Eggs

In general, when making scrambled eggs, the key is low and slow. For my Perfect Scrambled Eggs I recommend spending up to 10mins gently scrambling the eggs. Now you don’t want to be quite so excessive with cheesy scrambled eggs, because you run the risk of the cheese splitting, but the general idea of frying on low heat is preferable. It gives the eggs a far richer flavour, and a much more smooth and velvety texture.

The key to velvety scrambled eggs is making big circular motions with the spatula, as opposed to lots of tiny rapid ones. You want nice big long curds.

I also recommend taking the eggs off the heat when they’re nearly done. You want them still a touch runny, they’ll continue cooking from carry over heat as they rest.

8 step by step photos showing how to make cheesy scrambled eggs

Serving Cheesy Scrambled Eggs

When it’s time to serve up, go in with a good pinch of black pepper and fresh chives. These eggs are awesome on toast – here I’ve added some crispy bacon, sliced avocado and tomatoes.

After another delicious way to spruce up scrambled eggs? Check out my Chorizo Scrambled Eggs!

Alrighty, let’s tuck into the full recipe for these Cheesy Scrambled Eggs Shall we?

scrambled eggs with cheese on toast with bacon, avocado and tomatoes on white plate

How to make Cheesy Scrambled Eggs (Full Recipe & Video)

cheesy scrambled eggs served on toast on white plate with bacon, tomatoes and avocado

Print

Cheesy Scrambled Eggs

Scrambled eggs are great, but cheesy scrambled eggs are even better. Plus they couldn't be easier to make!
Course Breakfast, Brunch
Cuisine American, British
Prep Time 2 minutes
Cook Time 5 minutes
Total Time 7 minutes
Servings 2
Calories 373kcal
Cost £2 / $2.50

Equipment

  • Large Non-Stick Pan
  • Spatula
  • Bowl
  • Whisk
  • Fine Cheese Grater

Ingredients

  • 6 Eggs
  • 1/2 cup / 50g finely grated Cheddar
  • 2 tbsp Cream Cheese
  • Salt & Black Pepper, as needed
  • finely diced Chives, to serve

Instructions

  • Crack 6 eggs in to a bowl, then add a pinch of salt and whisk until smooth.
  • Add 2 tbsp cream cheese to a non-stick pan over low heat. Use your spatula to melt and spread the cheese across the pan, then pour in the beaten eggs. Sprinkle over cheddar, then begin gently stirring the eggs.
  • Ensure the heat stays nice and low, and make long strides with the spatula (not rapid tiny ones). After a few minutes the cheese should melt and blend in with the eggs. The eggs should start to turn into a thick custardy texture, with smaller curds forming. At this point stir in a circular motion to form larger curds. Try and prevent the eggs catching on the pan.
  • When the eggs have formed into large soft curds, but still very slightly runny, take off the heat. Serve up with chives and black pepper!

Video

Notes

a) Low ‘n’ Slow – Patience is key here, just so the cheese gets a chance to melt and bind with the eggs. There’s nothing worse than tough, dry scrambled eggs, so don’t crank up the heat to speed things up. It can take around 5mins for the eggs to scramble over low heat.

b) Cheese – Cheddar works best here, but other similar melty cheeses like Monterey Jack work well. In both cases just make sure it’s finely grated to help it melt easier. I highly recommend adding the cream cheese as it adds a nice creaminess and a subtle cheesy flavour too, but if you don’t have it sub for butter.

c) Serving – Chives are key for a pop of colour and hit of flavour (they pair beautifully with both eggs and cheese). Always great on toast, here I’ve served with avocado, bacon and tomatoes too.

d) Calories – Shared between two using large eggs:

Nutrition

Calories: 373kcal | Carbohydrates: 1.98g | Protein: 26.7g | Fat: 28.11g | Saturated Fat: 12.863g | Polyunsaturated Fat: 3.426g | Monounsaturated Fat: 9.079g | Trans Fat: 0.39g | Cholesterol: 600mg | Sodium: 460mg | Potassium: 245mg | Sugar: 1.16g | Vitamin A: 1245IU | Calcium: 285mg | Iron: 2.84mg

If you loved this Cheesy Scrambled Eggs Recipe recipe then be sure to pin it for later! Already made them or got a question? Give me a shout in the comments below and pick up your free ecookbook along the way!

The post Cheesy Scrambled Eggs appeared first on Don't Go Bacon My Heart.

Cod with Tomatoes & Capers

This cod with tomatoes and capers is such a simple dish, but it’s beyond delicious. Perfect for a quick and easy weeknight dinner!

If you’re looking for a tasty new way to serve fish that comes together in a pinch, this is just the ticket. Follow me…

cod with tomatoes and capers served on small white plate with bread and silver fork

What you’ll need

The awesome thing about this recipe is that you only need a handful of simple, store-bought ingredients. The full quantities are in the recipe card below, but here’s a quick note on each ingredient:

  • Cod – You’ll want to use boneless skinless fillets, which you’ll find in all supermarkets and fishmongers.
  • Flour – This is seasoned with salt and pepper and will be used to coat the fish (more on this in a sec).
  • Butter – For frying the cod and also to create the sauce.
  • Oil – This will be used to fry the cod alongside some of the butter.
  • Wine – This cuts through the rich, buttery sauce and adds a mellow background flavour. It’s also great for deglazing the pan.
  • Stock – Some vegetable stock will help create the sauce.
  • Parsley – I love loads of fresh parsley with this recipe, both in the sauce and to garnish.
  • Garlic – Adds flavour and pairs amazingly with the tomatoes and capers.
  • Capers – The salty, vinegary flavour of capers pairs beautifully with fish.
  • Tomatoes – These add little bursts of sweetness that balance out the salty, tangy flavours in the sauce. You’ll want to use cherry tomatoes or baby plum tomatoes.
overhead shot of cod with tomatoes and capers ingredients with text labels

Pan-Fried Cod

Before you do anything, I recommend using kitchen roll/paper towels to pat the cod dry and remove excess moisture. Excess moisture is going to prevent you from getting a nice golden crust. It will also cause the pan to ‘spit’ at you, which is never fun.

Dredging the cod through flour

Coating the cod in a thin layer of flour is important for two reasons:

  • It helps the cod build up a light, crispy crust.
  • It absorbs the sauce and helps it cling to the cod, instead of sliding right off it.

From there, we’re going to fry the cod in a combination of butter and oil; the butter adds a rich flavour, whilst the oil helps prevent the butter from burning. You’ll want to use a non-stick pan – cod is very delicate and can break apart if it sticks to the pan.

Process shots: add cod to seasoned flour (photo 1), coat then shake excess (photo 2), add to butter and oil (photo 3), fry both sides then remove (photo 4).

4 step by step photos showing how to pan fry cod

Tomato and Caper Sauce

The base of the sauce starts with the leftover butter and oil from the cod. Alongside the capers and garlic, I like to fry the parsley stalks too (just to reduce waste and add more flavour to the sauce).

Reducing the wine

When you add the wine, it’s really important to simmer it right down, almost until it has evaporated. This will burn off the alcohol and prevent the sauce from being too bitter.

Thickening the sauce

For this recipe, I love to coat the butter in the leftover flour and whisk it into the stock. This creates a light, glossy sauce that coats the cod perfectly. It’s a much easier method than creating a roux.

Process shots: fry capers, garlic and parsley stalks (photo 1), reduce wine then add stock (photo 2), toss butter in leftover flour (photo 3) add to sauce (photo 4), whisk to melt and bind with sauce (photo 5), stir in tomatoes and parsley (photo 6).

6 step by step photos showing how to make tomato caper sauce

How to serve Cod with Tomatoes & Capers

I like to add the cod back into the pan momentarily, just to coat it in the sauce and very gently warm it back through. From there, I love to finish with loads of fresh parsley!

To serve, I typically just serve with some warm, crusty bread. Rice or mash also work nicely. If you want some more veg I recommend green beans or asparagus!

For more delicious cod recipes check out my Cod and Parsley Sauce, Garlic Butter Cod and Simple Pan-Fried Cod!

Alrighty, let’s tuck into the full recipe for this cod with tomatoes and capers shall we?!

cod with capers and tomatoes in large pan

How to make Cod with Tomatoes and Capers (Full Recipe & Video)

cod with tomatoes and capers served on small white plate with bread and silver fork

Print

Cod with Tomatoes and Capers

This cod with tomatoes and capers is such a simple dish, but it's beyond delicious. Perfect for a quick and easy weeknight dinner!
Course Dinner, Main Course
Cuisine American, Italian
Prep Time 15 minutes
Cook Time 10 minutes
Total Time 25 minutes
Servings 4
Calories 268kcal
Cost £3.50 / $4

Equipment

  • Sharp Knife & Chopping Board
  • Paper Towels/Kitchen Roll (for patting cod dry)
  • Large Shallow Dish (for dredging cod)
  • Large Non-Stick Pan & Spatula/Turner
  • Wooden Spoon
  • Jug (for stock)

Ingredients

Cod

  • 4x 120-150g/4-5oz boneless skinless Cod Fillets (see notes)
  • 35g / 1/4 cup Plain Flour
  • 1 tsp Salt
  • 1/2 tsp Black Pepper
  • 1 tbsp Extra Virgin Olive Oil
  • 1 tbsp / 15g Unsalted Butter

Sauce

  • 2 cloves of Garlic, finely diced
  • 2 tbsp Capers, drained (keep 1 tsp brine)
  • 1/2 small bunch of Fresh Parsley, large stalks & leaves separated and both finely diced (~15g/0.5oz)
  • 60ml / 1/4 cup Dry White Wine
  • 120ml / 1/2 cup Vegetable Stock
  • 3 tbsp / 45g Unsalted Butter, diced into cubes (keep in fridge until needed)
  • 250g / 9oz Baby Plum or Cherry Tomatoes, halved

Instructions

  • Pat the cod dry with kitchen roll/paper towels to remove excess moisture. In a large shallow dish, combine the flour, salt and pepper. One by one coat the cod fillets in the flour, shake off excess then place to one side. Keep the leftover flour.
  • Heat 1 tbsp oil and butter in a large non-stick pan over medium-high heat. Place the cod in and fry for 2-3 minutes on each side, or until light golden on the outside and just about opaque through the centre. Carefully remove the fillets and place them on a plate to one side. Timings will depend on the thickness of the fillets, but I recommend being cautious as the cod will carry on slightly as it rests and when added back to the pan.
  • Add the capers, garlic and finely diced parsley stalks to the leftover fat in the pan and fry for 10-20 seconds (careful the garlic doesn't burn). Pour in the wine & caper brine and rapidly simmer for 2 minutes until it almost completely evaporates and the pungent smell of alcohol disappears.
  • Lower the heat to medium and pour in the stock. Toss the remaining butter in the leftover flour, shake off excess, then whisk it into the stock until melted. Add the tomatoes, half of the finely diced parsley leaves and the resting juices from the cod. Stir and simmer for a couple of minutes until the sauce thickens and the tomatoes just begin to soften.
  • Check for seasoning and adjust if needed, then gently place the cod back in the pan. Spoon over the sauce, then serve up with extra parsley and enjoy!

Video

Notes

a) Cod  – Timings will depend on the thickness of the fillets, so it’s better to time it with your eyes. You’ll want it very slightly underdone because it’ll carry on cooking slightly as it rests and when it’s added back into the pan. The end result should leave the cod opaque through the centre with the flesh nice and flaky. It can overcook quite quickly so just be vigilant.

b) Seasoning – I find that the capers/brine + the stock offers enough saltiness for this dish. You can however adjust it if you need to. If you’re very sensitive to salt, you could also use low salt stock too, but just make sure the sauce is properly seasoned, otherwise it could turn out bland.

c) Serving – I love this with some warm crusty bread. You can serve with an extra veg (green beans or asparagus work well). If you want more of a carby dinner then rice or mash works great.

d) Inspiration – This recipe pulls on ingredients/techniques from my Garlic Butter Cod and Chicken Piccata, and is inspired by a recipe I spotted from Sip and Feast!

e) Calories – Whole recipe divided by 4 assuming half the flour is used.

Nutrition

Calories: 268kcal | Carbohydrates: 7.58g | Protein: 21.21g | Fat: 15.88g | Saturated Fat: 7.967g | Polyunsaturated Fat: 1.126g | Monounsaturated Fat: 5.641g | Trans Fat: 0.473g | Cholesterol: 90mg | Sodium: 823mg | Potassium: 524mg | Fiber: 1.2g | Sugar: 1.86g | Vitamin A: 1052IU | Vitamin C: 11.8mg | Calcium: 31mg | Iron: 0.9mg

The post Cod with Tomatoes & Capers appeared first on Don't Go Bacon My Heart.

The Perfect Fried Egg on Toast

Here I’ll share with you some simple tips and tricks to making the perfect fried egg on toast!

Egg on toast comes in many a formation, but arguably none more delicious than the classic fried egg on toast. A simple dish it may be, there are certainly some simple ways to turn it up a few notches. Follow me…

close up shot of egg and bacon on toast on wooden board garnished with chives

Egg and Bacon on Toast

Oh, come on. Is it even legal to have fried egg and toast without bacon?! All jokes aside, the bacon actually plays an important role in this recipe.

Low ‘n’ Slow

By frying the bacon low and slow, you’ll render down all the fat. Doing this will not only leave you with gorgeously crispy bacon, but the excess fat in the pan is what you’ll use to fry the eggs and bread (more on this in just a sec).

What kind of Bacon to use?

In the UK you’re looking for streaky bacon (which I guess in the US is regular bacon). This tends to have more fat than back bacon, and the more fat the better for this recipe. Plus, streaky bacon is typically skinnier than back bacon, meaning you still get all the flavour, but without it overshadowing the fried egg, which realistically is the star of the show.

Process shots: add bacon to pan (photo 1), fry over low-medium until crisp with the fat rendered (photo 2).

2 step by step photos showing how to pan fry bacon

The Perfect Fried Egg

Admittedly fried eggs are tricky to mess up, but there are a few tips to help you get the perfect fried egg.

Tips for the perfect fried egg

  • Start with bacon – As discussed, the best fried eggs are cooked in bacon fat 😋
  • Fresh Egg – I find the fresher the egg, the more compact it is. Older eggs usually go thin and spill across the pan.
  • Room Temp – Not a deal-breaker, I just find eggs that are room temp tend to cook a little more evenly.
  • Temp – Increase the heat from low-medium for the bacon to around a medium. Make sure the pan is hot before you crack the egg, just so the instant heat helps keep the egg compact.
  • Close to pan – Try and crack the egg close to the pan. Too high and you risk the yolk breaking upon impact.
  • Baste in Butter – Basting the eggs in butter will not only ensure they cook evenly, but will also wrap them in gorgeous bacon/buttery goodness.

Do I have to make the eggs sunny-side-up?

I do recommend it, just because runny egg yolk is life. But you could have them over easy, medium or hard if you’d prefer. I’ve added a section on that in the recipe card.

Process shots: remove bacon and increase heat (photo 1), crack in eggs (photo 2), add butter (photo 3), baste egg whites (photo 4).

4 step by step photos showing how to fry an egg

Once the eggs are cooked, remove them from the pan and leave all the butter and bacon grease behind. That stuff is now officially liquid gold. From there, you can toast the bread in the pan to soak up all that goodness.

What kind of Bread to use?

I usually go for a loaf of Artisan style bread. Sourdough also works nicely too. I don’t recommend soft sandwich bread for this recipe; invest in a good quality loaf to create the best edible platform for your egg 🙂

Process shots: add bread to pan (photo 1), toast both sides (photo 2).

2 step by step photos showing how to pan fry bread

Fried Egg on Toast

Alrighty, bacon, egg and toast are all done and dusted, just two more ingredients to discuss:

  • Chilli Jam – This balances out the saltiness of the bacon and richness of the butter/egg yolk with a hit of sweetness and a gentle kick of spice. You’ll find it in most stores, or most definitely a Farmer’s market!
  • Chives – These add a final hit of flavour and a pop of colour.

Process shots: spread toast with chilli jam (photo 1), add bacon (photo 2), add egg (photo 3), season then sprinkle with chives (photo 4).

4 step by step photos showing how to make fried egg on toast

Serving Fried Egg on Toast

I usually whip this up for Brunch on the weekend. It’s perfect as it is, but if you wanted to take things up a notch you could serve with Hash Browns or Breakfast Potatoes!

Alrighty, let’s tuck into the full recipe for this fried egg on toast shall we!?

fried egg on toast on wooden board with chilli jam and fried eggs blurred in background

How to make Fried Egg on Toast (Full Recipe & Video)

close up shot of egg and bacon on toast on wooden board garnished with chives

Print

The Perfect Fried Egg on Toast

Here I'll share with you some simple tips and tricks to making the perfect fried egg on toast!
Course Breakfast, Brunch
Cuisine Universal
Prep Time 5 minutes
Cook Time 15 minutes
Total Time 20 minutes
Servings 2
Calories 401kcal
Cost £3 / $4

Equipment

  • Non-Stick Pan
  • Tongs
  • Bread Knife
  • Sharp Knife & Chopping Board or Scissors (for chives)
  • Spoon (for basting eggs)

Ingredients

  • 2 medium slices of Artisan Bread (or bread of choice)
  • 4 slices of Streaky Bacon
  • 2 fresh Eggs, at room temp
  • 2 tbsp Chilli Jam (see notes)
  • 1/2 tbsp Butter
  • 2 tsp finely diced Fresh Chives
  • Salt & Pepper, to taste

Instructions

  • Add bacon to a non-stick pan over low-medium heat. Fry until the fat has rendered down and the bacon is crisp. Remove from pan, leaving the fat behind. Increase heat to medium.
  • Carefully crack the eggs into the pan, making sure you crack them nice and close to the pan. Add in the butter and begin basting the egg whites. This adds a buttery flavour, but more importantly, this will help cook the tops of the eggs (just don't baste the yolks).
  • Once the egg whites are opaque, remove the eggs from the pan then add the bread. Toast both sides in the leftover fat, then remove.
  • Spread the toast with chilli jam then top with bacon and fried egg. Finish with a good pinch of salt & pepper and fresh chives. Enjoy!

Video

Notes

a) Chilli Jam – This is a key ingredient as it balances out the saltiness of the bacon and richness of the butter/egg yolk, by adding sweetness and a touch of spice. You’ll find chilli jam in almost all supermarkets/grocery stores or even farmer’s markets. The one I use here is from Sainsbury’s.

b) Do I have to have a runny yolk? – Nope, you don’t have to make sunny side up eggs, you could make them over easy instead. It’s the same process up until the egg whites are NEARLY cooked. Once they’re all nearly cooked (a little ring of uncooked white around the yolk) flip them over and cook for 30 seconds or so. For over medium or hard just flip the eggs sooner and cook longer on the flipped side (until the yolk is to your preference).

c) Bread – I usually grab a loaf of Artisan style bread from the bakery section at the supermarket. Sourdough also works nicely. I wouldn’t recommend soft sandwich bread for this recipe; invest in a good quality loaf to create the best edible platform for your egg 🙂

d) Calories – whole recipe divided by 2.

Nutrition

Calories: 401kcal | Carbohydrates: 24.45g | Protein: 14.03g | Fat: 27.22g | Saturated Fat: 2.72g | Polyunsaturated Fat: 1.236g | Monounsaturated Fat: 2.295g | Trans Fat: 0.022g | Cholesterol: 167mg | Sodium: 427mg | Potassium: 370mg | Fiber: 0.8g | Sugar: 11.45g | Vitamin A: 341IU | Vitamin C: 2.3mg | Calcium: 62mg | Iron: 1.86mg

For another bacon and egg recipe check out my Ultimate Egg and Bacon Sandwich!

For more similar recipes check out these beauties:

Delicious Toast Recipes


If you loved this Egg on Toast Recipe then be sure to pin it for later! Already made them or got a question? Give me a shout in the comments below and pick up your free ecookbook along the way!

The post The Perfect Fried Egg on Toast appeared first on Don't Go Bacon My Heart.

Hash Brown Chicken Cutlets (Potato Crusted Chicken)

Juicy chicken coated in super crispy shredded potato – this truly is the best kind of fried chicken!

This is one of those ‘I can’t believe I hadn’t thought of this before’ recipes. But we won’t dwell on the lost time. We are here now, and that’s all that matters. Follow me…

hash brown chicken served on small white plate with salad and coleslaw

Preparing Hash Browns

We’ll start by grating the potato on a box grater. No need to peel! That’s just extra faff. After that, there a two important steps:

  • Rinsing – I like to rinse the shredded potato in cold water to remove excess starch. The starch is what tends to make hash browns a little ‘gloopy’ in the centre, as opposed to ‘fluffy’. This step just helps the potato crisp up a bit more efficiently.
  • Drying – If you didn’t rinse the potato, it wouldn’t be the worst thing in the world. However, if you don’t squeeze out the water from the potato, it will completely ruin the recipe. It’s essential that you squeeze as much moisture from the shredded potato as possible, not only to help it crisp in the pan, but also to help it bind and cling to the chicken. I do this by twisting it in a tea towel.

Shredded Potato and Parmesan

Once you’ve shredded and dried the potato, you’ll want to combine it with Parmesan. This not only adds a boost of flavour, but it’ll also help the potato crisp up even more. Don’t skip this step.

Process shots: grate potato (photo 1), rinse (photo 2), dry (photo 3), combine with parmesan (photo 4).

4 step by step photos showing how to prepare hash browns

Recipe Tip

DO NOT add salt to the shredded potato. It will draw out moisture and make the batter very soggy. Only season the potato AFTER the chicken has cooked.

Potato Crusted Chicken

You want the chicken nice and thin, just so it cooks at the same rate the potato does. As such, you’ll want to halve the breasts right through the centre to create thinner, more even-sized cutlets. You can even gently pound them after that if you need to.

From there, we’ve got the classic flour and egg initial coating, which will help the potato cling to the chicken. When coating the chicken in the potato, use your hands to really press it into the chicken and create a flat, even coating of potato that completely covers the chicken.

Frying the chicken is very simple because we are only shallow frying, not deep frying. You just need enough oil to fill the base of the pan – you might want to work in batches too.

Process shots: slice chicken (photo 1), coat in flour (photo 2), coat in egg (photo 3), coat in potato (photo 4), add to hot oil (photo 5), fry both sides (photo 6).

6 step by step photos showing how to make hash brown chicken

Hash Brown Chicken FAQ

Can I bake the chicken?

These must be fried; otherwise the potato just doesn’t crisp up the way you want it to.

Can I make it ahead of time?

These are best made fresh. Prepping them ahead would just cause the potatoes to brown and go soggy. I have reheated them once cooked before, and they’re perfectly tasty, but they don’t return to the same level of crispiness.

Could I use a different meat?

I haven’t tried, but I imagine pork would work great! You could try chicken thighs, but you’d need to pound them nice and thin to ensure they cook through properly without the potato burning.

overhead shot of sliced potato chicken on chopping board

How to serve Hash Brown Chicken

Once the chicken has cooked, I like to rest it on a wire rack with paper towels underneath to catch excess oil. From there, you’ll want to hit them with a good pinch of salt (remember, the potato wasn’t seasoned).

When it comes to serving these, here are some ideas:

  • Coleslaw and Side Salad (as I’ve done here).
  • Green beans or some other veg with Gravy.
  • Sliced into a wrap.
  • Part of a breakfast situation with a fried egg, grilled tomato, beans, etc.

For my proper hash browns check out my Hash Brown Patties!

Alrighty, let’s tuck into the full recipe for this hash brown chicken shall we?!

close up shot of silver fork cutting potato crusted chicken on small white plate with coleslaw

How to make Hash Brown Chicken (Full Recipe & Video)

hash brown chicken served on small white plate with salad and coleslaw

Print

Hash Brown Chicken Cutlets (Potato Crusted Chicken)

Juicy chicken coated in super crispy shredded potato – this truly is the best kind of fried chicken!
Course Dinner, Main Course
Cuisine Western
Prep Time 30 minutes
Cook Time 15 minutes
Total Time 45 minutes
Servings 4
Calories 450kcal

Equipment

  • Sharp Knife & Chopping Board
  • Box Grater (for grating potato)
  • Large Bowl (for rinsing potato)
  • Clean Tea Towel (for straining potato)
  • 3 Large Dishes (for dredging)
  • Large (preferably heavy-based) Pan & Tongs (for frying chicken)
  • Kitchen Thermometer
  • Wire Rack and Paper Towels (for resting chicken)

Ingredients

  • 650g / 1.4lbs Potatoes (see notes)
  • 30g / 1oz Parmesan (see notes)
  • 35g / 1/4 cup Plain Flour
  • 1 tsp Salt
  • 1/2 tsp EACH: Paprika, Onion Powder, Garlic Powder, Black Pepper
  • 2 Eggs, beaten
  • 2x 200g/7oz Chicken Breasts, take out of the fridge 30 mins or so before needed (see notes)
  • 240ml / 1 cup Vegetable Oil, for frying
  • Flaky Sea Salt, to serve (for just more regular salt)

Instructions

  • Use a box grater to grate the potatoes (no need to peel), then place into a large bowl. Fill with enough cold water to comfortably cover the shredded potato, then use your hand to swish everything around. The water should turn cloudy from the excess starch.
  • A handful at a time, grab the potato, squeeze out excess water, then place in the centre of a large, clean tea towel. Twist it into a ball over the sink and squeeze out as much moisture as possible. For extra insurance, I then like to untwist the ball and press down kitchen roll/paper towels to remove any excess water. If the potato is at all soggy, it won't bind or crisp up on the chicken.
  • Place the now dry shredded potato in a large dish and combine with the parmesan (do not add salt). Place a dish with the beaten egg to the left of it, then place the flour + the seasonings in a large dish to the left of that.
  • Carefully slice the chicken breasts right through the centre to create 4 even-sized cutlets. If they're still thick and/or uneven, consider using cling film and a rolling pin to gently pound them to level them out.
  • One by one, coat the cutlets in the flour, then egg, then the shredded potato. You'll need to press the potato into the chicken to create a flat, even coating of potato that completely covers the chicken.
  • Add enough oil to comfortably fill the base of a large (preferably heavy-based) pan. Turn the heat to medium-high and heat the oil to 180C/350F (a shred of potato should rapidly sizzle). Carefully add the cutlets and fry both sides for around 3-4 minutes until golden and crispy with the chicken cooked through the centre (safe internal temp of chicken is 74C/165F). Lower the heat/and or add in more oil if they look like they're burning/cooking too quickly (you can peek underneath to check). Place on a wire rack with paper towels underneath to catch excess oil. You may need to work in two batches.
  • Serve the chicken with a good pinch of salt (remember the potato isn't seasoned), then tuck in and enjoy!

Video

Notes

a) Chicken – I like the chicken relatively small/thin to ensure it definitely cooks through by the time the potato cooks. I also recommend getting the chicken close to room temp before cooking. I find cooking fridge-cold meat causes it to seize up and release moisture, which, in turn, would work to push off the potato.

b) Potatoes – I recommend floury/baking potatoes like Maris Pipers or Russets, because they crisp up, whilst still staying fluffy in the centre. 

c) Rinsing – I have tested this recipe by rinsing the potato and by not rinsing. They do crisp up a little more efficiently if you wash off the starch first, but it’s not a complete deal-breaker if you just squeeze out the moisture without rinsing first. The most important thing is squeezing out the water from the potato, so definitely do not skip this step.

d) Parmesan – This adds a boost of flavour and helps the coating crisp up even more. If you are vegetarian then just use a vegetarian alternative. I like to use the fresh dusty variety you find in packets in the refrigerated section, just because it blends through the shredded potato really nicely.

e) Salt – You do not want to salt the potato directly, because it’ll draw out moisture, no matter how much you already squeezed out. Salting the potato will just make the batter go soggy, so just salt once they’re cooked.

f) Calories – Per cutlet assuming all the flour/egg/potato is used and 1 tbsp oil is soaked up per cutlet.

Nutrition

Calories: 450kcal | Carbohydrates: 36.5g | Protein: 31.31g | Fat: 19.65g | Saturated Fat: 4.395g | Polyunsaturated Fat: 8.884g | Monounsaturated Fat: 4.929g | Trans Fat: 0.147g | Cholesterol: 145mg | Sodium: 809mg | Potassium: 992mg | Fiber: 3.9g | Sugar: 1.4g | Vitamin A: 222IU | Vitamin C: 32.1mg | Calcium: 110mg | Iron: 3.01mg

For more similar recipes check out these beauties:

Crusted Chicken Recipes


The post Hash Brown Chicken Cutlets (Potato Crusted Chicken) appeared first on Don't Go Bacon My Heart.

Tomato Baked Eggs (Caprese Style)

These Caprese Style Baked Eggs are totally delicious and so simple to make!

This dish is very similar to a classic Shakshuka, but with an Italian twist. It uses simple ingredients and is super easy to whip up. Follow me…

close up shot of caprese eggs in skillet surrounded by toast and fresh basil

Bring on the bread!

My edible tool of choice for this dish is of course bread. I love toasting it so you get that gorgeous crisp/gooey contrast.

What kind of bread to use?

I recommend using something like a baguette and slicing it up, just so the slices are the perfect size for dunking. Stay away from soft sandwich bread – you want something firm to give you a sturdy dunk!

How do I toast the bread?

Just lightly brush both sides with oil, then toast both sides under the grill on a baking tray. You could also toast in a frying pan if you’d prefer.

Process shots: brush sliced baguette with oil (photo 1), grill, then brush and grill the other side (photo 2).

2 step by step photos showing how to toast bread under the grill

Tomato Baked Eggs

The baked eggs themselves are actually really simple to whip up and only require a handful of simple ingredients. Just a few notes…

Chopped Tomatoes

These make up the base of the sauce, so try and use some good-quality tomatoes. You’ll want to season well with salt & pepper; I also like to add some sugar to balance out the acidity of the tomatoes.

Sun Dried Tomatoes

To really emphasize the tomato aspect, and to bulk out the dish, I love adding sun dried tomatoes. They go nice and plump/juicy as they simmer in the sauce and add such gorgeous flavour. You can also use the oil from the jar to fry the garlic too, which is always a bonus!

Simmering the sauce

Really important to simmer the sauce for around 20mins. This will not only give the opportunity for the flavours to deepen and marry together, but it’ll also reduce the sauce so it’s nice and thick. Because nobody likes watery baked tomatoes!

Process shots: add garlic and oil to oven-safe pan (photo 1), fry (photo 2), add in chopped tomatoes, sun dried tomatoes, water, basil and seasoning (photo 3), simmer to reduce (photo 4), crack in eggs (photo 5), bake (photo 6).

6 step by step photos showing how to make tomato baked eggs

Tomato Baked Eggs FAQ

Do I have to toast the bread?

Strictly speaking no. If you’re not, I recommend big chunks of buttered bread 😋

What if I don’t have an oven-safe dish?

If your pan isn’t suitable for baking, you can add on a lid and allow the steam to poach the eggs and cook them through. However, my preferred method is baking.

How do I know when the eggs are cooked?

You’ll notice the whites turning opaque and the yolk should turn a little wrinkly. I recommend staying on the side of caution and taking them out slightly early as they’ll carry on cooking slightly once out of the oven. You can always add them back in, but once the yolk is set, there’s no going back!

overhead shot of caprese baked eggs in skillet surrounded by toast and fresh basil

Serving Tomato Baked Eggs

Once they’re out of the oven, I like to dot over some roughly torn mozzarella, then drizzle with balsamic glaze and garnish with fresh basil leaves. From there, you can tuck straight in with the toast!

I like serving this for Brunch or Lunch, but honestly, it’s so good for any meal of the day!

For more Caprese recipes check out my Caprese Pull Apart Bread and Caprese Burrata Pasta!

Alrighty, let’s tuck into the full recipe for these Caprese baked eggs shall we?!

close up overhead shot of hand holding toast with tomato baked eggs on it

How to make Tomato Baked Eggs (Full Recipe & Video)

overhead shot of caprese baked eggs in skillet surrounded by toast and fresh basil

Print

Tomato Baked Eggs (Caprese Style)

These Caprese Style Baked Eggs are totally delicious and so simple to make!
Course Brunch, Lunch
Cuisine Italian
Prep Time 5 minutes
Cook Time 35 minutes
Total Time 40 minutes
Servings 3
Calories 404kcal
Cost £3 / $4

Equipment

  • Large Cast Iron Skillet & Wooden Spoon (or other oven-safe skillet)
  • Baking Tray, Small Pot & Brush (for toast)
  • Paper Towels (for patting mozzarella dry)
  • Sharp Knife & Chopping Board

Ingredients

Baked Eggs

  • 2x 14oz/400g good quality cans of Chopped Tomatoes
  • 6 Eggs
  • 1 cup / 150g Sun Dried Tomatoes, finely diced
  • 3.5oz / 100g Fresh Mozzarella, roughly torn & patted dry to remove moisture
  • 1 small bunch Fresh Basil, finely diced (save some small leaves to serve)
  • 2 tbsp Sun Dried Tomato Oil, from the jar (can sub Extra Virgin Olive Oil)
  • 3-4 cloves of Garlic, very thinly sliced
  • 1/2 tsp Sugar
  • 1/4 tsp EACH: Salt, Black Pepper, or to taste (plus more to season eggs)

To Serve

  • 1 small Baguette, sliced (3 or so slices each)
  • 2 tbsp Extra Virgin Olive Oil
  • Balsamic Glaze, as needed

Instructions

  • In a large cast iron/oven-safe skillet over medium heat, add 2 tbsp sun dried tomato oil. Add garlic and fry for a couple of mins until it starts to tinge with colour, then pour in the chopped tomatoes. Fill one of the cans up halfway with water, give it a swill, then pour into the second can and swill that out too. Pour into the pan then add sun dried tomatoes, basil, sugar, salt & pepper.
  • Give it all a good stir, then simmer for 20mins. This is important to marry the flavours and reduce the sauce.
  • Meanwhile, add sliced bread to a tray and brush one side with oil. Place under the grill and broil until crisp. Flip the slices over, brush with oil and place back under the grill until the other side is crisp. Place to one side and preheat the oven to 180C/350F.
  • Once the sauce has reduced, check for seasoning and adjust if needed. Use your wooden spoon to make a well/dent in the sauce. Crack an egg into the well, then repeat with the remaining eggs. Place the skillet in the oven for 7-10mins, or until the whites are just about cooked through and the yolk is still a little runny. Check regularly after 6-7mins as they'll cook quickly, and keep in mind they'll carry on cooking a little more once out of the oven.
  • Season the eggs with a pinch of salt & pepper. Dot over the torn mozzarella, then drizzle over the balsamic glaze and finish with a sprinkle of basil. Tuck in with toast and enjoy!

Video

Notes

a) Mozzarella – You could bake the mozzarella with the eggs, I just much prefer it freshly torn on top. In both cases though it’s important to soak up as much moisture from the mozzarella as possible, otherwise it’ll turn everything watery as it warms up.

b) Bread – You could also toast the bread in a pan instead of under the grill. You don’t have to toast the bread at all – in which case I recommend big hunks of buttered bread.

c) Balsamic Glaze – You can use Homemade Balsamic Glaze or store-bought. Either way, just make sure it’s balsamic glaze, not straight balsamic vinegar, otherwise it’ll spoil the dish!

d) Calories – Whole recipe divided by 3 without bread.

Nutrition

Calories: 404kcal | Carbohydrates: 22.92g | Protein: 23.53g | Fat: 26.04g | Saturated Fat: 8.519g | Polyunsaturated Fat: 3.394g | Monounsaturated Fat: 12.162g | Trans Fat: 0.038g | Cholesterol: 353mg | Sodium: 879mg | Potassium: 1315mg | Fiber: 7.5g | Sugar: 15.04g | Vitamin A: 2368IU | Vitamin C: 43.2mg | Calcium: 346mg | Iron: 5.23mg

If you loved this Tomato Baked Eggs Recipe then be sure to Pin it for later! Already made it or got a question? Give me a shout in the comments and pick up your free ecookbook along the way!

The post Tomato Baked Eggs (Caprese Style) appeared first on Don't Go Bacon My Heart.

Boursin Puff Pastry Bakes (Leftover Turkey or Chicken)

These Boursin Bakes are the easiest and most delicious way to use up leftover cooked chicken or turkey!

These are so delicious that I often go out specifically to buy cooked chicken or turkey just to make them. Given how easy they are to make, I’m confident you’ll end up doing the same too! Follow me…

4 halved boursin bakes stacked on each other on wooden board

The Filling

If you’re in the UK, I’d say these are definitely a ‘nod’ to the classic Chicken Bake from Greggs. Just with more flavour, thanks to our good friend Boursin. Yes, if you’ve been around here for a little while, you’ll know I’m obsessed with the stuff.

Extra goodies

Alongside the chicken/turkey and Boursin, I love adding some pancetta (or bacon) for another punch of flavour. I also love adding a leek, which pairs really beautifully with the Boursin.

The sauce

The sauce is simply milk + Boursin, thickened with flour + butter. I also like adding a dash of Dijon mustard, just for a little more complexity of flavour and to bring everything together. You want the sauce nice and thick, just so it stays nice and compact in the pastry and doesn’t leak out.

Process shots: fry pancetta then remove (photos 1&2), fry leek (photo 3), melt butter then stir in flour (photo 4), whisk in milk then melt Boursin (photo 5), stir in mustard, chicken/turkey and pancetta then simmer (photo 6).

6 step by step photos showing how to make boursin bake filling

Puff Pastry Bakes

Once the filling has thickened, it’s very important to let it cool. Otherwise, it’ll steam the pastry and not only make it very difficult to work with, but it’ll prevent the pastry from crisping up too.

In general, cold pastry will flake up more efficiently. I typically have to wait 5 or so minutes before I unroll the pastry, just so it doesn’t crack, but this will be dependent on which brand you get. Once unrolled, you’ll want to work fairly quickly so the pastry stays cold.

Process shots: slice pastry (photo 1), add filling (photo 2), fold over and crimp (photo 3), brush with egg wash (photo 4).

4 step by step photos showing how to make boursin bakes

Recipe Tip

You can prep these ahead of time, just make sure the filling is 100% cooled before making the bakes. You can then store in the fridge (or freezer), just thaw in the fridge first if frozen then egg wash and bake.

Once they’re deep golden and puffy, you’ll want to wait 5 or so minutes before tucking in, just because the filling will be screaming hot.

For more puff pastry ‘bake’ recipes, check out my Steak Bakes and Bangers and Mash Bakes!

Alrighty, let’s tuck into the full recipe for these Boursin Bakes shall we?!

overhead shot of boursin puff pastry sliced open showing filling

How to make Boursin Bakes (Full Recipe & Video)

4 halved boursin bakes stacked on each other on wooden board

Print

Boursin Puff Pastry Bakes (Leftover Turkey or Chicken)

These Boursin Bakes are the easiest and most delicious way to use up leftover cooked chicken or turkey!
Course Leftovers, Lunch
Cuisine British
Prep Time 20 minutes
Cook Time 45 minutes
Total Time 1 hour 5 minutes
Servings 6 bakes
Calories 669kcal

Equipment

  • Sharp Knife & Chopping Board
  • Large Pan & Wooden Spoon
  • Large Baking Tray & Baking Paper (or use the paper stored with the pastry)
  • Small Pot & Brush (for egg wash)

Ingredients

  • 70g / 2.5oz diced Pancetta (see notes)
  • 1 medium/large Leek, firm dark green part removed & discarded, light part diced
  • 1 tbsp Butter
  • 1 1/2 tbsp Plain Flour
  • 240ml / 1 cup Milk
  • 1x 150g/5.3oz block of Garlic & Herbs Boursin Cheese
  • 1 tsp Dijon Mustard
  • 200g / 7oz Cooked Chicken or Turkey, diced (see notes)
  • Salt & Black Pepper, to taste
  • 1 1/2 sheets of pre-rolled Puff Pastry (see notes)
  • 1 Egg, beaten (for egg wash)

Instructions

  • Add the pancetta to a large pan with the heat off. Turn to medium and gently fry until crispy, with the fat rendered out. Remove and place to one side, leaving the excess fat behind.
  • Add the diced leek and sweat it right down until soft and starting to turn golden. Melt the butter, then stir in the flour. Add the milk, 1/2 a cup at a time, whisking as you go to make sure no lumps form. Stir in the Boursin until it melts, then stir in the mustard.
  • Stir in the chicken/turkey and pancetta, then simmer for around 7-8 minutes until everything is nice and thick. It will be pretty thick at the start, but then it loosens up, so you will need to simmer to reduce it and thicken it back up again. Check for seasoning and adjust if needed, then leave to completely cool to room temp.
  • Whilst the filling is cooling, preheat the oven to 200C/400F.
  • Roll out the pastry and slice the whole sheet into 4 rectangles, then slice the half sheet into 2 more rectangles (6 in total). Add the filling to one side of each rectangle, then fold over the other side to secure the filling (see video below for reference). Use a fork to crimp around the edges, then clean up with a knife if needed.
  • Place on a large tray lined with baking/parchment paper (you can use the paper with the pastry), then brush with egg wash. Slice a few steam holes, then bake in the oven for around 20 minutes, or until deep golden and visibly crisp.
  • Tuck in and enjoy (careful, the filling will be very hot).

Video

Notes

a) Pancetta – I use half a pack of the ones you can get from supermarkets, which are usually around 65g-70g each. I use unsmoked, but you could use smoked if you’d prefer. If you don’t have pancetta, you can absolutely use bacon instead. Just make sure it’s streaky bacon so you can render down the fat and use it to fry the leek.

b) Turkey/Chicken – Either will work fine, but I usually have chicken on hand, so just use that. I recommend dicing it into cubes, as opposed to shredding it, just so it holds up better over the long cooking period. The dark parts of the meat will hold up even better (thigh).

c) Puff Pastry – For reference, each sheet I used was 14″x9″ / 35.5cmx22cm and weighed 320g/11.3oz each.

d) Calories – Per bake.

Nutrition

Calories: 669kcal | Carbohydrates: 42.64g | Protein: 20.52g | Fat: 46.36g | Saturated Fat: 14.33g | Polyunsaturated Fat: 4.604g | Monounsaturated Fat: 20.491g | Trans Fat: 0.112g | Cholesterol: 57mg | Sodium: 431mg | Potassium: 283mg | Fiber: 1.6g | Sugar: 4.21g | Vitamin A: 652IU | Vitamin C: 1.9mg | Calcium: 89mg | Iron: 3.11mg

For more leftover chicken recipes check out my Delicious and Easy Leftover Chicken Recipes!

For more leftover turkey recipes check out these beauties:


The post Boursin Puff Pastry Bakes (Leftover Turkey or Chicken) appeared first on Don't Go Bacon My Heart.

Avocado Egg Toast

Here I’ll show you THE most delicious way to serve up avocado and egg on toast!

There’s a ridiculous amount of different ways you could make avocado and egg on toast, and whilst there’s no right or wrong way, today I’m going to show you the best way. Follow me…

avocado fried egg toast on small wooden chopping board surrounded by garnish on wooden surface

Smashed Avocado

The avocado makes up a big part of this recipe, so it’s important to let it shine. Sure, you could just mash up some avocado, but I like throwing in a few extra goodies:

Simple Smashed Avocado Ingredients

  • Avocados – Ripe, but not bruised.
  • Chives – These add a gorgeous pop of flavour.
  • Extra Virgin Olive Oil – Helps give the smashed avo a silky texture. It also adds a gentle background flavour.
  • Lemon Juice – Enhances the natural flavours of the avocado and prevents it from browning.
  • Salt and Pepper – Season well with a good pinch of salt and black pepper.

When it comes to smashing the avocado, just make sure you don’t mash it into oblivion. You want to keep a bit of texture, so a few lumps here and there are fine!

3 step by step photos showing how to make smashed avocado

Fried Egg

When it comes to frying the egg, I won’t patronise you too much, but here are a few tips to consider:

  • Room Temp – I find bringing the eggs to room temp helps them cook a little more evenly. Not a deal-breaker though!
  • Fresh Eggs – Do try and use fresh eggs. They’ll be more tightly compact, so won’t spill out across the pan.
  • Butter – I love frying eggs in butter, just so you can baste the tops of the egg whites. This not only wraps the eggs in a gorgeous buttery flavour, but it also helps cook the eggs evenly.

Could I serve the egg differently?

My second option would be a Poached Egg, just so you get the glorious runny egg yolk. Scrambled Eggs are pretty nice, but you’ll miss out on the runny egg yolk 🙁

Process shots: add butter to non-stick pan (photo 1), stir to melt (photo 2), fry eggs and baste in butter (photo 3), remove from pan, leave butter (photo 4).

4 step by step photos showing how to fry eggs in butter

Fried Bread

I always get stick when I post a ‘something on toast’ recipe because I always end up frying the bread. Which I guess leaves you with more of a ‘something of fried bread’ recipe, but let’s not get stuck on technicalities here. It’s criminal to waste leftover butter!

What kind of bread to use?

You want something sturdy like Sourdough or Artisan Style bread. Just so it toasts up nicely and gives you a firm platform to stack on the avocado and egg. Soft sandwich bread isn’t great for this recipe.

Process shots: add bread to leftover butter (photo 1), fry both sides (photo 2).

2 step by step photos showing how to fry bread

Avocado and Egg on Toast

When it comes to putting everything together, the only extra addition I add is hot sauce. Because quite frankly no avocado egg toast is complete without a few lashings of hot sauce. It adds a final hit of flavour and cuts through the rich egg yolk and buttery egg whites.

What kind of hot sauce to use?

I typically use Cholula hot sauce, but Frank’s and Tabasco also work well.

What else could I add to avocado egg toast?

Honestly? I’d keep it simple as it is. However, if you want to crank it up a notch then bacon, feta or roasted cherry tomatoes are all welcomed additions.

Process shots: add fried bread to chopping board (photo 1), add smashed avocado (photo 2), add fried egg (photo 3), season and drizzle over hot sauce (photo 4).

4 step by step photos showing how to make avocado egg on toast

Serving Avocado Egg Toast

I usually whip this up for Breakfast or Brunch on the weekend. It’s perfect as it is, but if you wanted to take things up a notch you could serve with Hash Browns or Breakfast Potatoes!

Alrighty, let’s tuck into the full recipe for this fried egg on toast shall we!?

close up shot of avocado egg toast on small chopping board surrounded by garnish

How to make Avocado Egg Toast (Full Recipe & Video)

close up shot of avocado egg toast on small chopping board surrounded by garnish

Print

Avocado Egg Toast

Here I'll show you THE most delicious way to serve up avocado and egg on toast!
Course Breakfast, Brunch
Cuisine Western
Prep Time 10 minutes
Cook Time 10 minutes
Total Time 20 minutes
Servings 3
Calories 412kcal
Cost £2.50 / $3

Equipment

  • Medium Sized Mixing Bowl & Fork (for smashed avocado)
  • Large Non-Stick Pan (for eggs & bread)
  • Sharp Knife & Chopping Board (for chives & lemon)

Ingredients

  • 3 medium-large slices of Bread (something firm like a sourdough works fell)
  • 2 medium sized Avocados, halved, pitted and peeled
  • 3 Eggs
  • 1 tbsp finely diced Fresh Chives
  • 1/2 tbsp EACH: Lemon Juice, Extra Virgin Olive Oil
  • 1 tbsp Butter, or as needed
  • Salt & Black Pepper, to taste
  • Hot Sauce, to taste

Instructions

  • In a medium-sized bowl add avocado with chives, lemon juice, extra virgin olive oil and a good pinch of salt & pepper to taste. Roughly smash with a fork (a few lumps here and there are fine). Place to one side.
  • Add 1 tbsp butter to a large non-stick pan over medium heat. Once melted, carefully crack in the eggs close to the pan. Begin basting the egg whites with the butter until the egg whites are opaque. Remove eggs, leaving the leftover butter in the pan.
  • Lay bread in the leftover butter and toast both sides until golden for a couple of minutes. Add more butter if it all soaks up on the first side and work in batches if you need to.
  • Stack fried bread with smashed avocado, followed by a fried egg with a good pinch of salt and pepper and hot sauce to preference!

Video

Notes

a)  Hot Sauce – I’d recommend a few drops even if you’re not good with spice. It adds a final kick of flavour to cut through the richness of the yolk and buttery eggs. Don’t sub with chilli/red pepper flakes, they don’t offer the same kind of tangy/vinegary flavour. I typically use Cholula hot sauce, but Frank’s and Tabasco also work well.

b) Runny egg yolks – You don’t have to make sunny side up eggs if you don’t like runny egg yolk; you could make them over easy instead. Once they’re all cooked (a little ring of uncooked white around the yolk) just flip them over and fry for another 30 seconds or so. For over medium or hard just flip them sooner and cook longer on the flipped side until the yolk is cooked to your preference.

c) Can I make scrambled eggs or poached eggs instead? – Yep! Check out my Perfect Scrambled Eggs and Perfect Poached Eggs 🙂

d) Calories – Per toast.

Nutrition

Calories: 412kcal | Carbohydrates: 26.79g | Protein: 10.94g | Fat: 30.95g | Saturated Fat: 7.181g | Polyunsaturated Fat: 4.141g | Monounsaturated Fat: 17.57g | Trans Fat: 0.181g | Cholesterol: 174mg | Sodium: 249mg | Potassium: 755mg | Fiber: 9.8g | Sugar: 2.83g | Vitamin A: 596IU | Vitamin C: 15mg | Calcium: 86mg | Iron: 2.62mg

For more similar recipes check out these beauties:

Delicious Toast Recipes


The post Avocado Egg Toast appeared first on Don't Go Bacon My Heart.

Chicken, Bacon & Leek Orzo

This chicken, bacon and leek orzo is super hearty, simple to make and oozes comfort!

This is the kind of comfort food that sticks to your ribs. Not only is it really easy to make, but you only need one pan to whip it up in! Follow me…

overhead shot of chicken bacon leek orzo in large white bowl with lemon wedges

Chicken and Bacon

For this recipe, we’ll be using chicken breasts. ‘Why not use thighs?’ I hear you cry! Whilst you could, I prefer using breast for this recipe for two reasons:

  1. The sauce is pretty rich with the bacon and cream, so it’s nice to offset that with a cut of chicken that’s not as fatty.
  2. I like to serve the chicken sliced on top, instead of cooking it in the sauce. It comes out much more tender and is visually more appealing than using thigh (although that is just my opinion).

Before we fry the chicken, we’ll be frying the bacon. This way, you can render out the fat and recycle it to fry the chicken (don’t let that liquid gold go to waste!).

To most efficiently extract the fat from the bacon, I recommend starting in a cold pan and frying at no higher than medium. You need to gently draw it out.

Process shots: slice chicken then season (photos 1&2), add bacon to pan (photo 3), fry then remove (photo 4), add chicken (photo 5), fry then remove (photo 6).

6 step by step photos showing how to fry chicken and bacon

Creamy Leek Orzo

If you’ve been here for a while, you know I love a one pot orzo recipe as much as the next person. Cooking the orzo in with everything else is awesome for a few different reasons:

  1. Flavour – the orzo soaks in all the gorgeous flavours in the sauce as it cooks.
  2. Starch – the orzo releases starch as it cooks, which helps turn the sauce extra glossy and creamy.
  3. One Pot – the clue is in the name – rejoice for less washing up!

Orzo Consistency

It’ll seem like there’s a lot of liquid at the start, but the orzo will absorb a fair bit. You want the end result to be similar to a risotto. If you run out of liquid just simply add in more as needed. Keep in mind it’ll thicken up even more as you plate up.

Process shots: melt butter (photo 1), add leeks, garlic and thyme (photo 2), fry (photo 3), stir in orzo (photo 4), simmer with stock, cream, dijon and nutmeg (photo 5), stir in bacon and parmesan (photo 6).

6 step by step photos showing how to make bacon leek orzo

How to serve Chicken, Bacon & Leek Orzo

I like to plate up the orzo and add the sliced chicken on top. When slicing the chicken, make sure you do it at a slight angle and preferably against the natural grain of the meat – just for maximum tenderness!

I also like to serve with a wedge of lemon. I find this really brightens up the dish and brings everything together. Just work to taste when squeezing it over.

For another chicken and bacon recipe check out my Chicken and Bacon Pasta Bake!

For more orzo recipes check out my Orzo Roundup!

Alrighty, let’s tuck into the full recipe for this chicken, bacon and leek orzo shall we?!

close up shot of chicken bacon leek orzo in large white dish

How to make Chicken, Bacon & Leek Orzo (Full Recipe & Video)

overhead shot of chicken bacon leek orzo in large white bowl with lemon wedges

Print

Chicken, Bacon and Leek Orzo

This chicken, bacon and leek orzo is super hearty, simple to make and oozes comfort!
Course Dinner, Main Course
Cuisine Italian, Western
Prep Time 20 minutes
Cook Time 35 minutes
Total Time 55 minutes
Servings 4
Calories 1016kcal
Cost £3 / $4

Equipment

  • Sharp Knife & Chopping Board
  • Large Deep Saucepan & Wooden Spoon
  • Slotted Spoon (for removing bacon)
  • Tongs (for chicken)
  • Aluminium Foil (for resting chicken)
  • Jug (for stock)
  • Fine Cheese Grater (for parmesan)

Ingredients

Chicken

  • 2x 200g/7oz Chicken Breasts
  • 1 tsp Paprika
  • 1/2 tsp EACH: Salt, Onion Powder, Garlic Powder
  • 1/4 tsp Black Pepper
  • Olive Oil, as needed

Orzo

  • 220g / 7.8oz Streaky Bacon, diced (see notes)
  • 2 tbsp Butter
  • 2 medium/large Leeks, dark green part removed and discarded, then finely dice the lighter part
  • 2 cloves of Garlic, finely diced
  • 3-4 sprigs of Fresh Thyme
  • 400g / 2 cups uncooked Orzo (see notes)
  • 1 litre / 4 cups Chicken Stock, or as needed
  • 240ml / 1 cup Double/Heavy Cream, leave at room temp
  • 2 tsp Dijon Mustard
  • 1/8 tsp Ground Nutmeg
  • 40g / 1/2 cup freshly grated Parmesan, plus more to serve if desired
  • 4 Lemon Wedges, to serve

Instructions

  • Horizontally slice both chicken breasts right through the centre to create 4 even-sized breasts, then coat both sides in the seasoning. Place to one side.
  • Add the bacon to a large, deep saucepan with the heat off. Turn the heat to medium and fry the bacon until crisp with the fat rendered out. Use a slotted spoon to remove the bacon and place to one side, leaving the excess fat in the pan.
  • Top the pan up with oil if there's less than a tbsp or so of fat (just eyeball it), then raise the heat slightly to medium-high. Add the chicken and fry both sides for around 3 minutes until lightly charred on the outside and just about cooked through the centre. Remove and place on a plate to one side, then loosely cover with foil to keep warm.
  • Melt the butter in the pan, then add the leeks, garlic and thyme. Sweat the leeks right down until they're nicely soft and golden (lower the heat if you need to). Stir in the uncooked orzo, pour in the stock and cream, then stir in the mustard and nutmeg. Simmer until the orzo is cooked through and the sauce thickens to a risotto-style consistency (it thickens more as it rests). Give a good stir now and then. If the sauce dries up before the orzo cooks, just add in more stock (or boiling water) as needed.
  • Stir in the resting juices from the chicken, then stir in the parmesan and bacon. Adjust seasoning with salt and pepper.
  • Plate up the orzo (removing the thyme stalks as and when you find them) with the chicken thinly sliced on top. Serve with extra parmesan and lemon juice to taste. Enjoy!

Video

Notes

a) Bacon – I recommend using streaky bacon (aka regular bacon in the US) because it is fattier than back bacon. That way, you can use the excess fat to fry the chicken and recycle the flavour. I typically use unsmoked bacon, but you can use smoked it you prefer.

b) Orzo – You’ll find this in most supermarkets. Different brands might absorb different amounts of liquid. It’s unlikely you’ll have too much, especially since it thickens up quite quickly as you plate up. But if you need more, just stir in a splash of stock or boiling water as needed, as you would a risotto. 

c) Lemon – This really brightens up the dish at the end and brings everything together. I highly recommend adding this (just work to taste).

d) Calories – Whole recipe divided by 4 with no extra oil or parmesan.

Nutrition

Calories: 1016kcal | Carbohydrates: 91.27g | Protein: 42.61g | Fat: 54.76g | Saturated Fat: 19.64g | Polyunsaturated Fat: 2.663g | Monounsaturated Fat: 9.704g | Trans Fat: 0.321g | Cholesterol: 167mg | Sodium: 1789mg | Potassium: 1015mg | Fiber: 12.2g | Sugar: 4.99g | Vitamin A: 2390IU | Vitamin C: 6.5mg | Calcium: 186mg | Iron: 3.45mg

The post Chicken, Bacon & Leek Orzo appeared first on Don't Go Bacon My Heart.