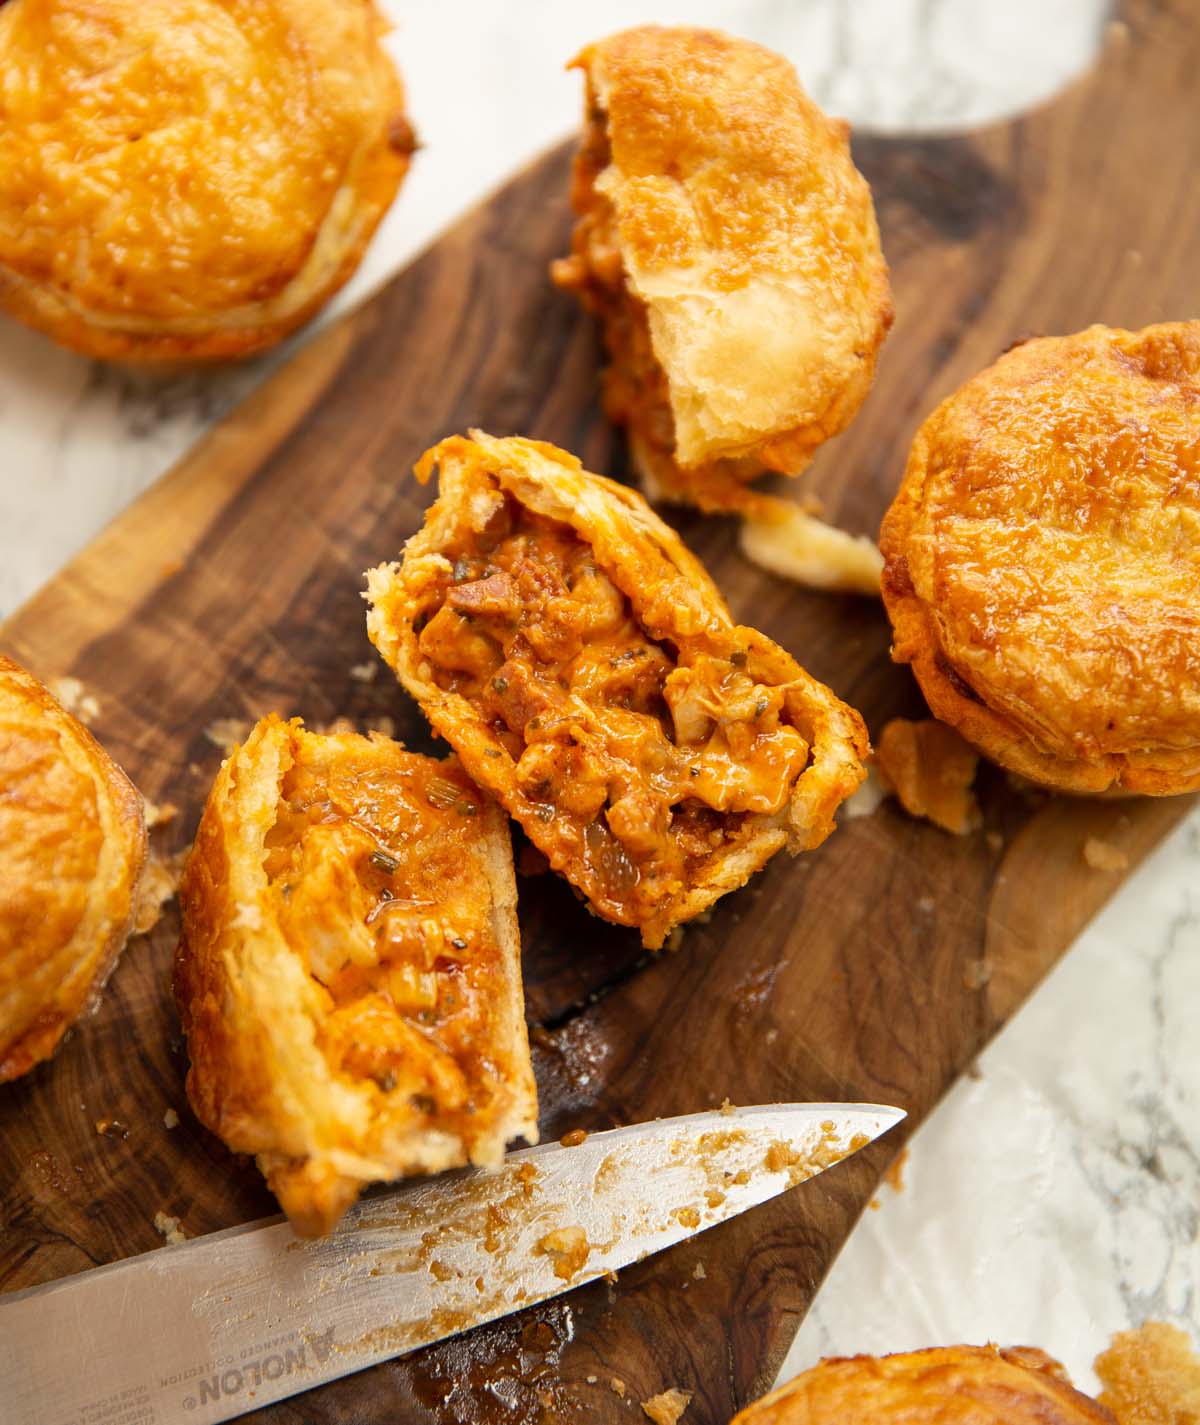
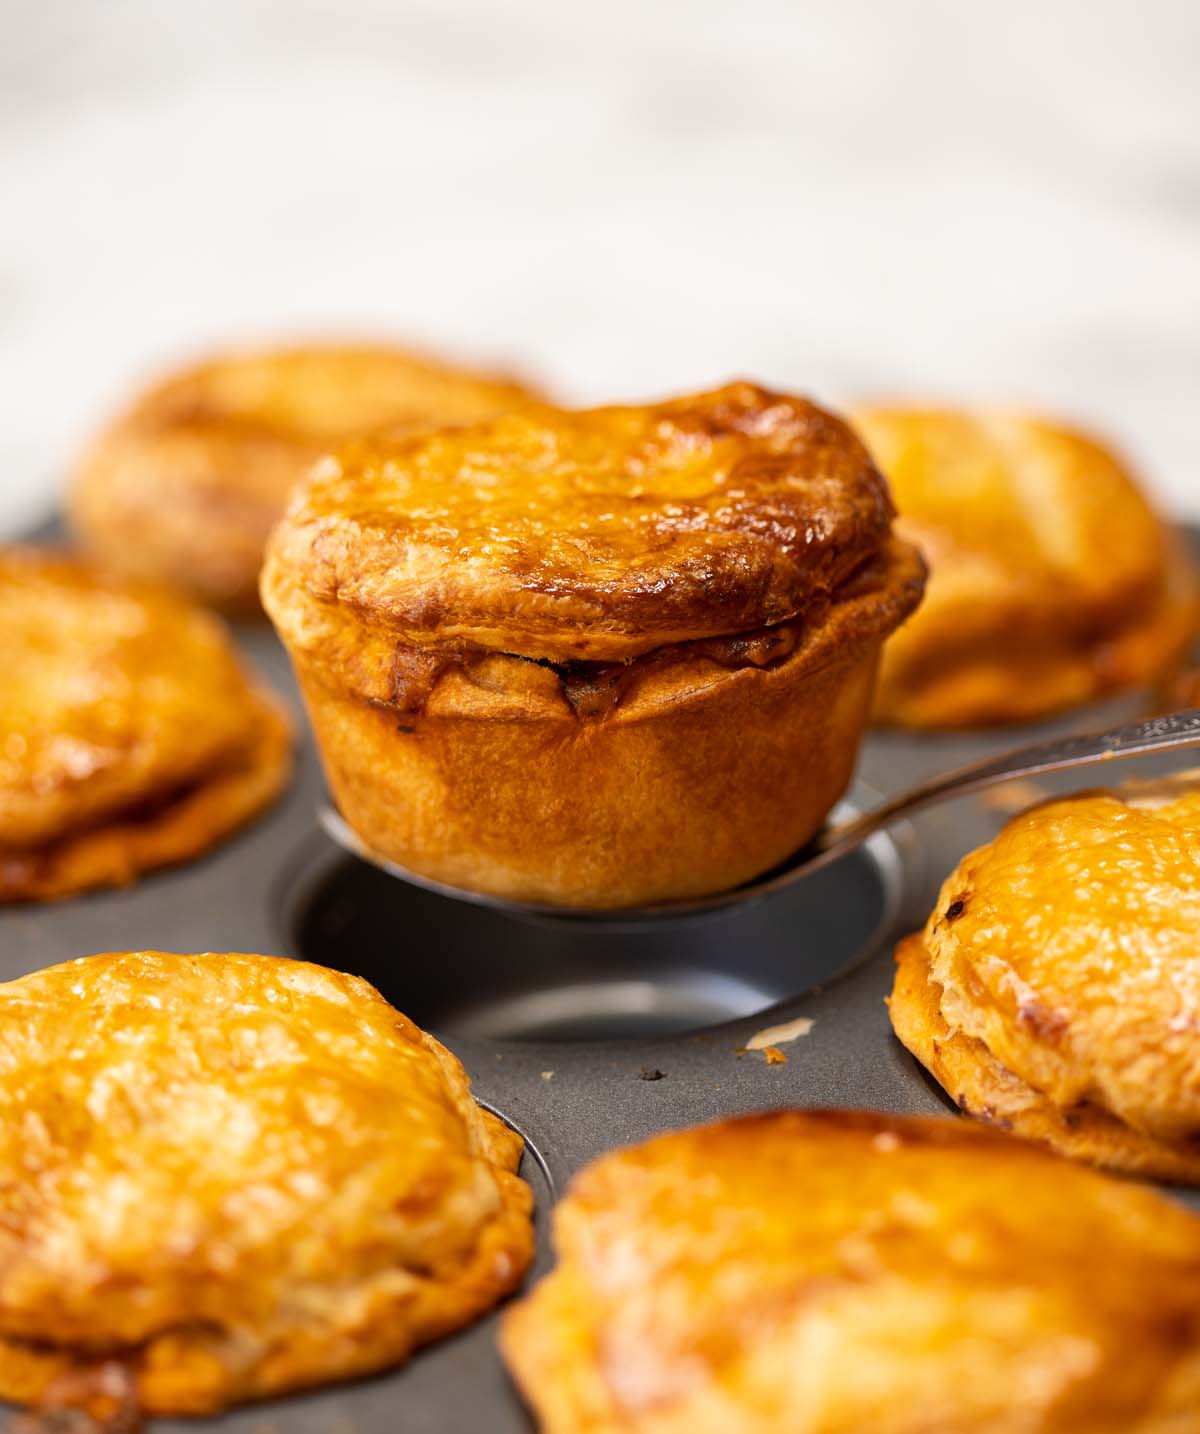
These chicken and chorizo pies are so delicious you’ll have to resist eating the entire batch!
Not the classic pie filling, I know. But, if you’ve never tried a chicken and chorizo pie before, your life is about to change for the better. Follow me…
Pan-Fried Chicken Thighs
For this recipe, we’ll be using boneless skinless chicken thighs. The chicken is essentially going to cook twice: once when it’s fried in the pan, then once again when it’s in the pie. As such, because thighs are fattier than breast, they are less likely to dry out over the longer cooking time.
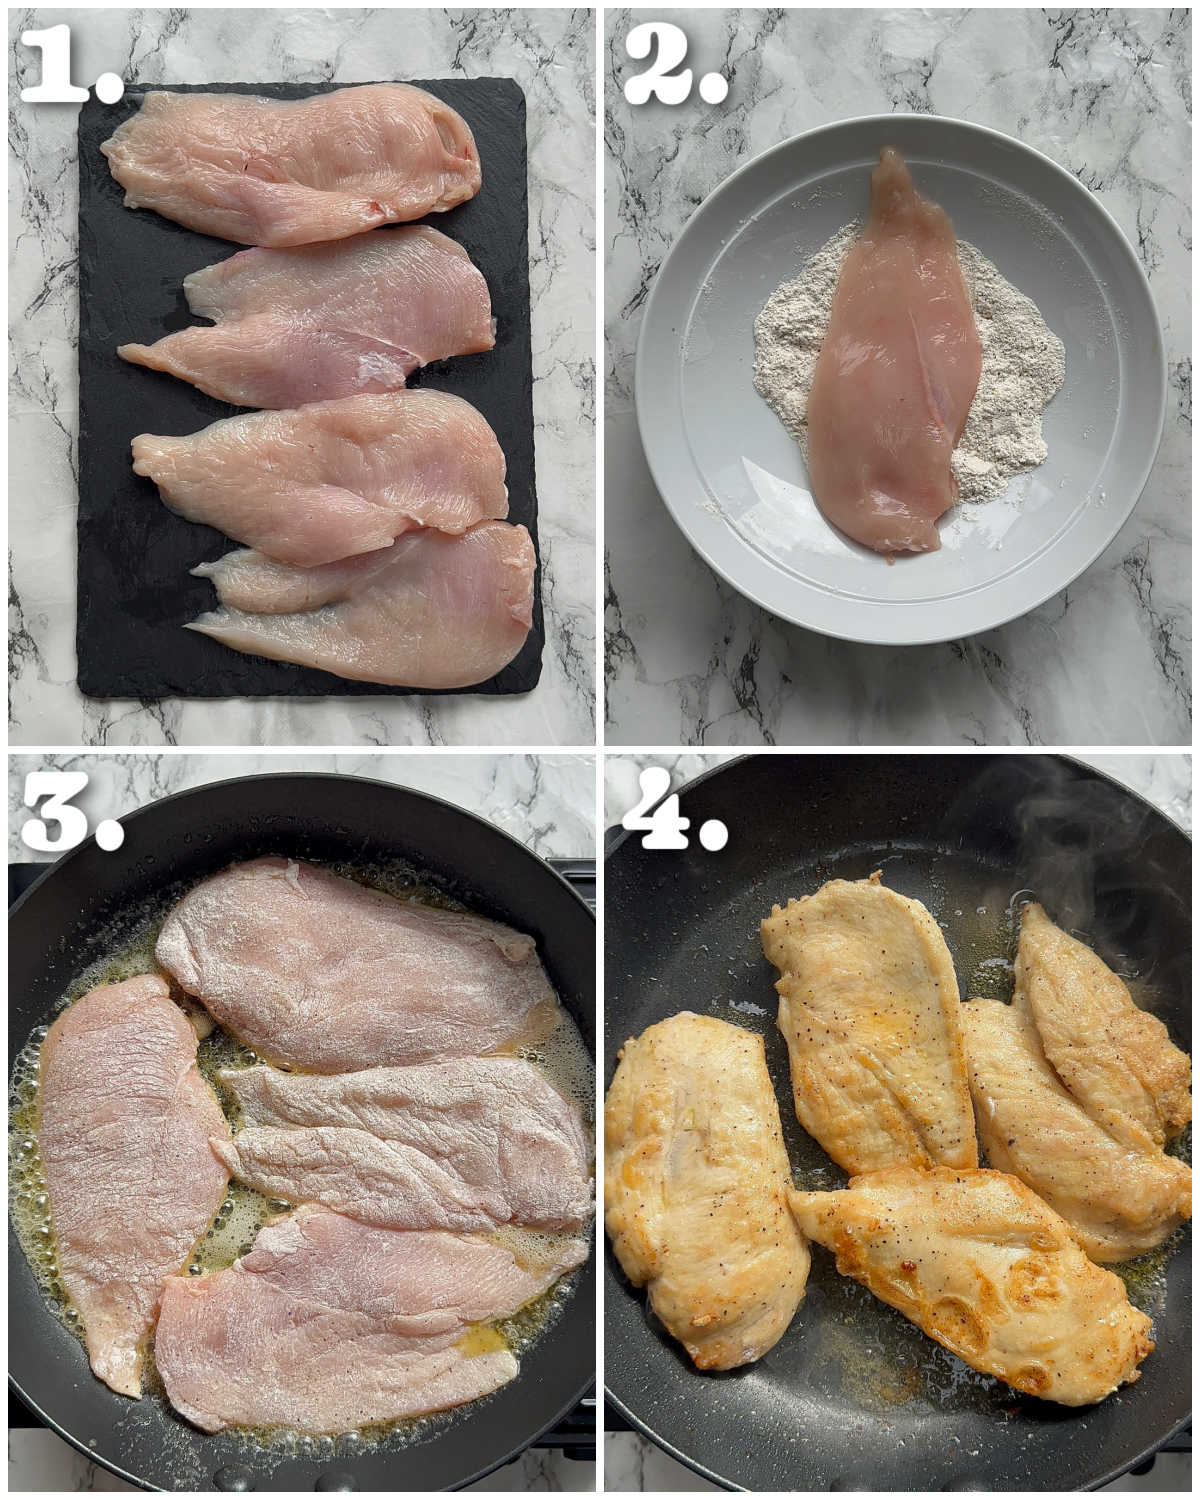
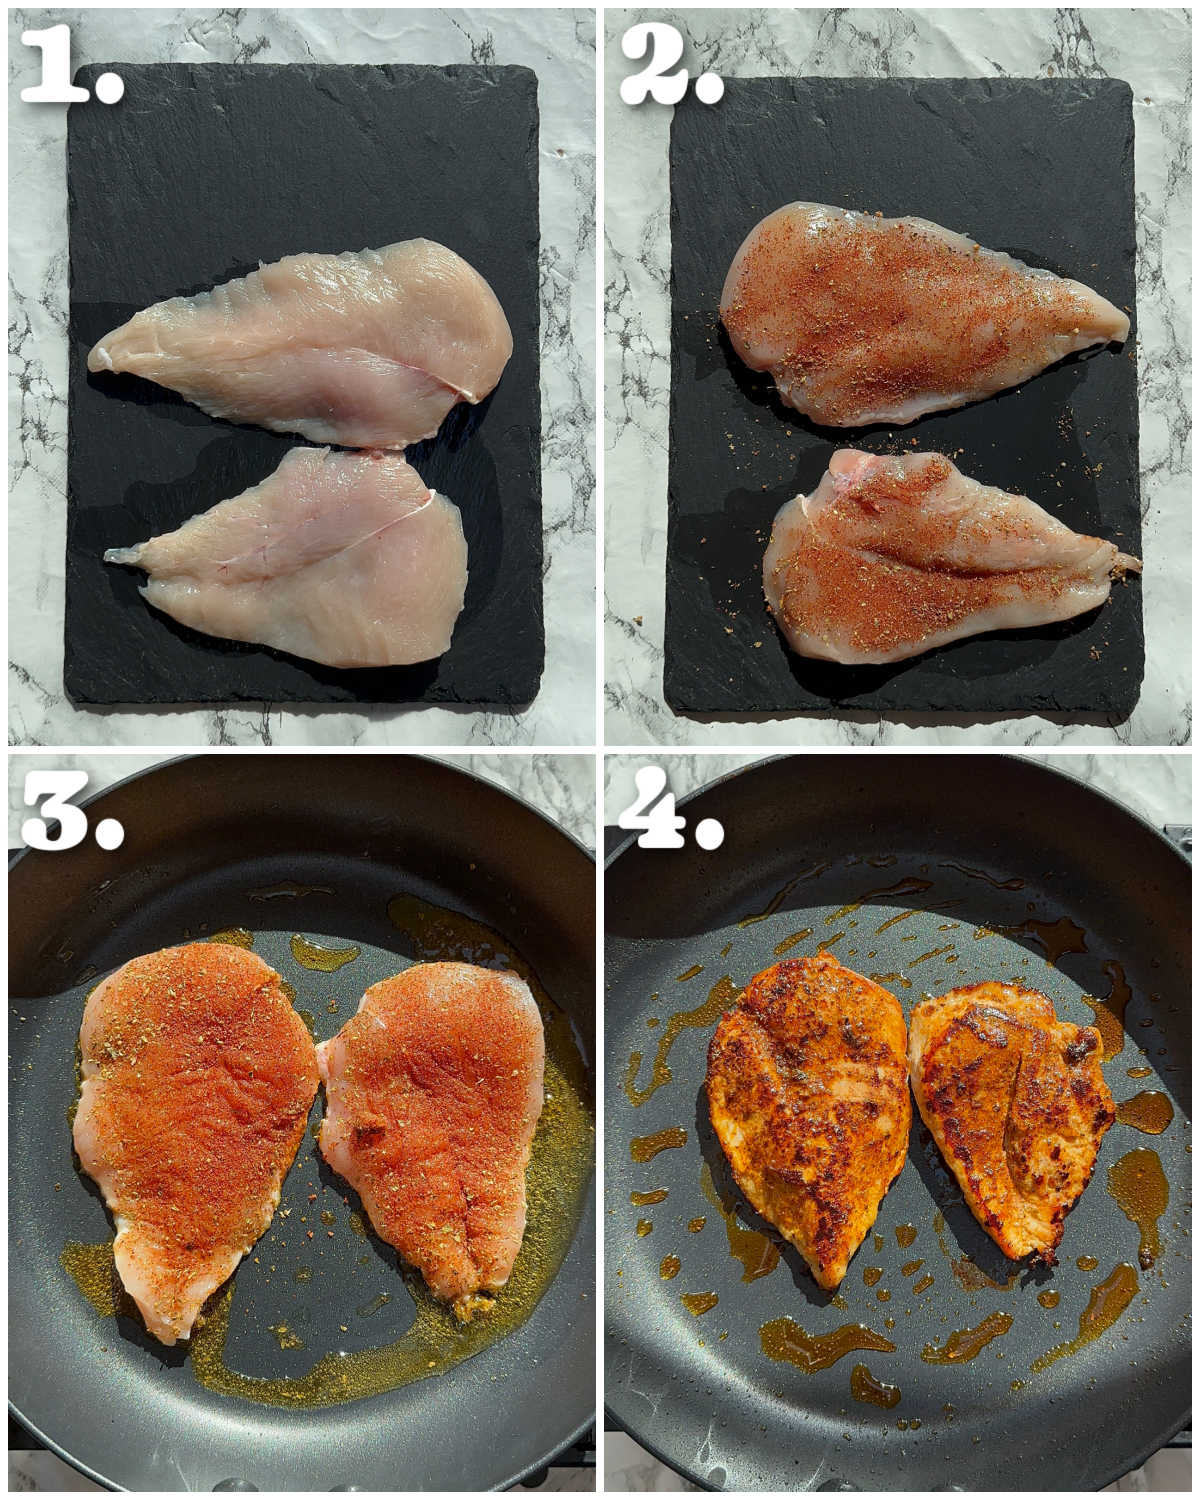
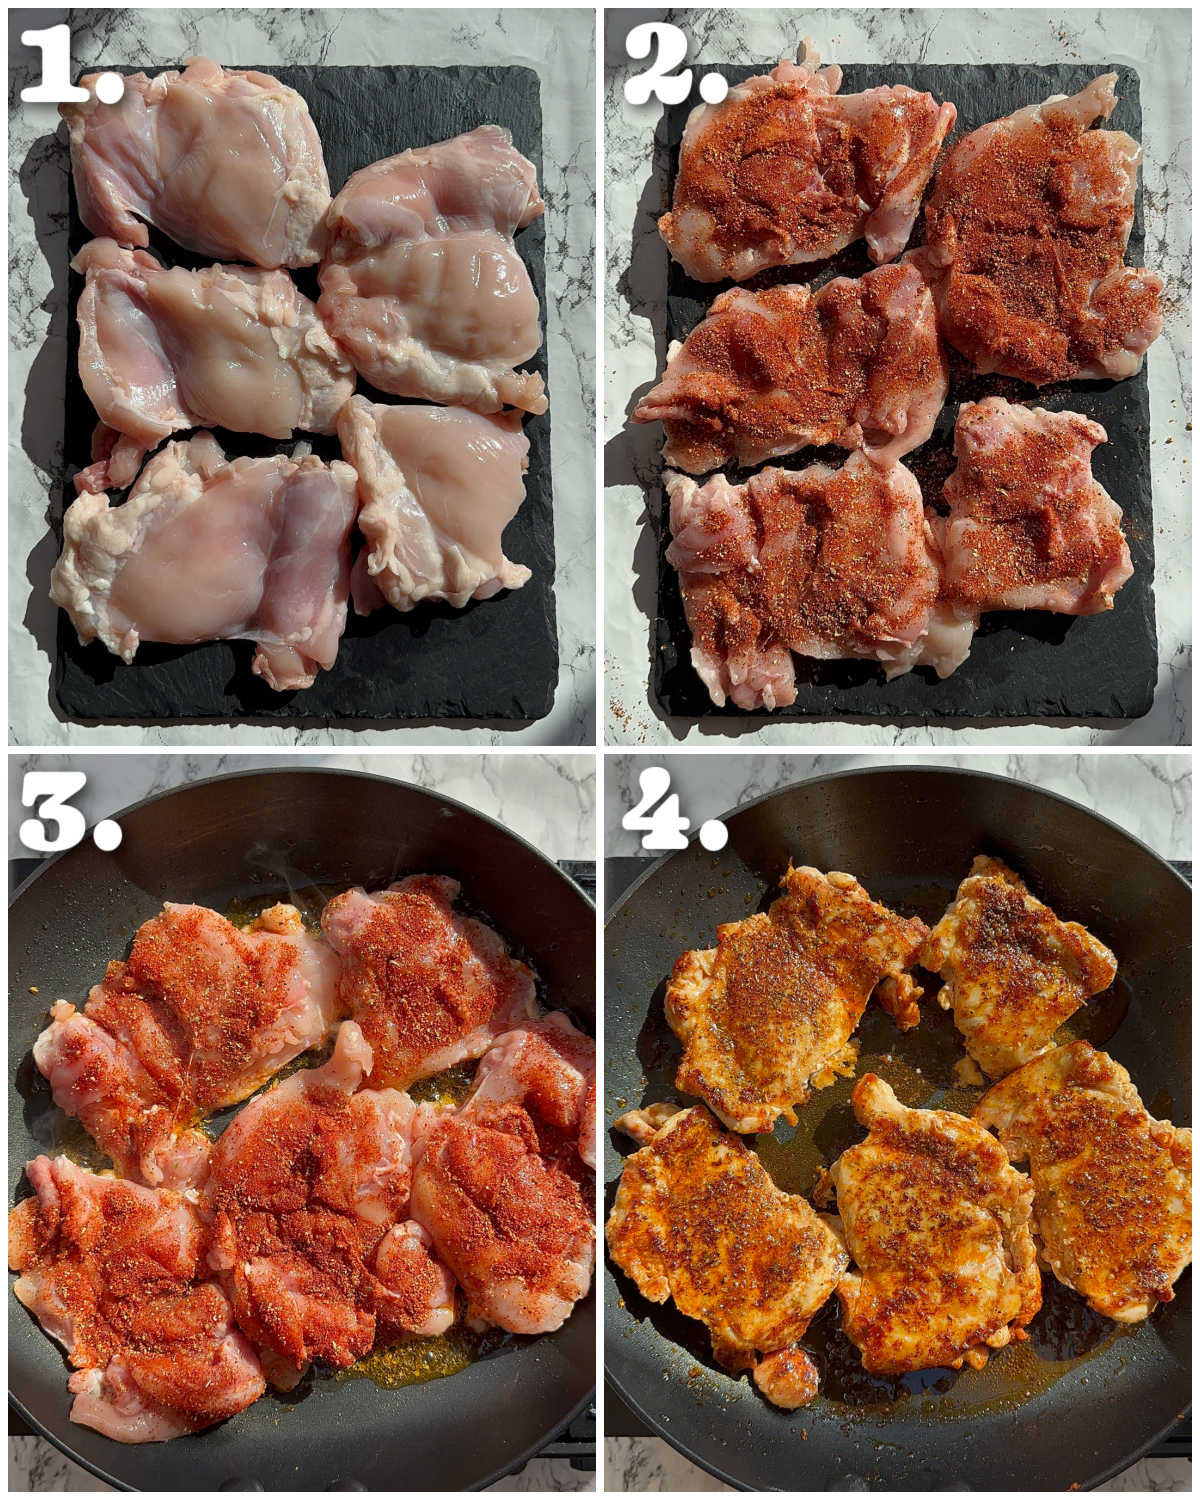
The sauce in the pie is going to be nice and flavoursome, but we’ll also be seasoning the chicken directly, just to help it shine. No fancy spices needed: just some smoked paprika, oregano, onion & garlic powder and some cayenne pepper (alongside the obvious salt and black pepper).
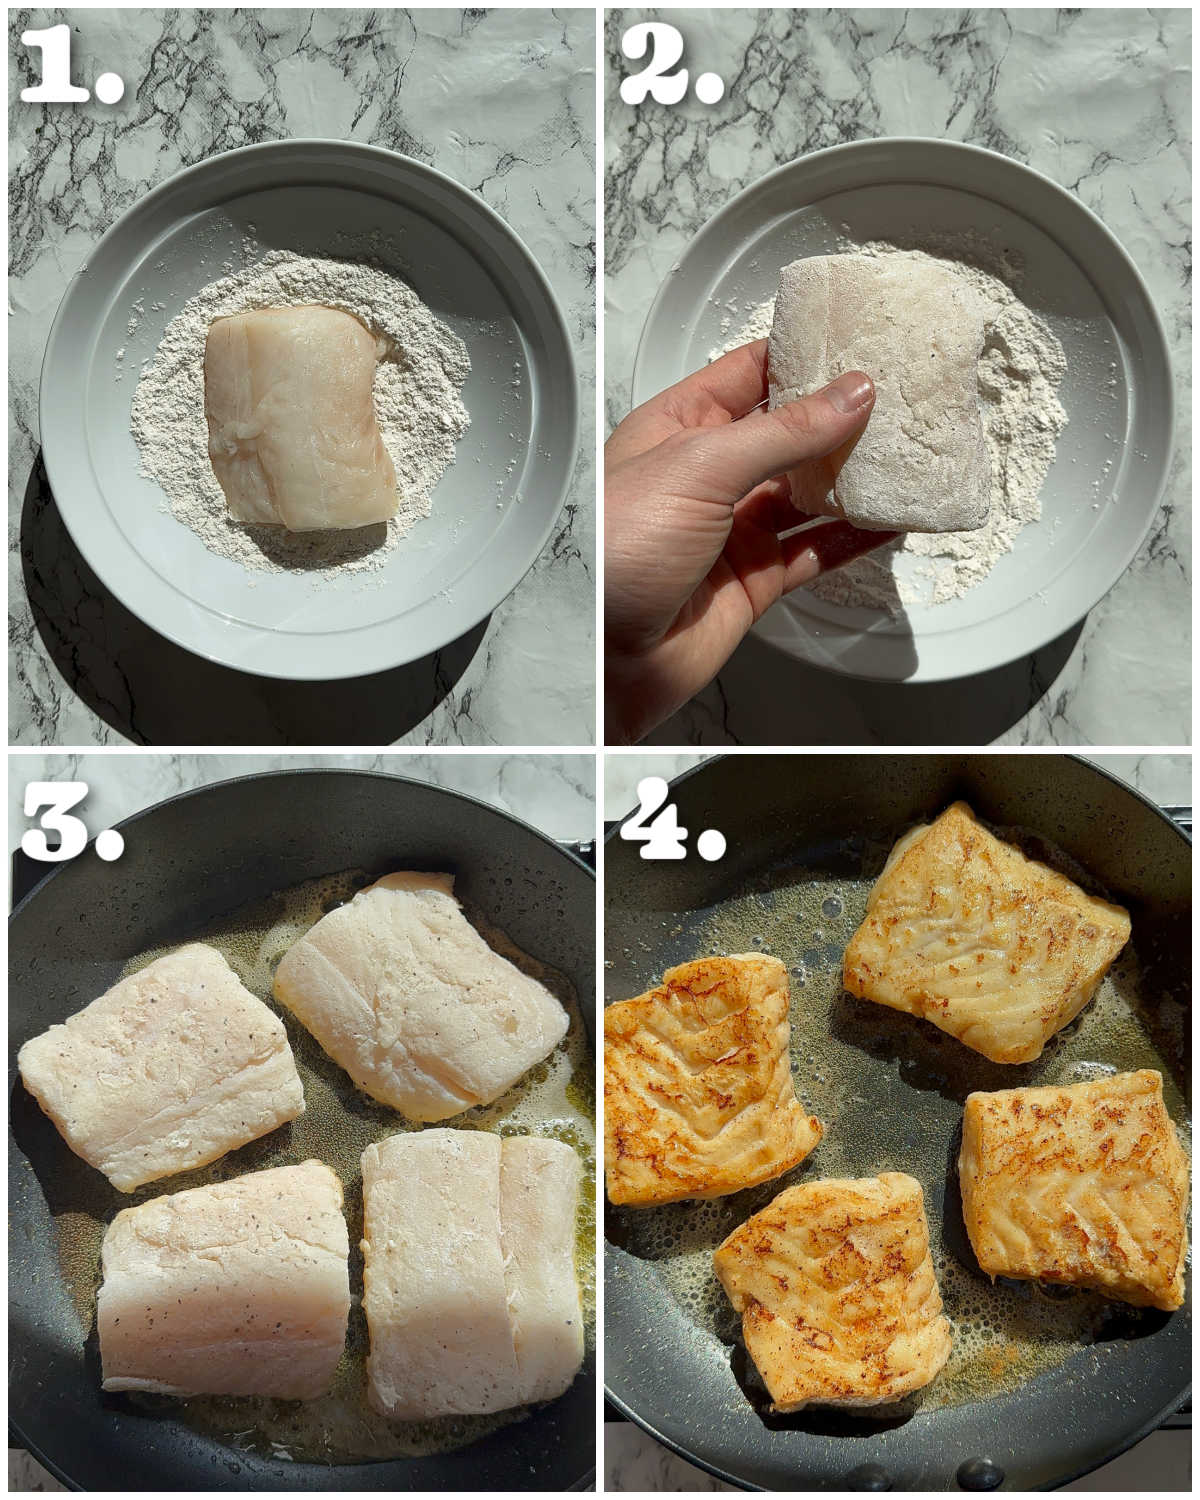
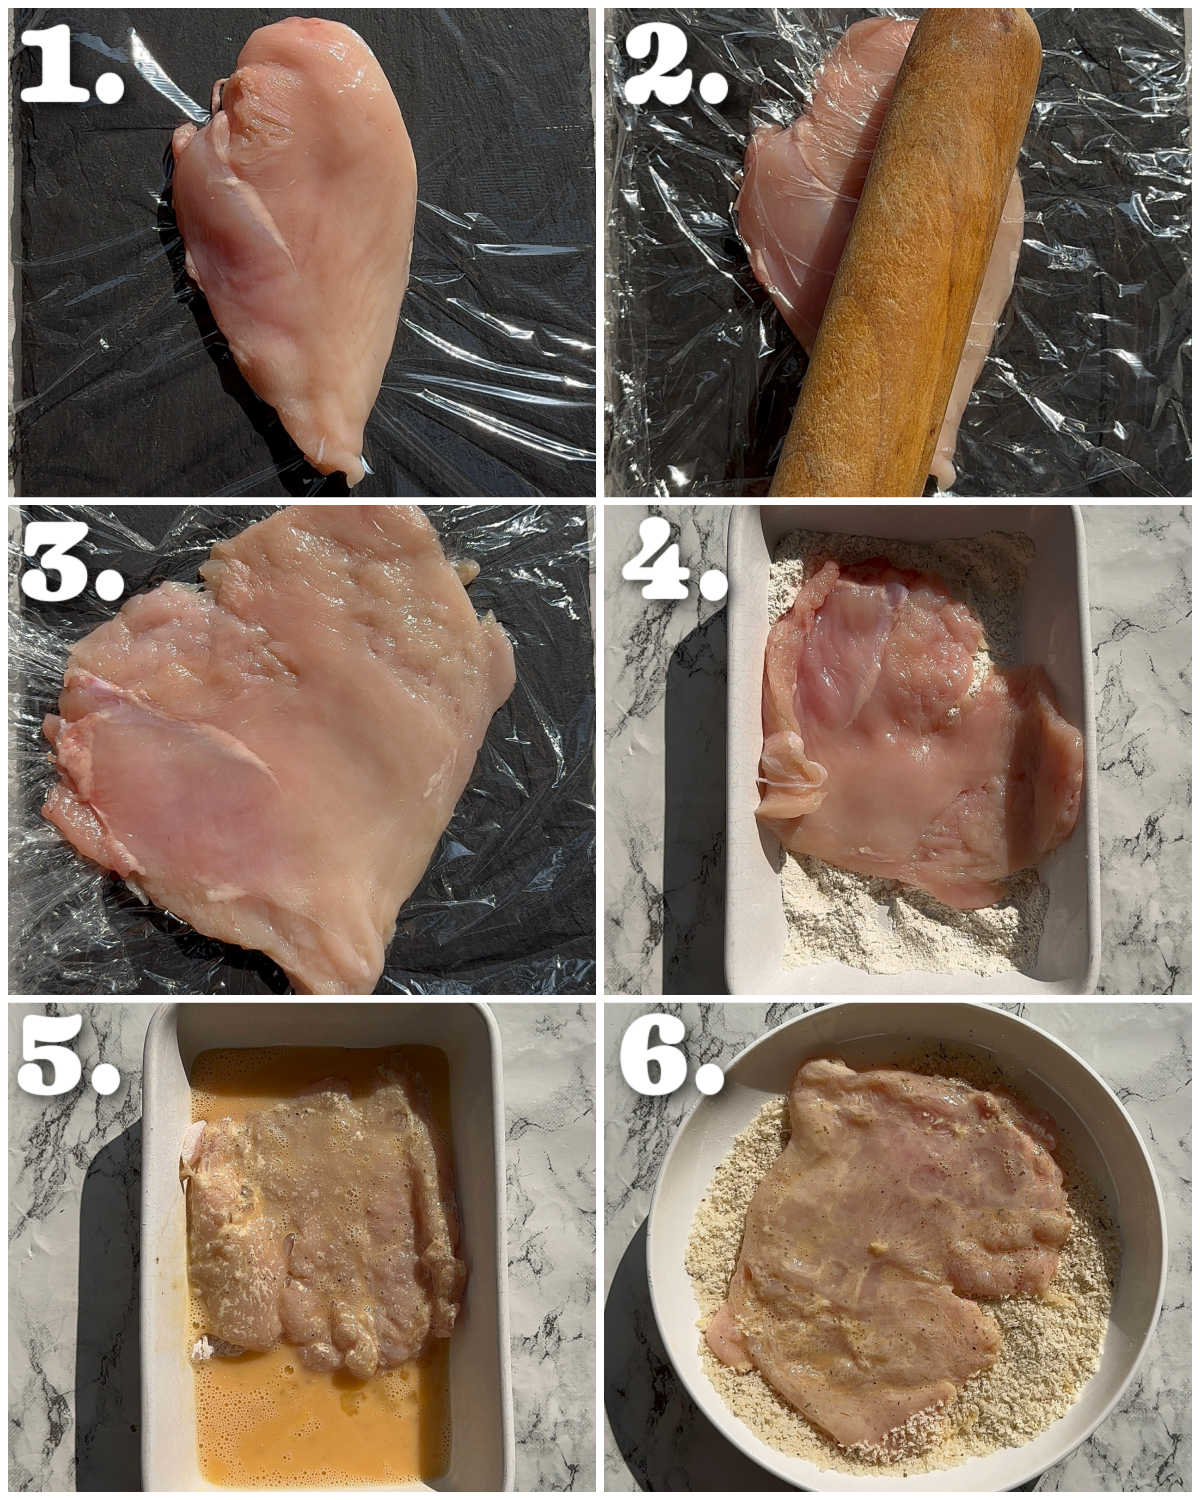
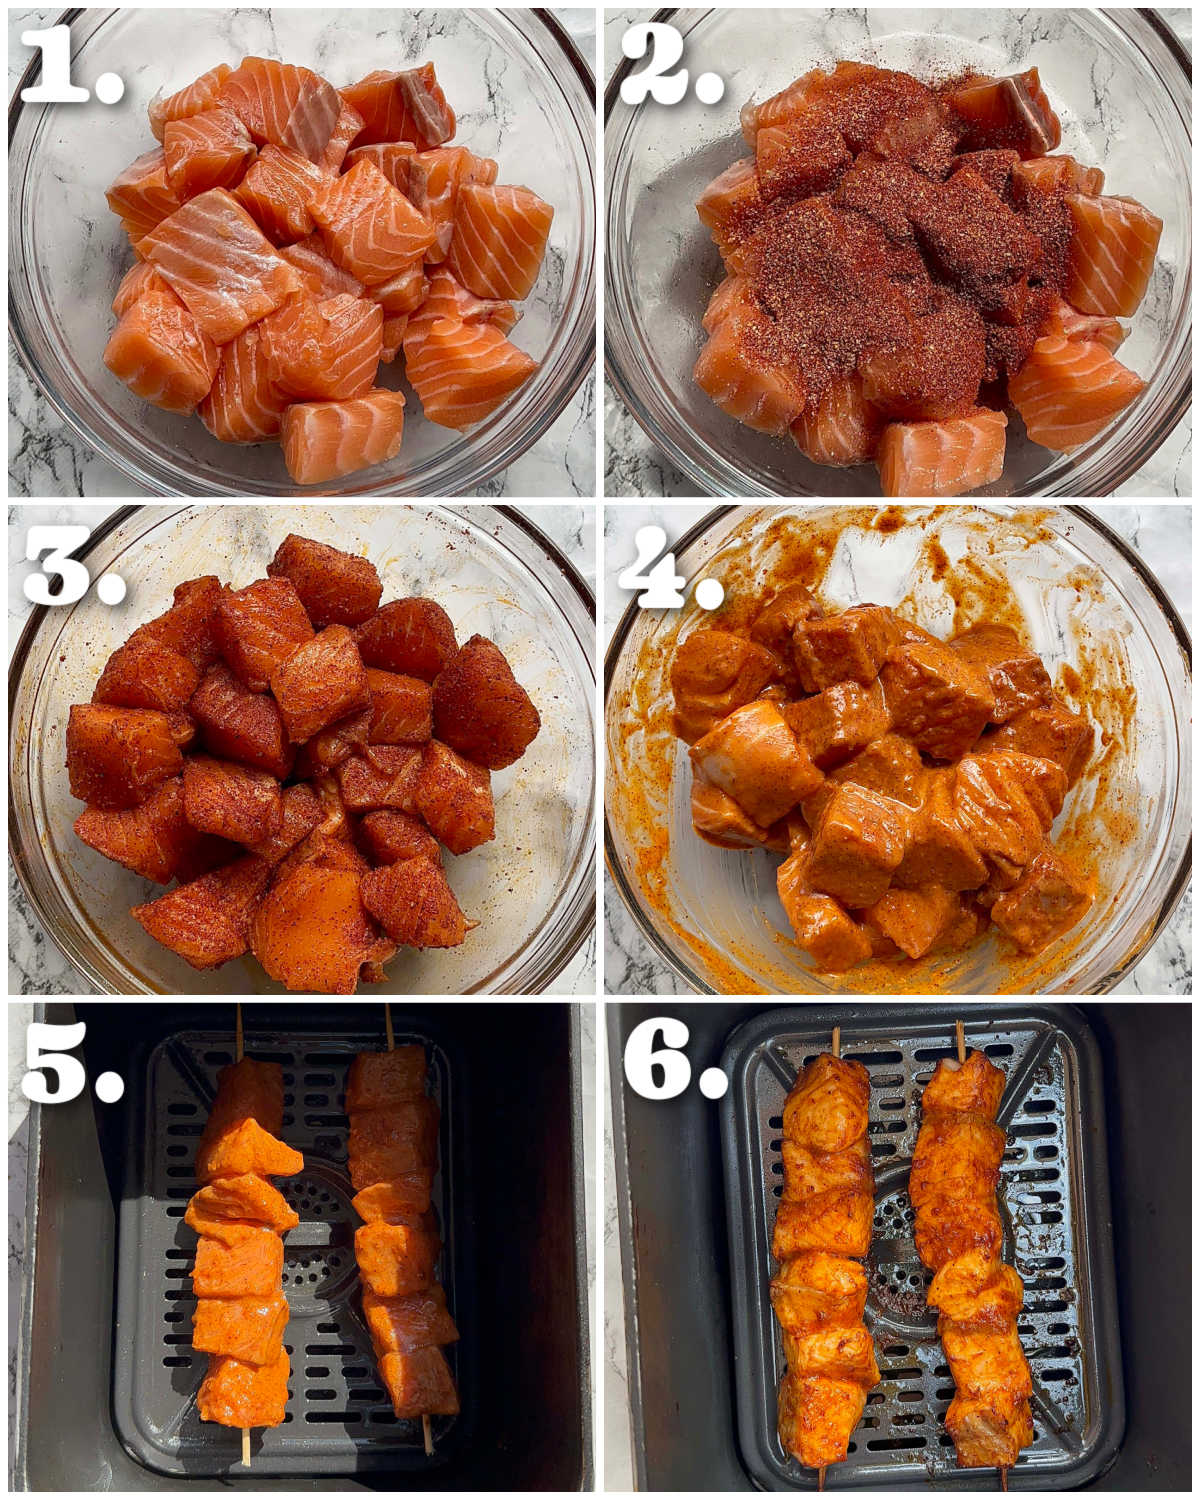
Process shots: season thighs (photos 1&2), pan-fry then remove (photos 3&4)
Chicken and Chorizo Pie Filling
The other awesome thing about using thighs is that you can use the excess fat to begin frying the rest of the ingredients. Alongside the chorizo, we’ve got some onion, celery and garlic to help build a base flavour for the filling.
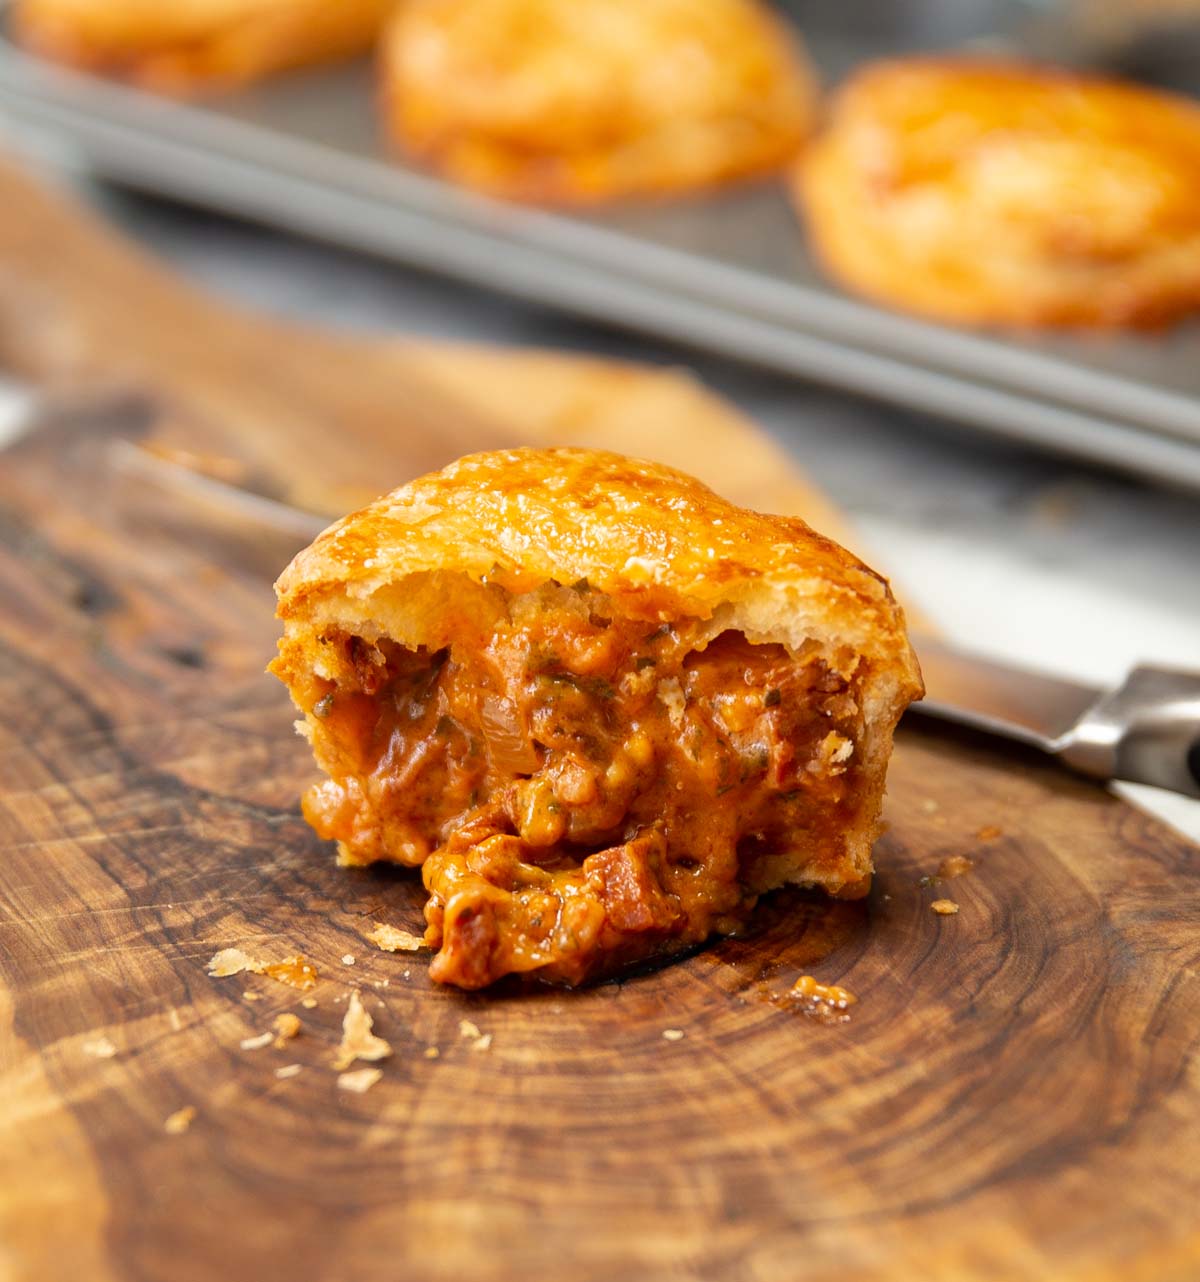
The sauce is mainly made with chicken stock, but I also love adding a good dollop of crème fraîche for a light, creamy texture and flavour. Some lemon juice and tomato puree also help to really bring the filling together.
Sauce consistency
The sauce is thickened with flour, and what’s really important is that you simmer the sauce until it’s nice and thick. The sauce shouldn’t be watery at all – more of a very thick sauce that you can spoon into the pies. This is not only important to reduce and condense the flavour of the filling, but it’s also important to keep the pies nice and sturdy.
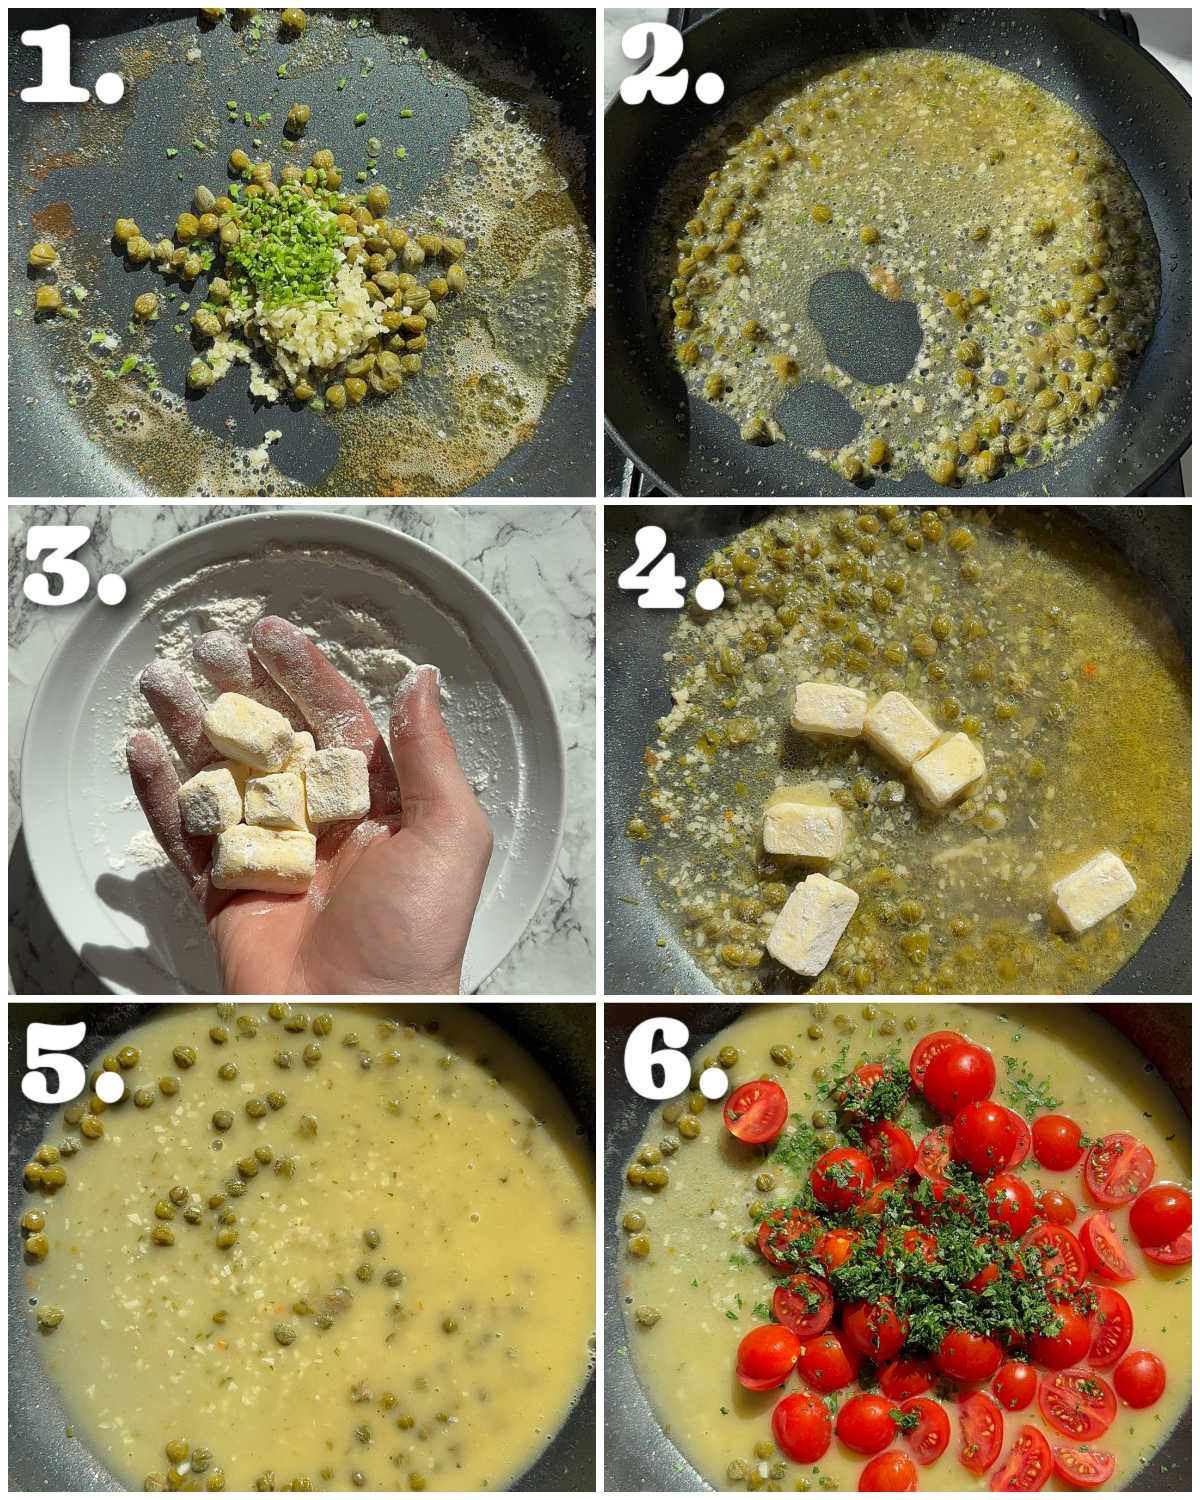
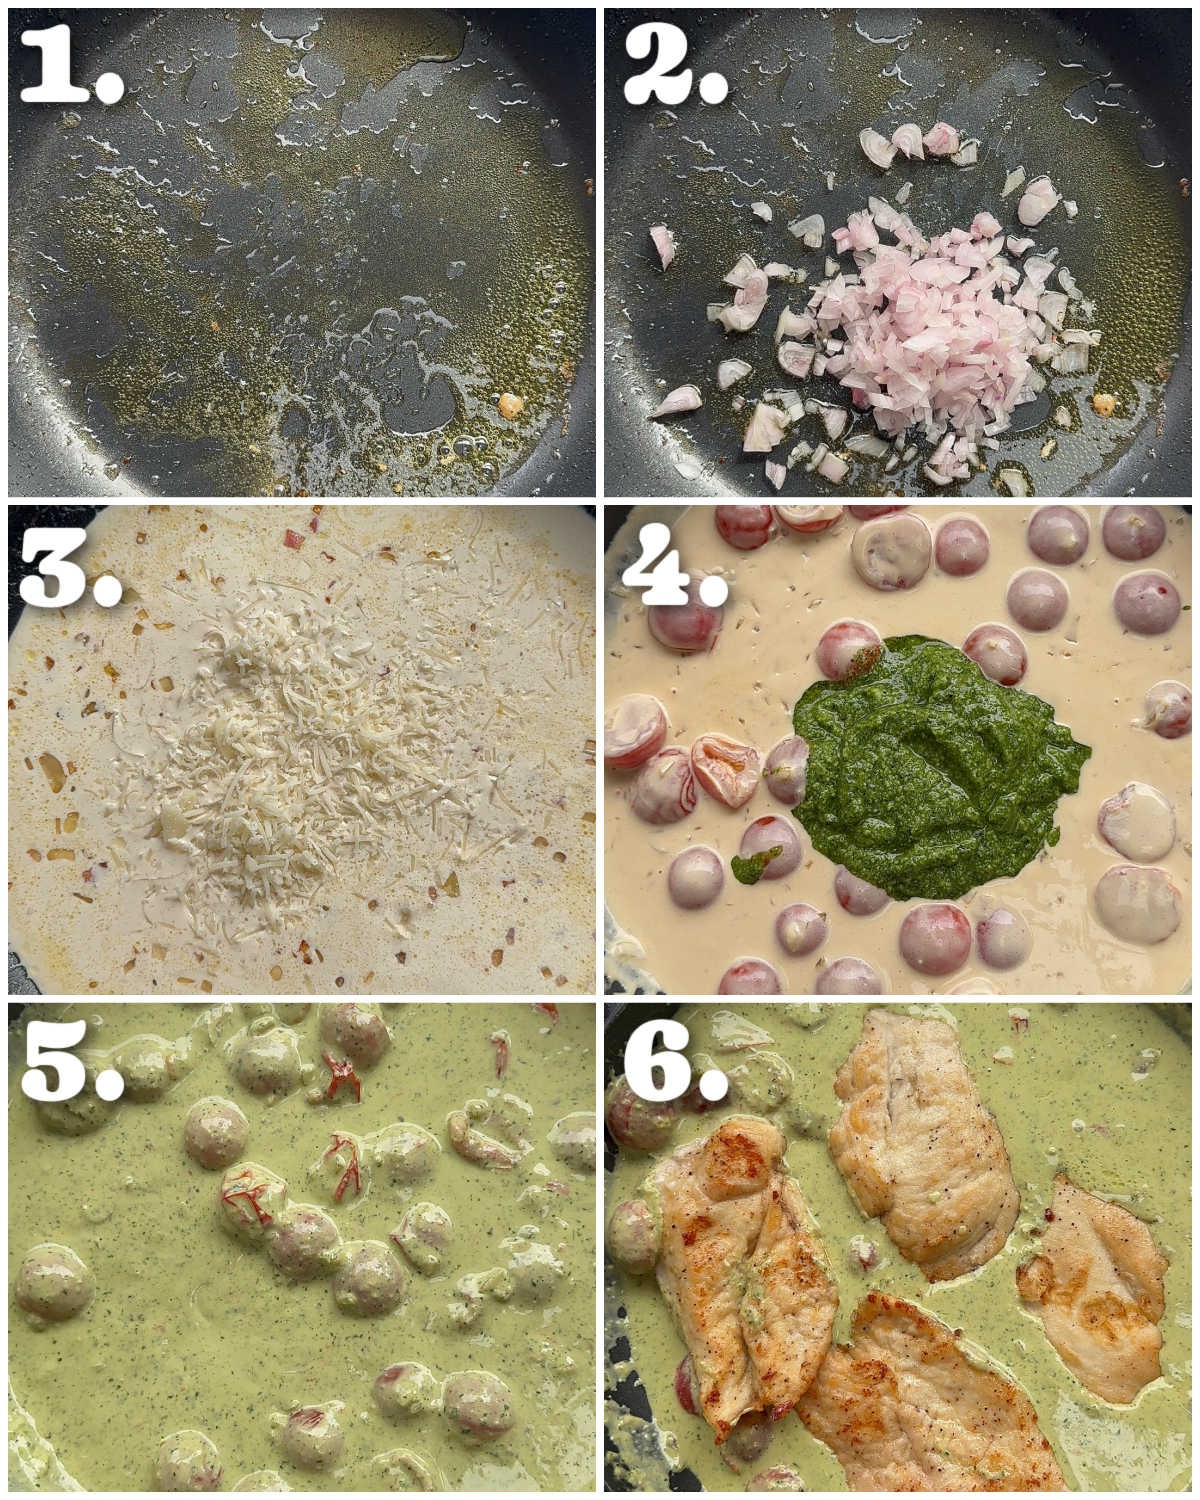
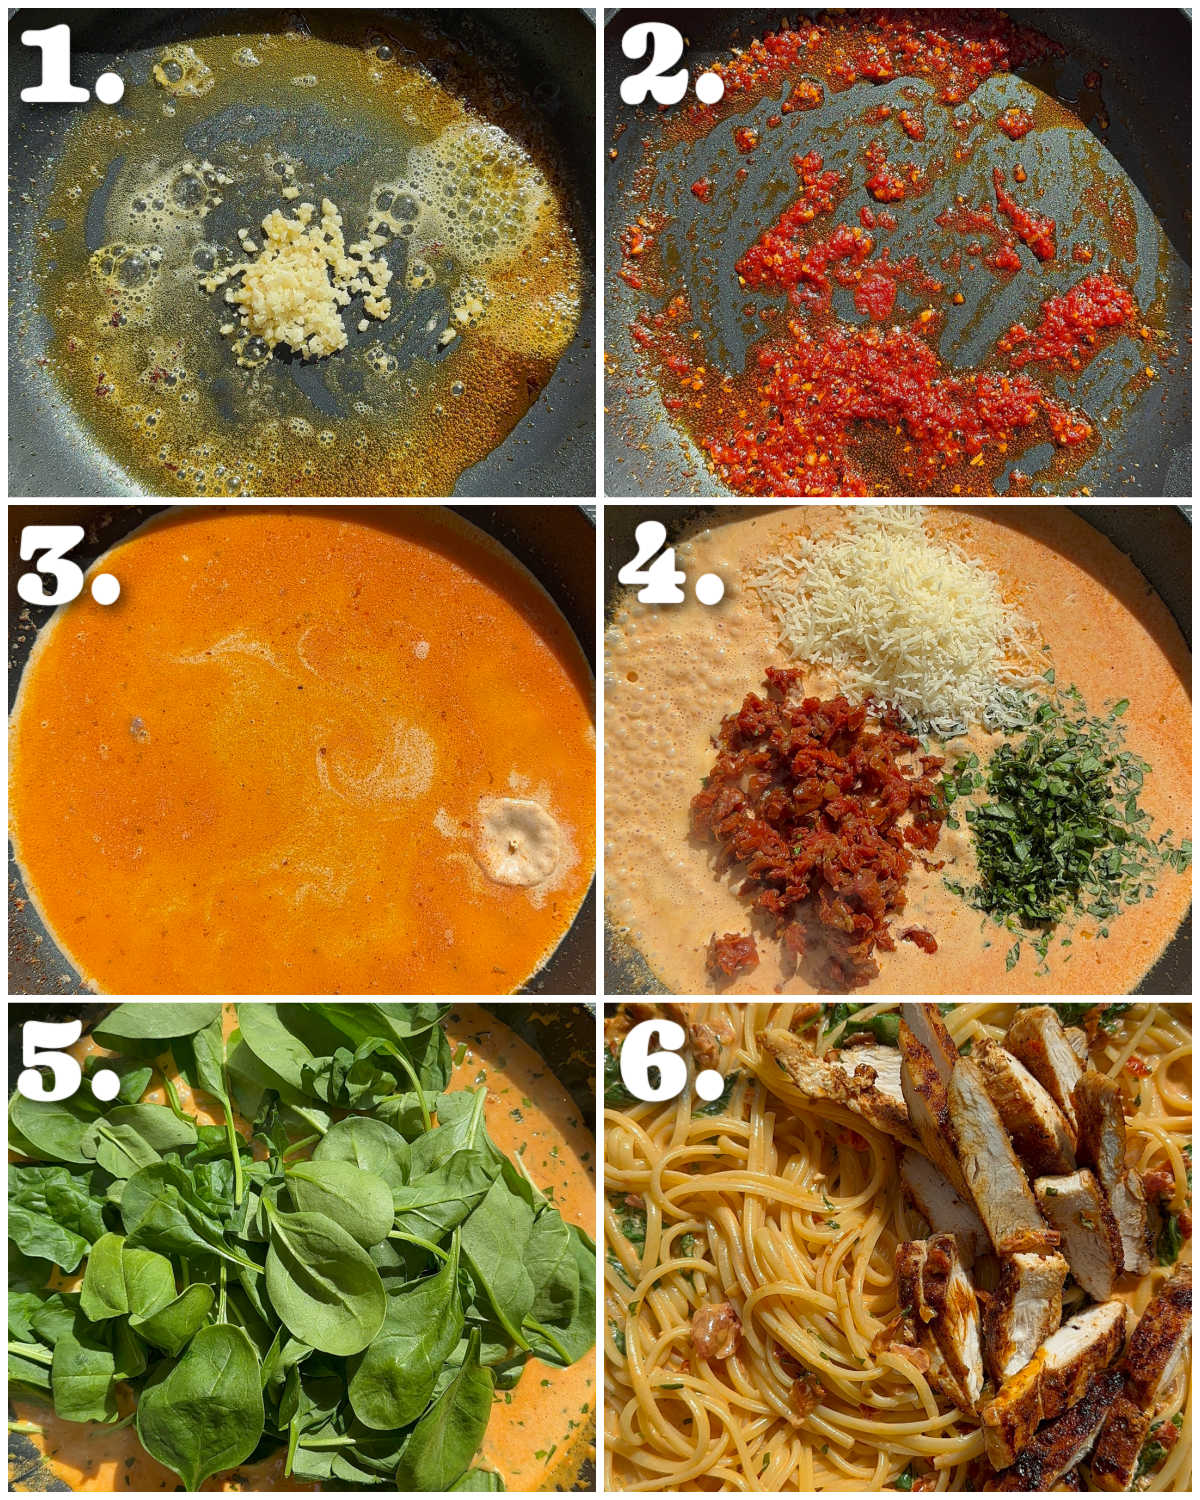
Process shots: fry chorizo then onion, celery and garlic (photo 1), stir in flour (photo 2), whisk in stock then crème fraîche (photo 3), stir in lemon juice, tomato puree, parsley and the resting juices from the chicken (photo 4), simmer then dice chicken (photo 5), stir through sauce (photo 6).

Chicken and Chorizo Pies
Heavy emphasis on the plural here. Yep, we’re making hand-held pies. Mini chicken and chorizo pies if you will.
Pastry
I have no shame in saying I use store-bought pastry for this recipe. Here’s what I typically go for:
- Shortcrust pastry – this is for the base. Shortcrust works great for pies as it creates a nice, sturdy base.
- Puff pastry – I like to use puff pastry for the lid of the pie. However, you can use more shortcrust pastry if you’d prefer.
Cooling the filling
It’s really important that you let the filling cool before you add it to the pastry. Otherwise, it’s going to steam the pastry and it won’t crisp up. The colder the pastry = the more it’ll crisp up.
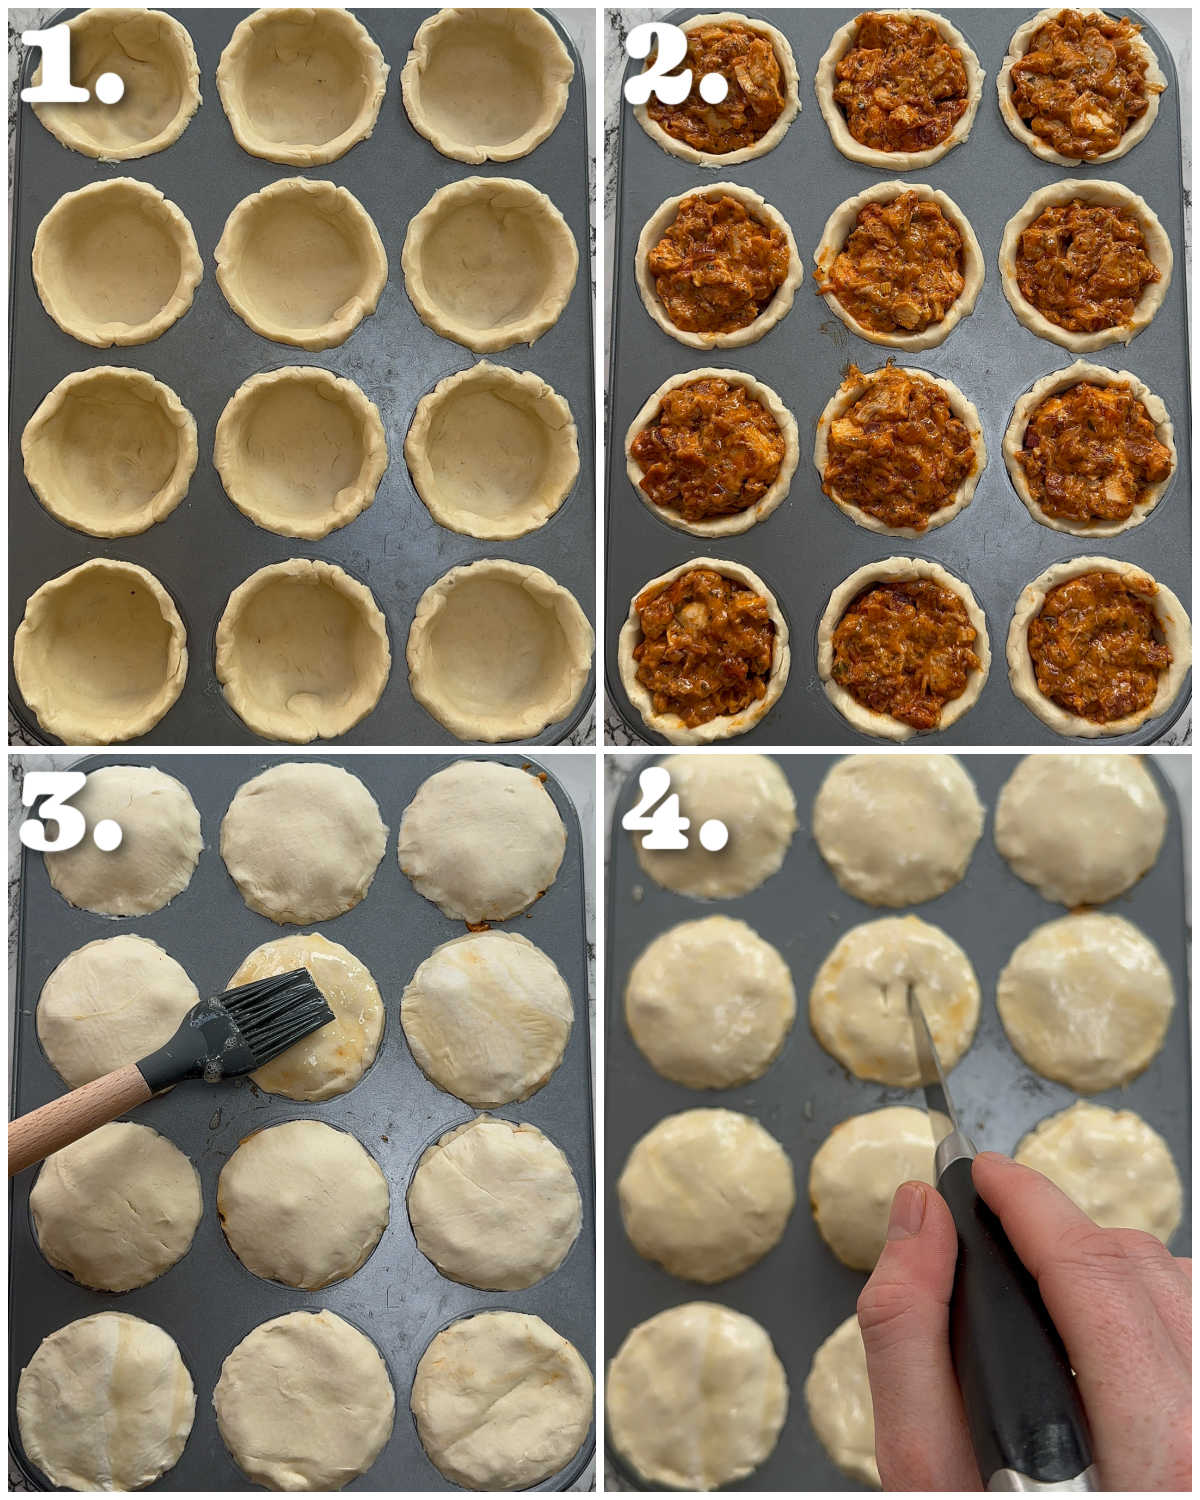
Process shots: add pastry to muffin tin (photo 1), add filling (photo 2), add pastry then brush with egg wash (photo 3), slice steam holes then bake (photo 4).
Chicken and Chorizo Pies FAQ
As I mentioned, you’ll get better results using thighs. However, you could use the same weight in breasts, slice them in half horizontally through the centre, then fry them that way. Then just continue the recipe as stated.
You’ll want to use regular Spanish cured chorizo. I use pre-diced, but you can dice up a full chorizo if you’d prefer.
These are best made fresh, but you could tightly store any leftovers in the fridge for a few days. From there, I’d recommend covering them in foil and baking at 180C/350F until piping hot again (much easier if you bring them to room temp first so they cook through evenly).
How to serve Chicken and Chorizo Pies
Once they’re out of the oven, you’ll want to let them sit for 5 or so minutes. Just to let the filling calm down a little bit (they’ll be piping hot).
These are PERFECT for any sort of gathering or any time you’ve got company. Heck, they’re even great cold in lunch boxes!
If you want to turn them into a full meal though, I recommend serving them with a side or two. Here are some ideas:
- Carb – these are perfect with chips or mash.
- Veg – green beans or even peas would be great.
- Salad – if you want something a little lighter, then consider a simple side salad!
For more chicken and chorizo recipes check out my Creamy Chicken and Chorizo, Chicken and Chorizo Pasta and Chicken and Chicken Potato Bake!
For another ‘mini pie’ recipe check out my Mini Mac & Cheese Steak Pies and Mini Cottage Pies!
Alright, let’s tuck into the full recipe for these chicken and chorizo pies shall we?!
How to make Chicken and Chorizo Pies (Full Recipe & Video)

Chicken and Chorizo Pies
#wprm-recipe-user-rating-6 .wprm-rating-star.wprm-rating-star-full svg * { fill: #343434; }#wprm-recipe-user-rating-6 .wprm-rating-star.wprm-rating-star-33 svg * { fill: url(#wprm-recipe-user-rating-6-33); }#wprm-recipe-user-rating-6 .wprm-rating-star.wprm-rating-star-50 svg * { fill: url(#wprm-recipe-user-rating-6-50); }#wprm-recipe-user-rating-6 .wprm-rating-star.wprm-rating-star-66 svg * { fill: url(#wprm-recipe-user-rating-6-66); }linearGradient#wprm-recipe-user-rating-6-33 stop { stop-color: #343434; }linearGradient#wprm-recipe-user-rating-6-50 stop { stop-color: #343434; }linearGradient#wprm-recipe-user-rating-6-66 stop { stop-color: #343434; }
Equipment
-
Sharp Knife & Chopping Board
-
Large Pan, Tongs & Wooden Spoon
-
12 Hole Muffin Tin
-
Jug (for stock)
Ingredients
Chicken Seasoning
- 1 1/2 tsp Smoked Paprika
- 1 tsp Dried Oregano
- 1/2 tsp Salt
- 1/4 tsp EACH: Onion Powder, Garlic Powder, Black Pepper
- 1/8 – 1/4 tsp Cayenne Pepper (optional)
Pies
- 600g / 1.3lb boneless skinless Chicken Thighs
- 1 tbsp Olive Oil
- 130g / 4.5oz diced Spanish Chorizo (see notes)
- 1 large Red Onion, finely diced
- 1 medium/large stalk of Celery, finely diced
- 2 cloves of Garlic, finely diced
- 3 tbsp Plain Flour
- 480ml / 2 cups Chicken Stock
- 120g / 1/2 cup Crème Fraîche, at room temp (see notes)
- 2 tbsp finely diced Fresh Parsley
- 1 tbsp Tomato Puree (Tomato Paste in US)
- 1/2 small Lemon, juice only (1 tbsp)
- 2x 320g/11.3oz sheets of Shortcrust Pastry
- 1x 320g/11.3oz sheet of Puff pastry (optional – see notes)
- 1 Egg, beaten for egg wash
Instructions
-
In a small pot or bowl combine the chicken seasoning. Lay out the thighs and evenly sprinkle the seasoning over both sides of the thighs.
-
Heat 1 tbsp oil in a large pan over medium-high heat. Once hot, add the thighs and fry both sides for around 4-5mins, until lightly charred and just about cooked right through the centre (they will carry on cooking as they rest and when in the pies). If they start charring too aggressively just lower the heat slightly. Remove and place on a plate to one side. Lower the heat to medium.
-
Add the chorizo to the pan and fry for a couple of minutes until it starts to leak out fat and crisp very slightly. Add the onion, celery and garlic and continue frying until it all softens right down and the chorizo crisps up a little more. Don't rush this – you need to render out the fat from the chorizo and sweeten/soften the onion.
-
Stir in the flour to create a roux, then gradually add the stock, whisking as you go to avoid lumps. Stir in the crème fraîche, then stir in the tomato puree, lemon juice, parsley and the resting juices from the chicken. Simmer and stir somewhat frequently for 10 minutes until the sauce is nice and thick.
-
Meanwhile, dice the chicken into small pieces (see video for reference) then stir into the sauce. At this point the sauce should be pretty thick and not runny at all. Leave to cool and preheat the oven to 190C/375F.
-
Slice 12x 10.5cm/4" circles from the shortcrust pastry. Grease the tin holes then place in the pastry, ensuring you gently press it against the tin, creating 12 'cups'. For the lids, you'll need to cut out 12x circles the same size as the rim of the holes (should be 7.5cm/3"). You can either use puff pastry, or roll out the excess shortcrust pastry and use that.
-
Spoon the filling into the cups, then top with the lids and use your fingers to gently press around the edges so it sticks to the base. Brush the tops with egg wash, slice in a couple of small steam holes then bake in the oven for around 25 minutes until deep golden and crisp.
-
Leave to rest for 5 or so mins (the filling will be pretty hot) then tuck in and enjoy!
Video
Notes
b) Chorizo – I know 130g might seem slightly random, but it is the perfect amount and what size the packs of pre-diced chorizo typically come in. You can of course grab a full chorizo and dice it nice and small.
c) Crème Fraîche – Important that this is close to room temp AND full-fat, otherwise it might curdle. It might split a little bit at first, but just keep stirring and it’ll come back together.
d) Puff Pastry – Shortcrust pastry is essential for a sturdy base, but I actually like to do puff pastry on top. If you’d rather not use a 3rd sheet of pastry though there will definitely be enough excess shortcrust pastry to roll out and cover the tops though.
Nutrition
The post Chicken and Chorizo Pies appeared first on Don't Go Bacon My Heart.