beef-stroganoff.jpg

The BEST Beef Stroganoff Recipe

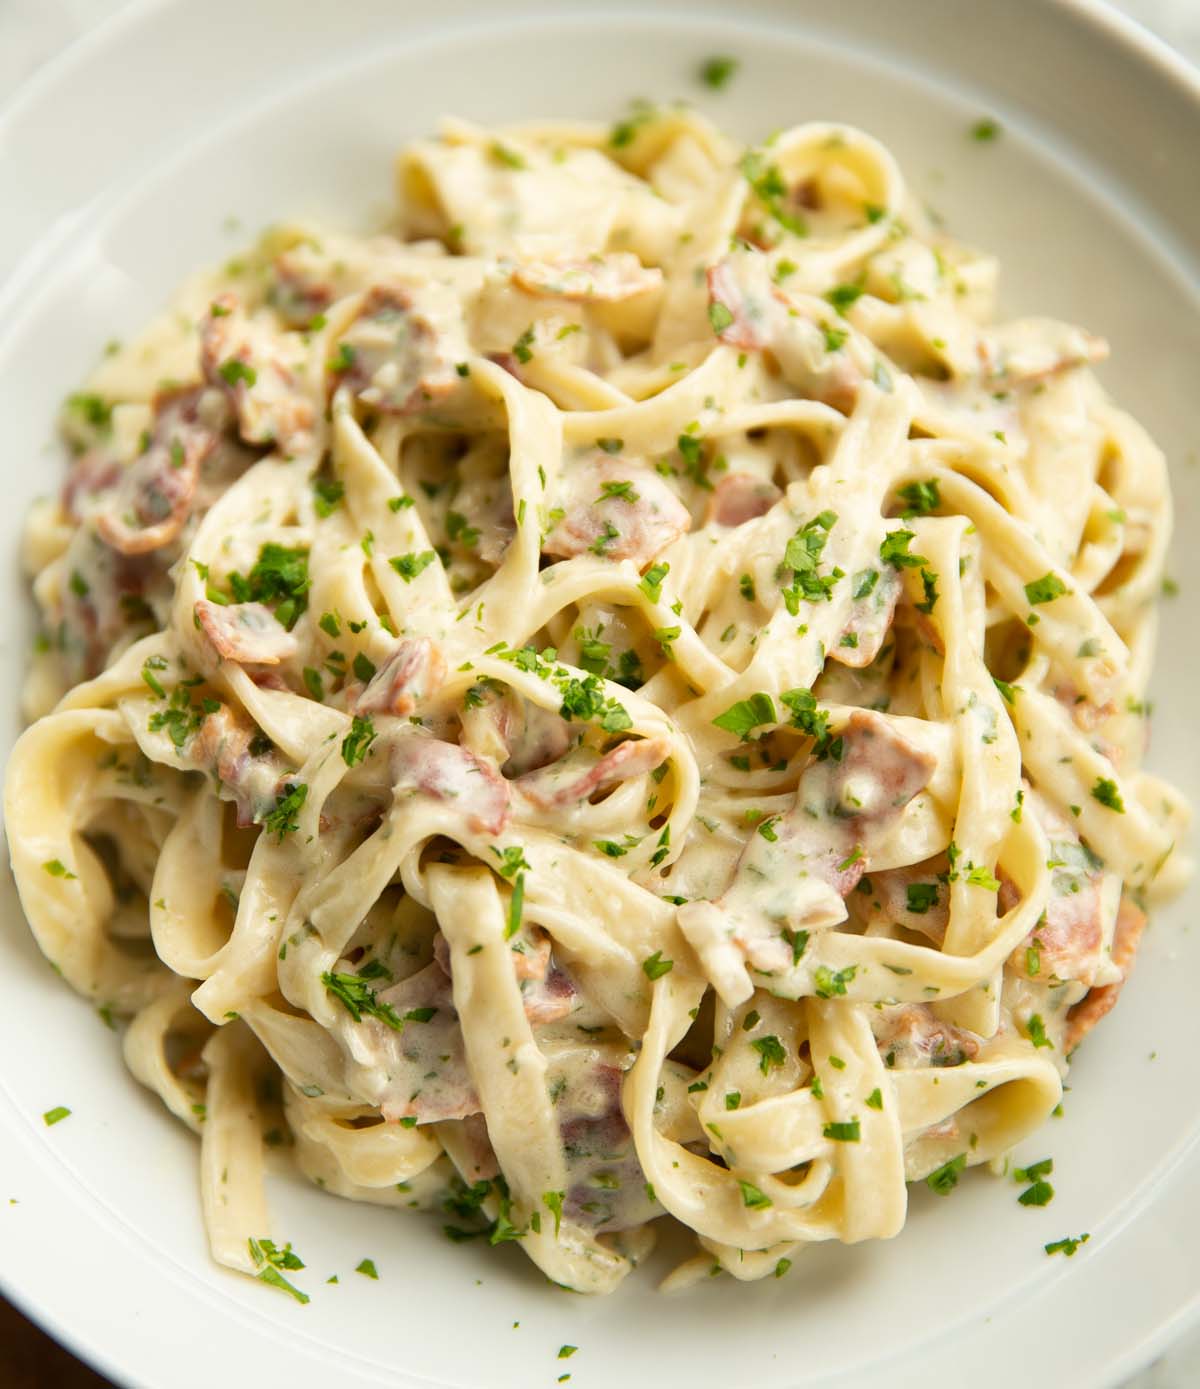
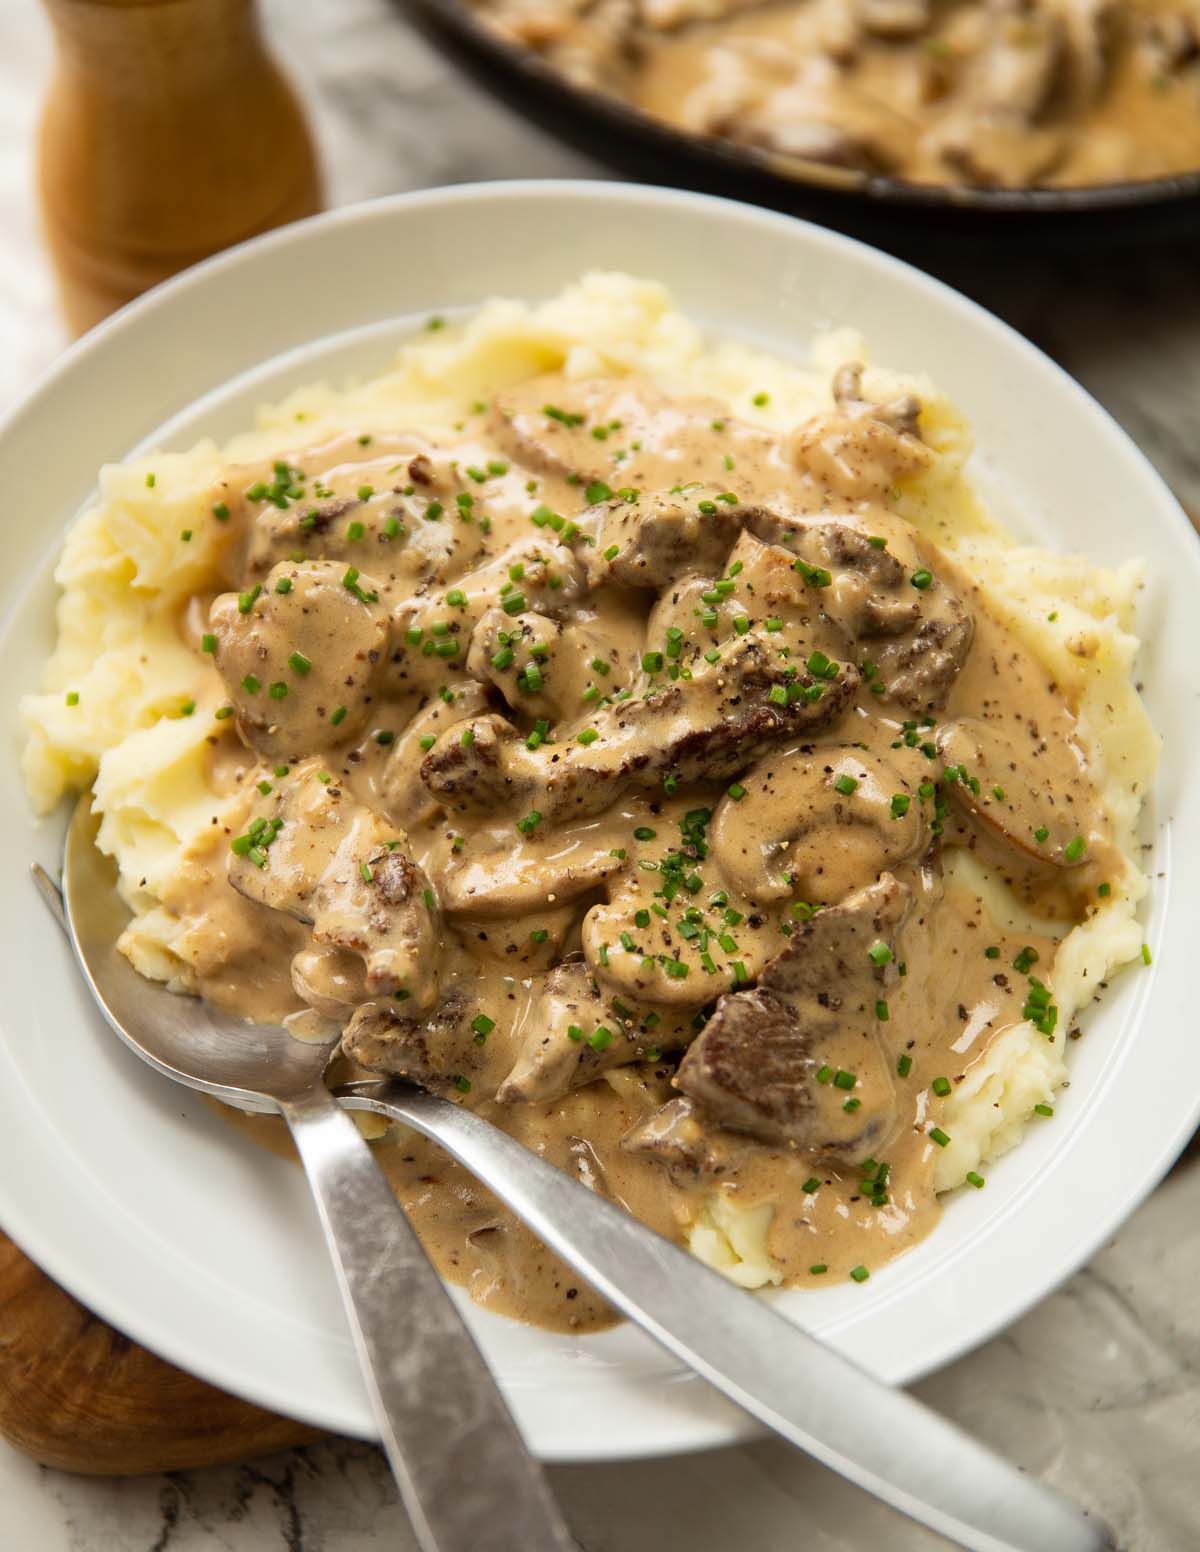
Here I’ll show you the easiest and most delicious way to make a classic Beef Stroganoff!

I’ve tested the living daylights out of this recipe to ensure the end result is a gorgeous, creamy stroganoff that’s packed with flavour. Better still, it’s incredibly quick and easy to make! Follow me…

beef stroganoff in large pan with serving spoon

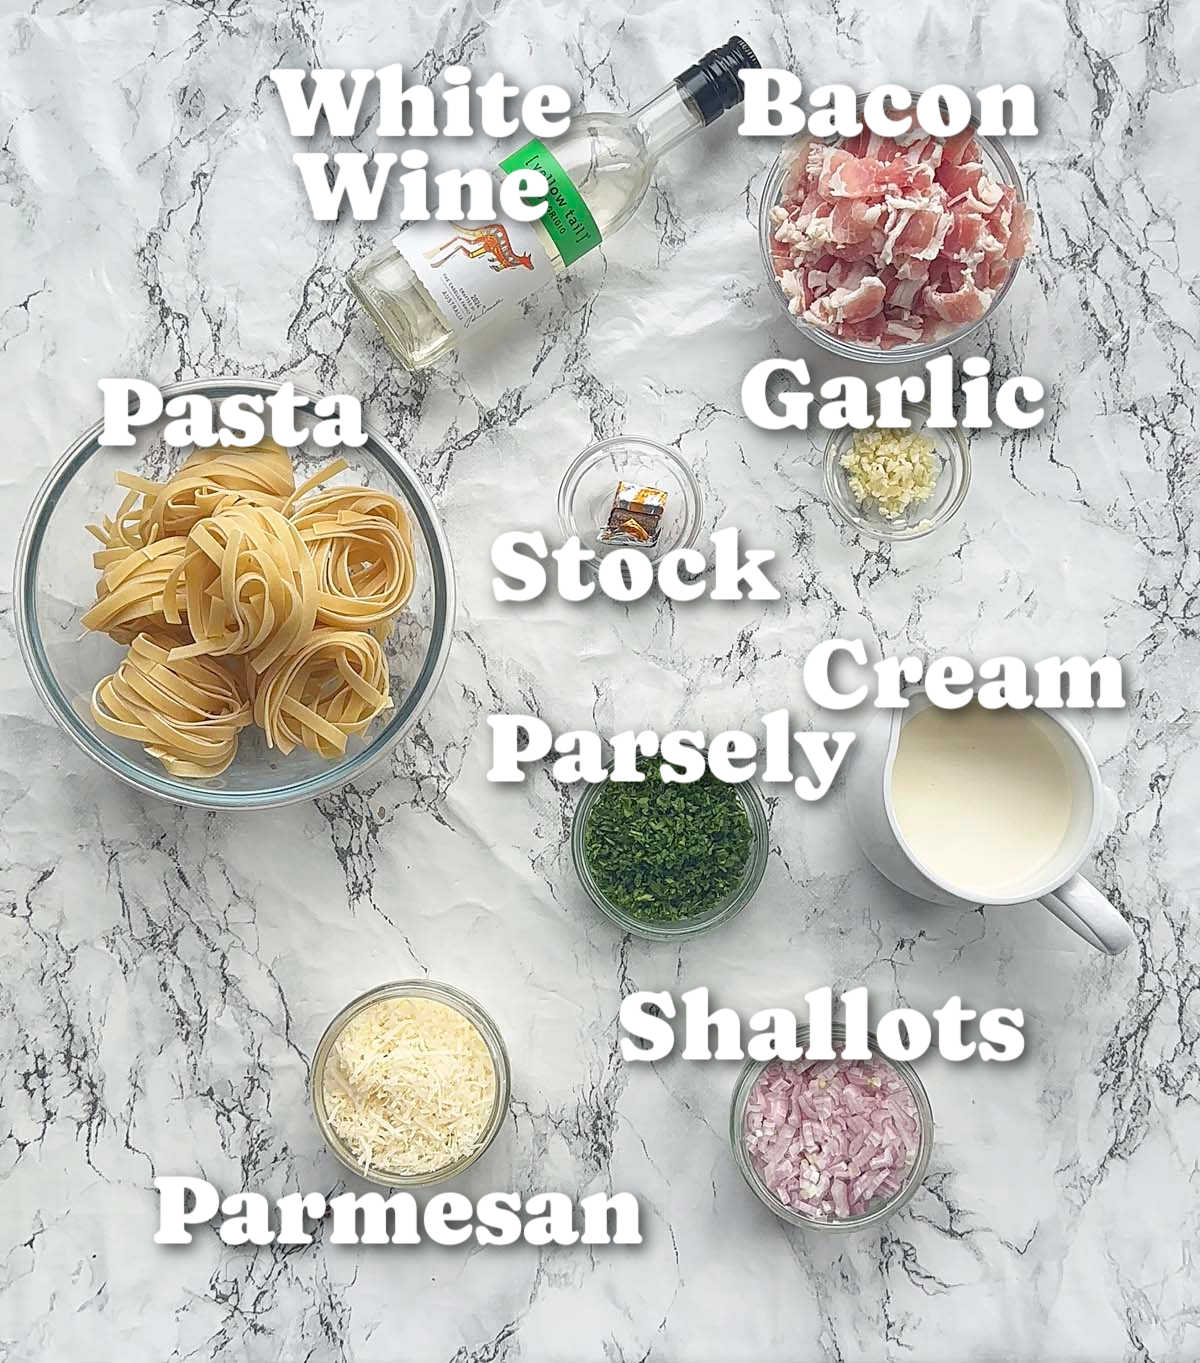
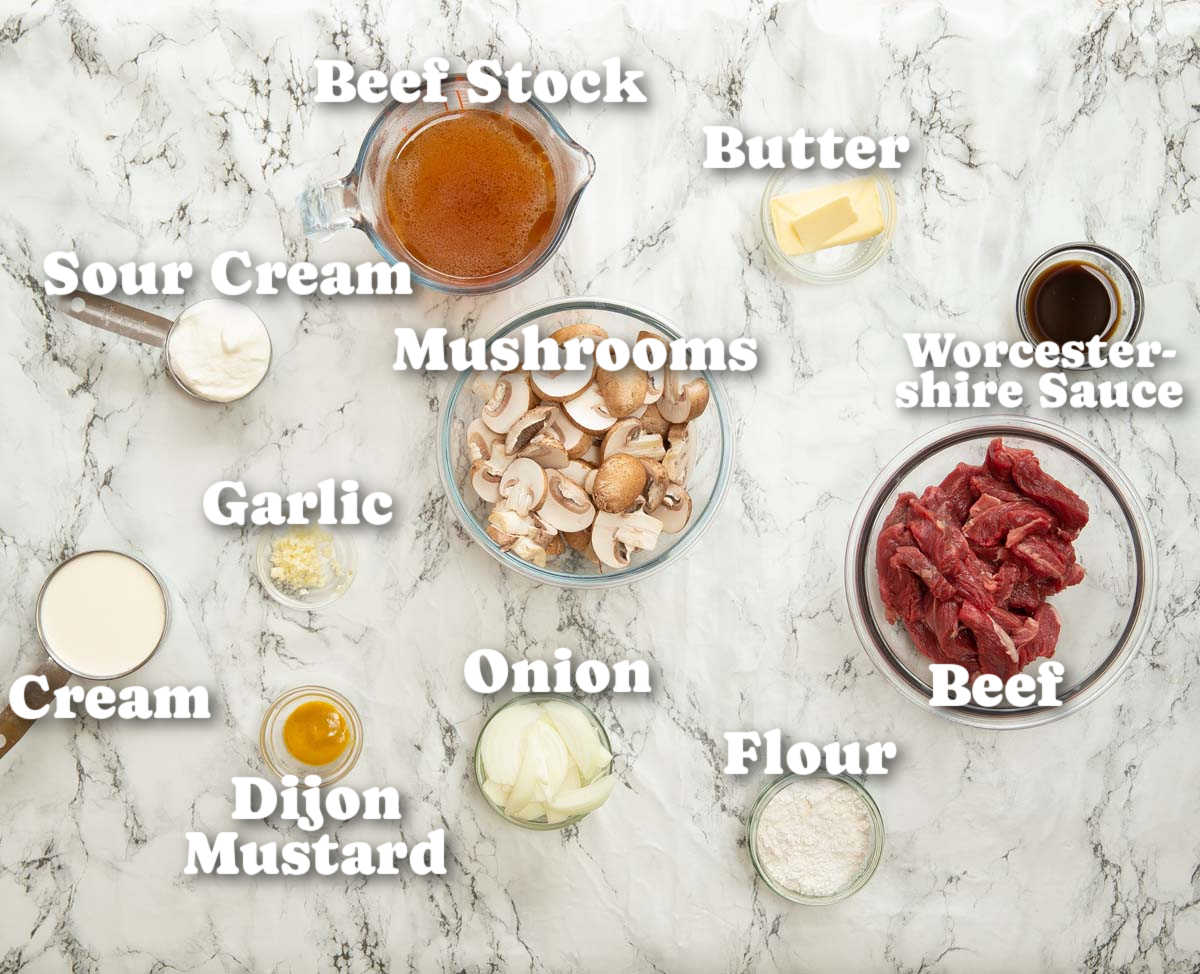
Beef Stroganoff Ingredients

There are a few variations of this dish, but the bulk of the ingredients are fairly universal. It’s more about the technique and the quantities of each ingredient. Let’s take a look at why we’re using each ingredient:

  • Beef – you don’t have to use an expensive cut. I typically use rump or sirloin because they’re both cheap. Ribeye also works nicely.
  • Mushrooms & Onion – these both bulk out the dish and add flavour.
  • Garlic – pairs nicely with the beef and the creamy sauce.
  • Butter – for frying the onion/mushrooms.
  • Flour – to create a roux to thicken the sauce.
  • Stock – this makes the bulk of the sauce.
  • Cream – double/heavy cream helps create a gorgeous, rich and creamy sauce.
  • Sour Cream – this is a classic addition in Stroganoff and helps balance the richer flavours.
  • Worcestershire Sauce – deepens the beefy flavour.
  • Dijon Mustard – adds a gentle warmth which helps balance the flavours of the sauce.
overhead shot of beef stroganoff ingredients with text labels

How to Prepare Beef Stroganoff

Prepping the beef is really simple. There are just a few tips to consider to bring out the best in the beef.

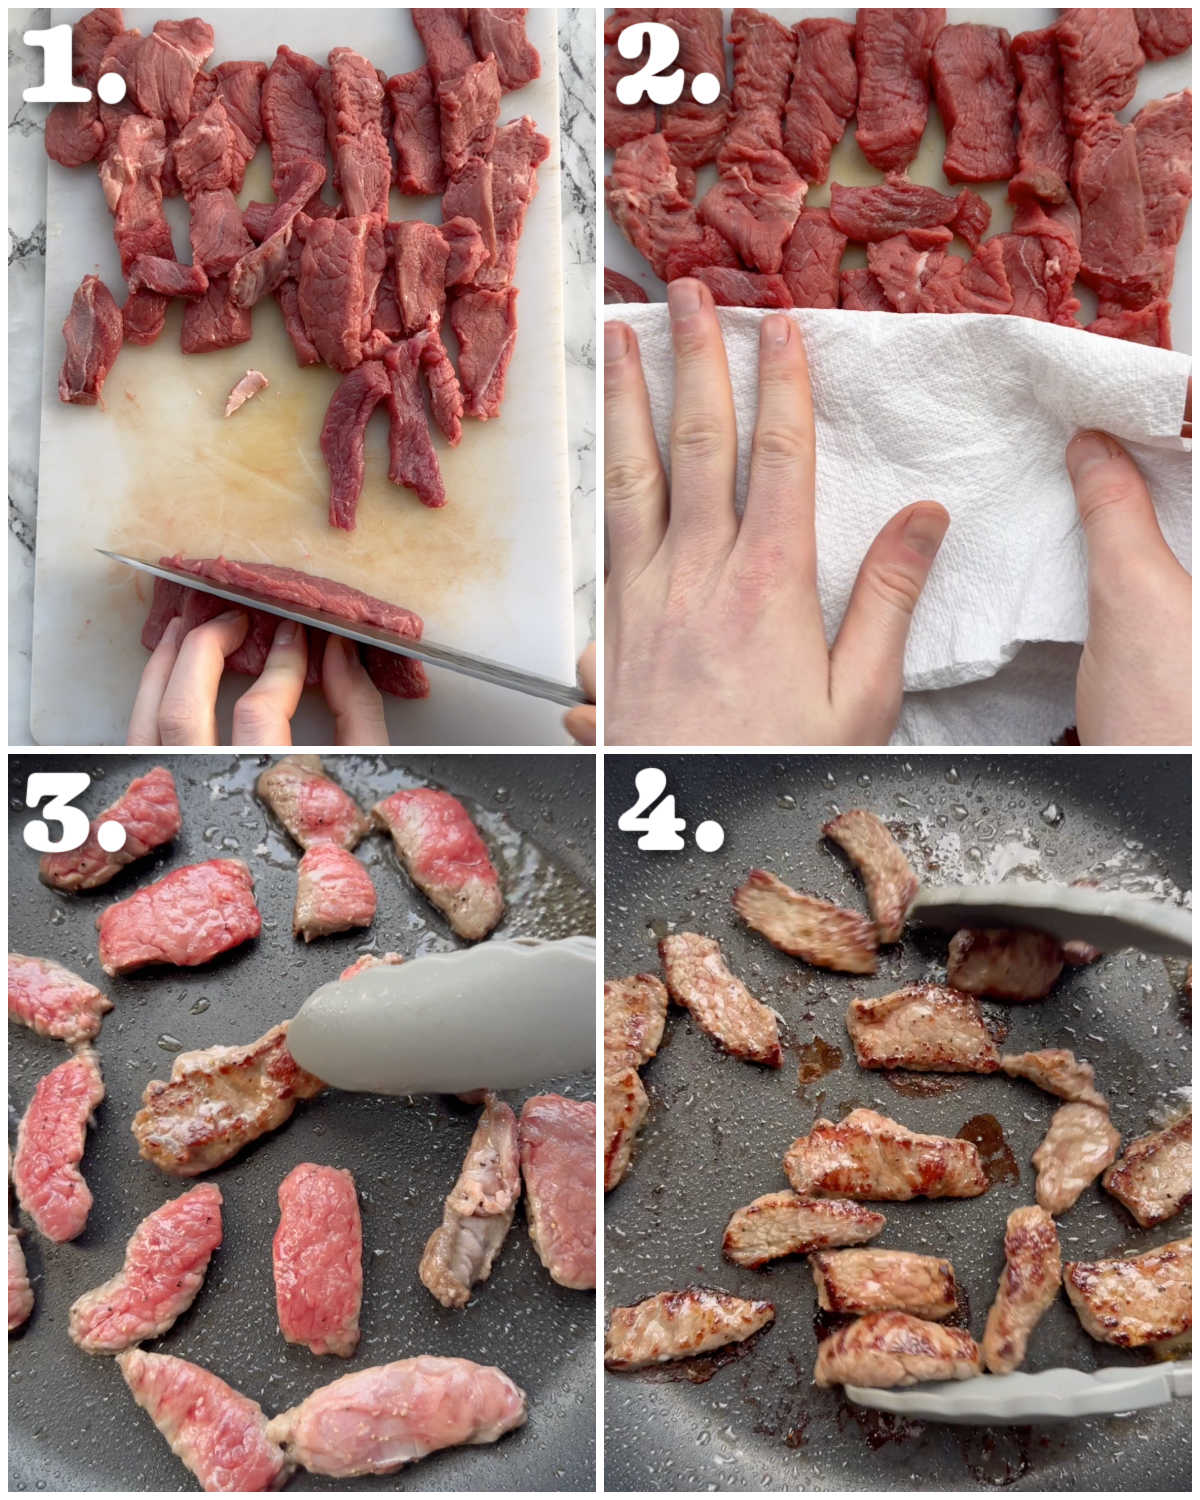
Tips for preparing the beef

  • Remove fat – because the beef is sliced so thinly and fries so quickly, you won’t have time to render out any large bits of fat. As such, you’ll want to remove it.
  • Pat dry – patting the beef dry before you fry it is important to remove moisture, which in turn, would cause the beef to steam instead of fry. This prevents the beef from browning and developing flavour.

Tips for frying the beef

  • High heat – to get a nice crust on the beef without drying it out, you’ll want to fry over a high heat.
  • Quick – because the beef is thinly sliced, it’ll cook very quickly. Just be vigilant so it doesn’t overcook!
  • Batches – spreading the slices out in the pan is important so they all get direct contact with the pan and don’t all steam. As such, you’ll likely need to fry in two batches.

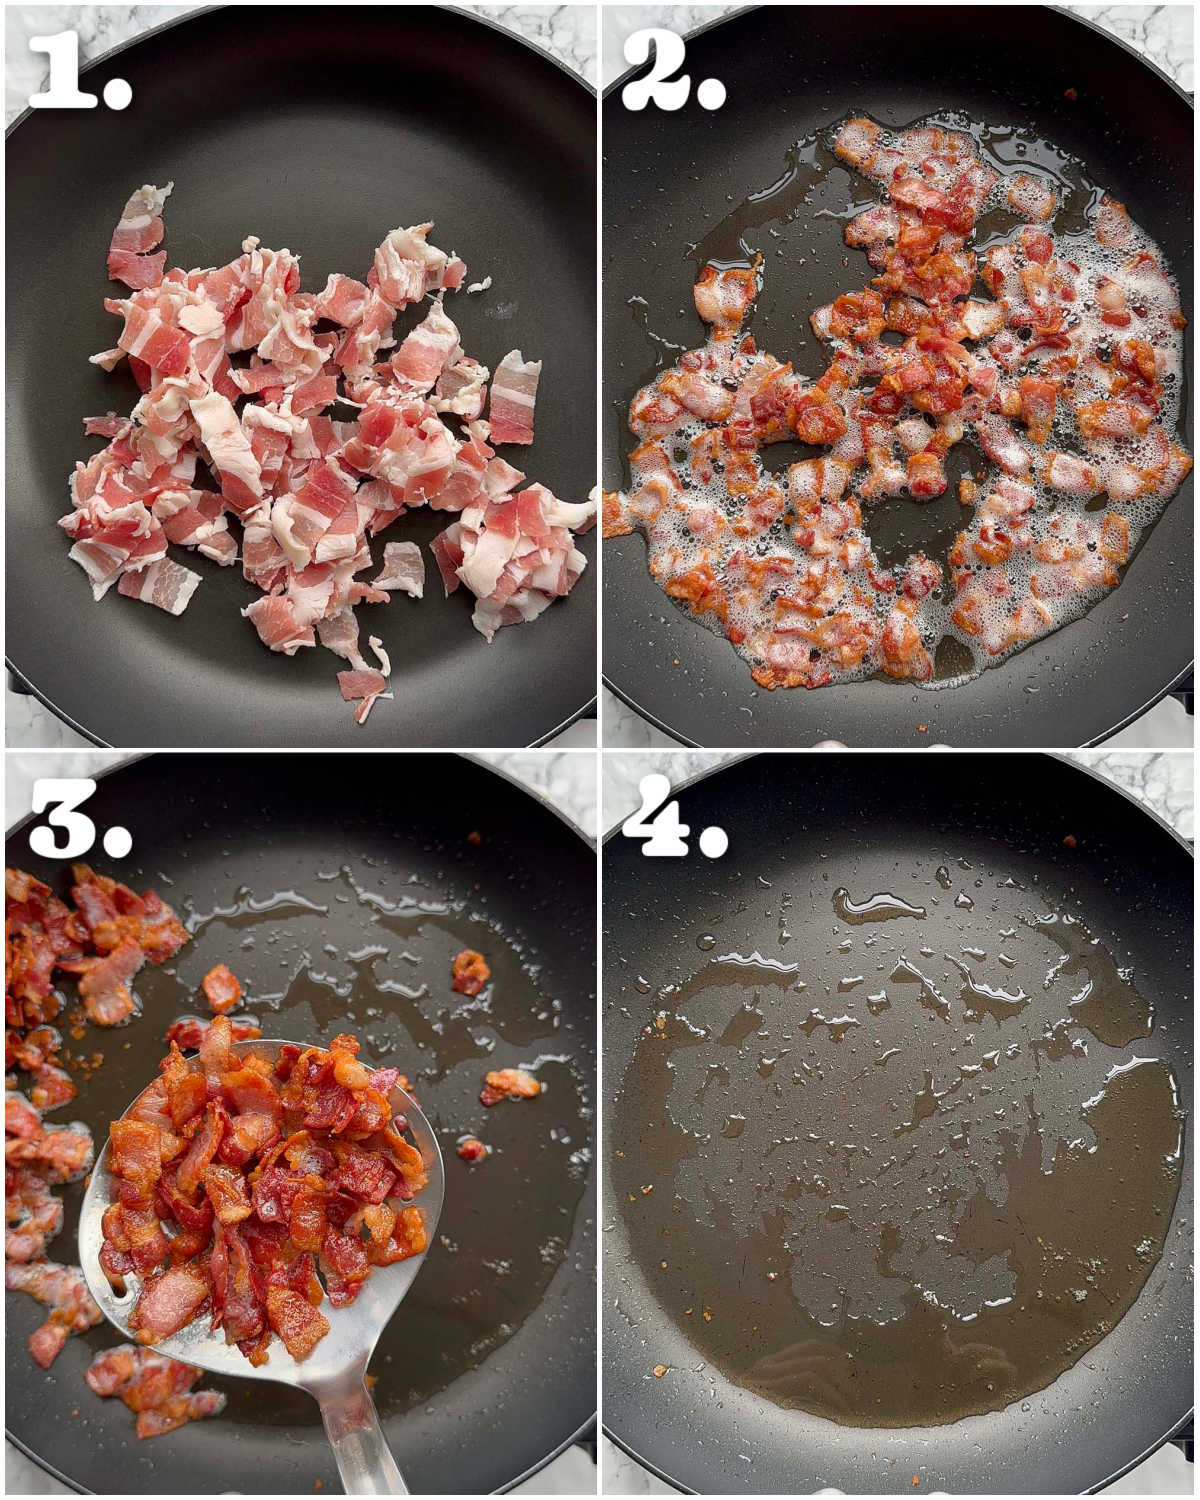
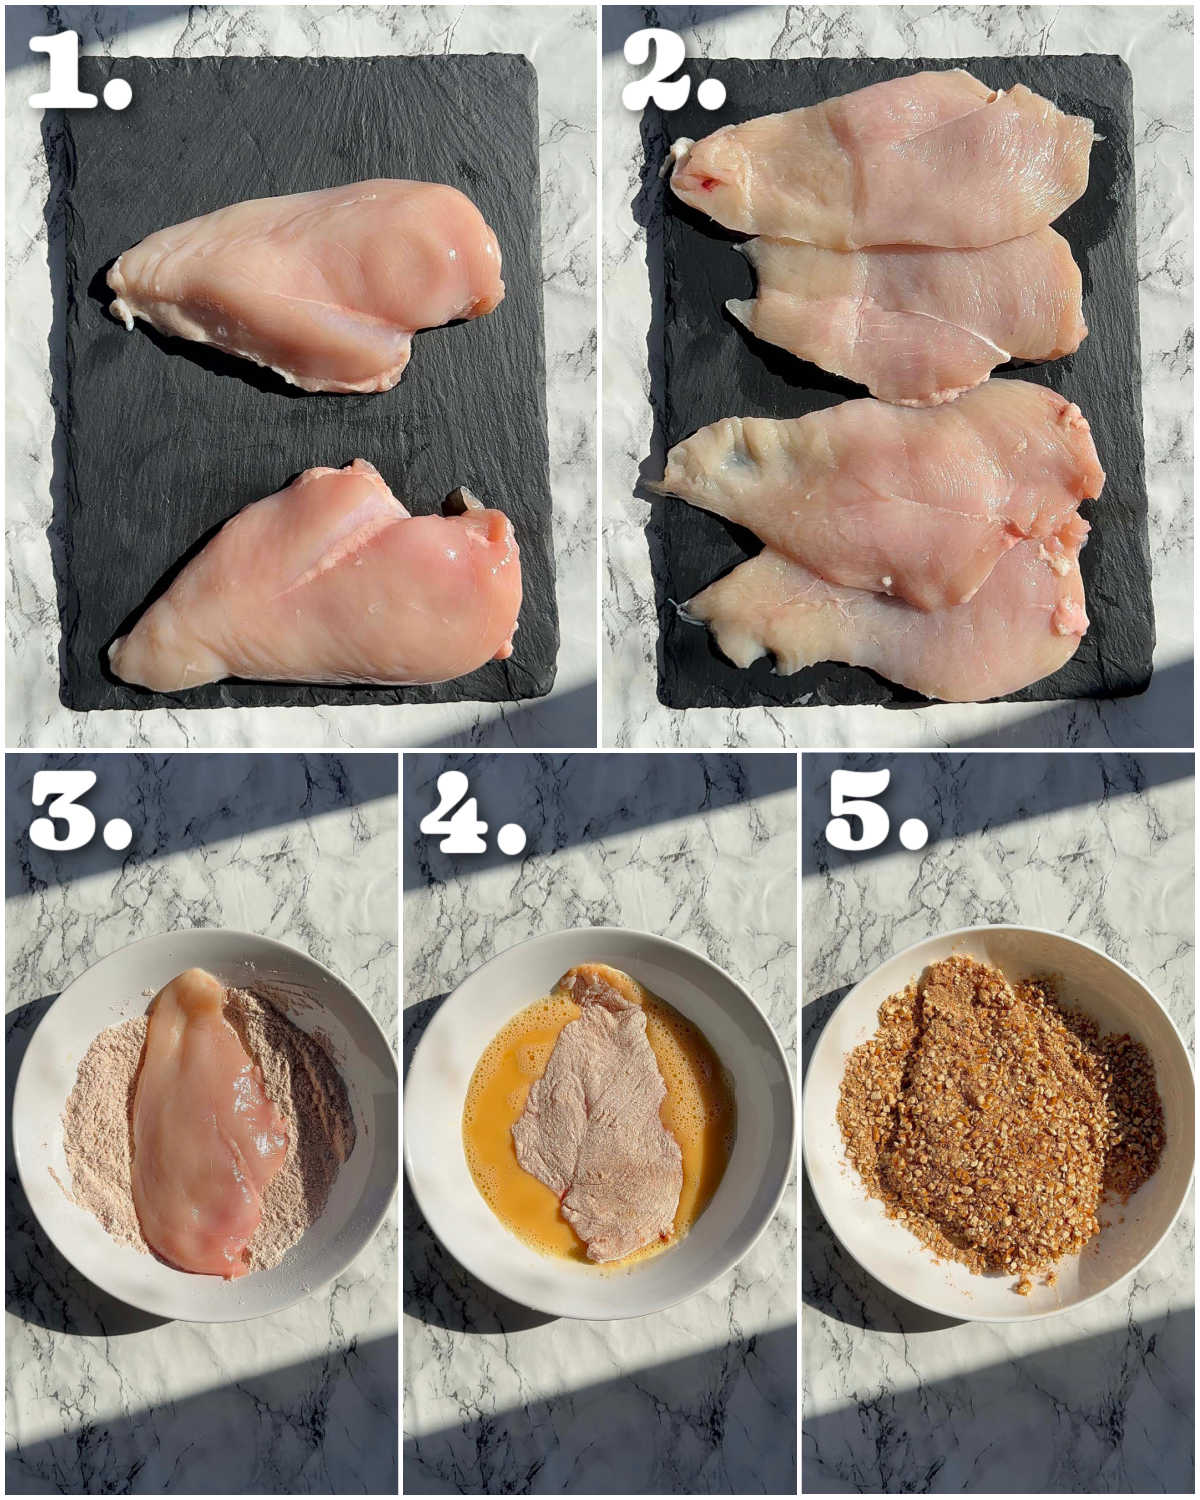
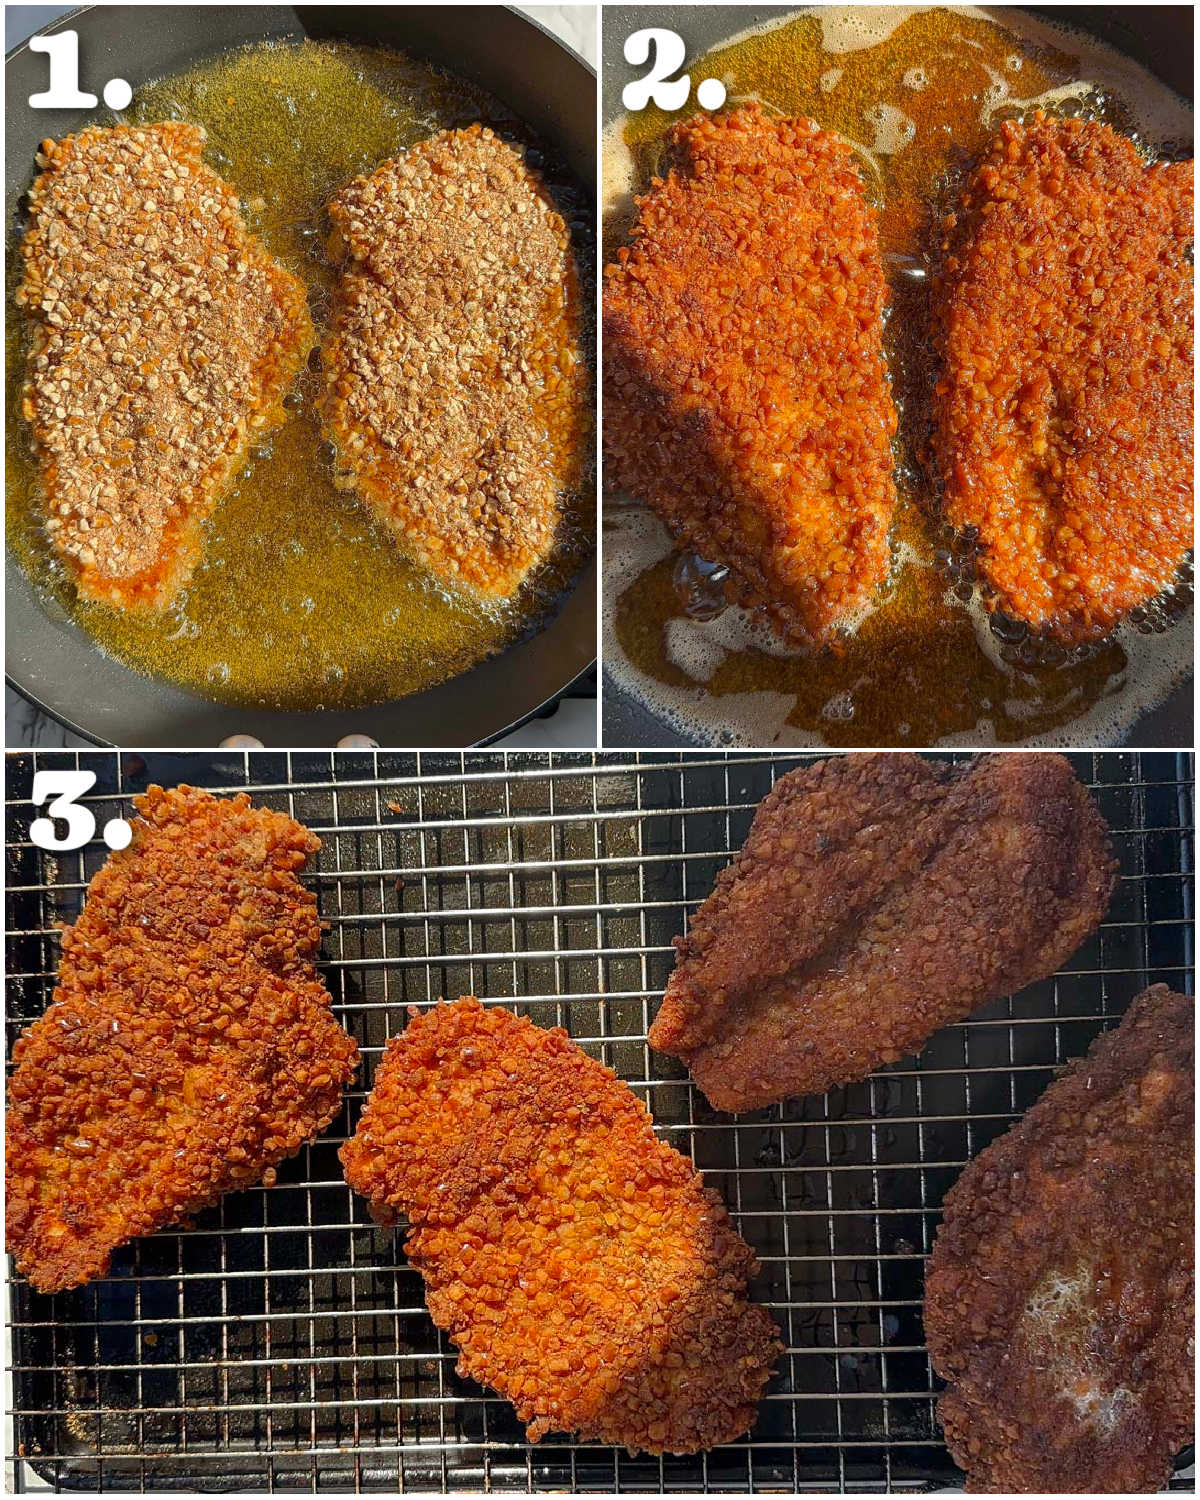
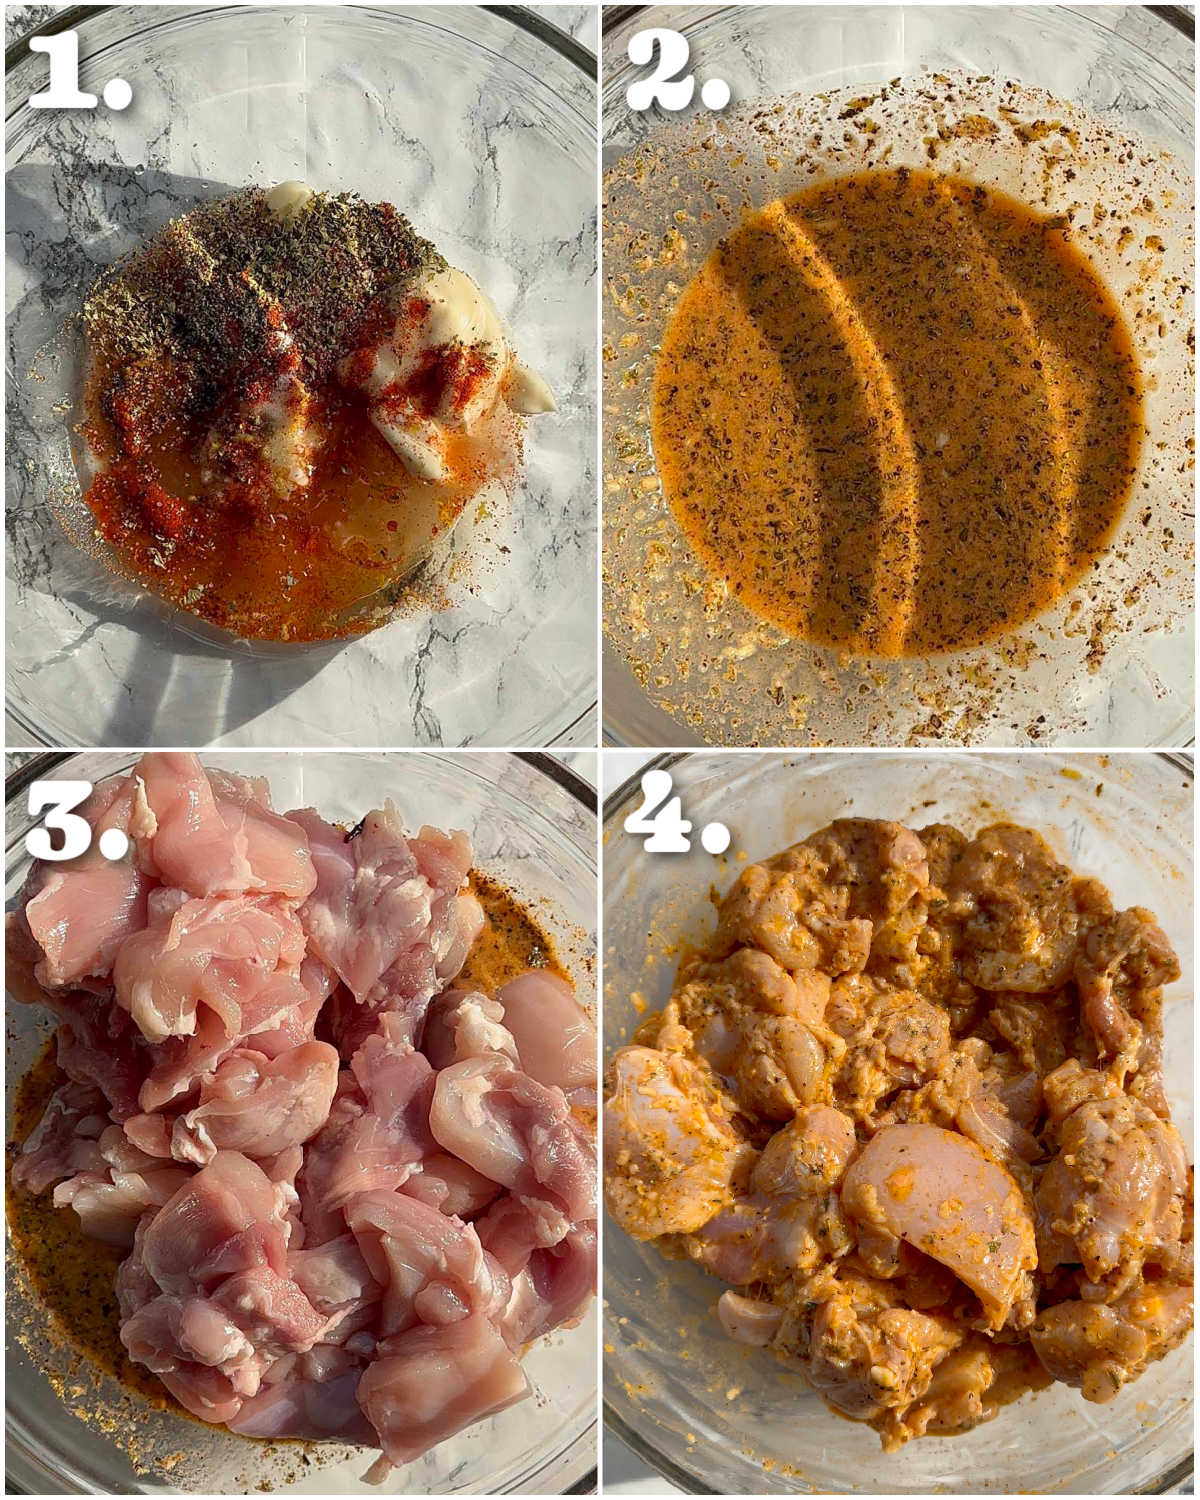
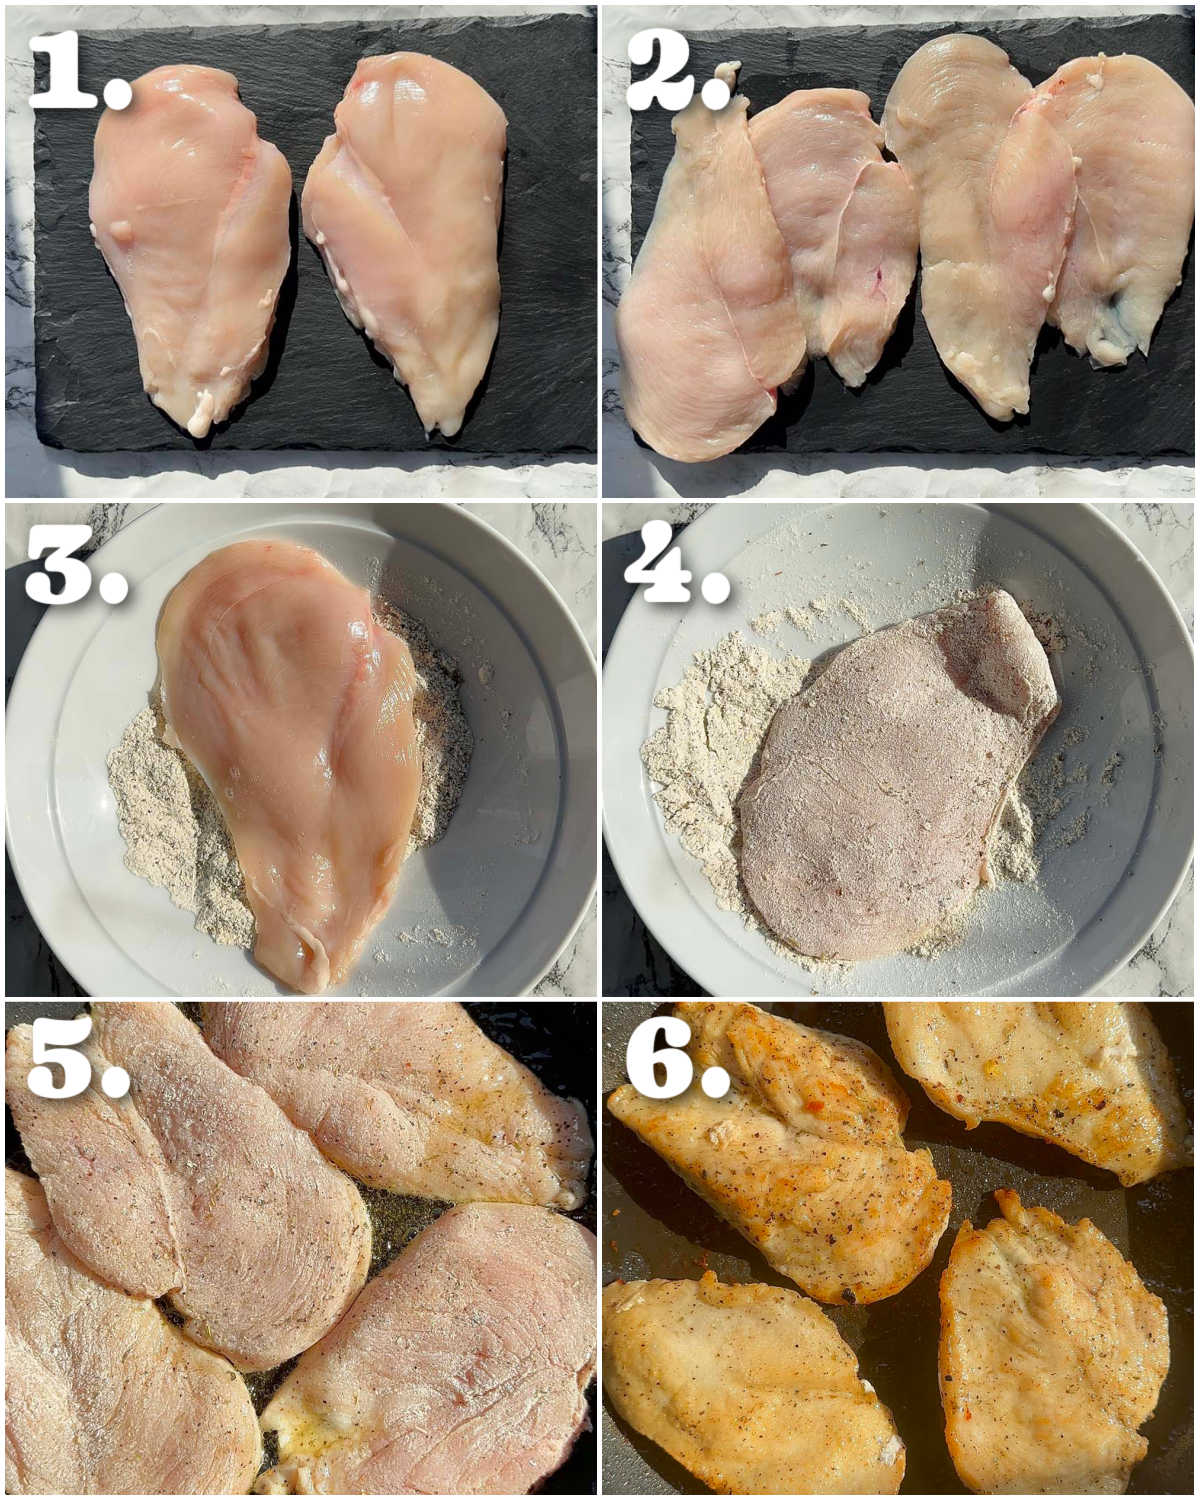
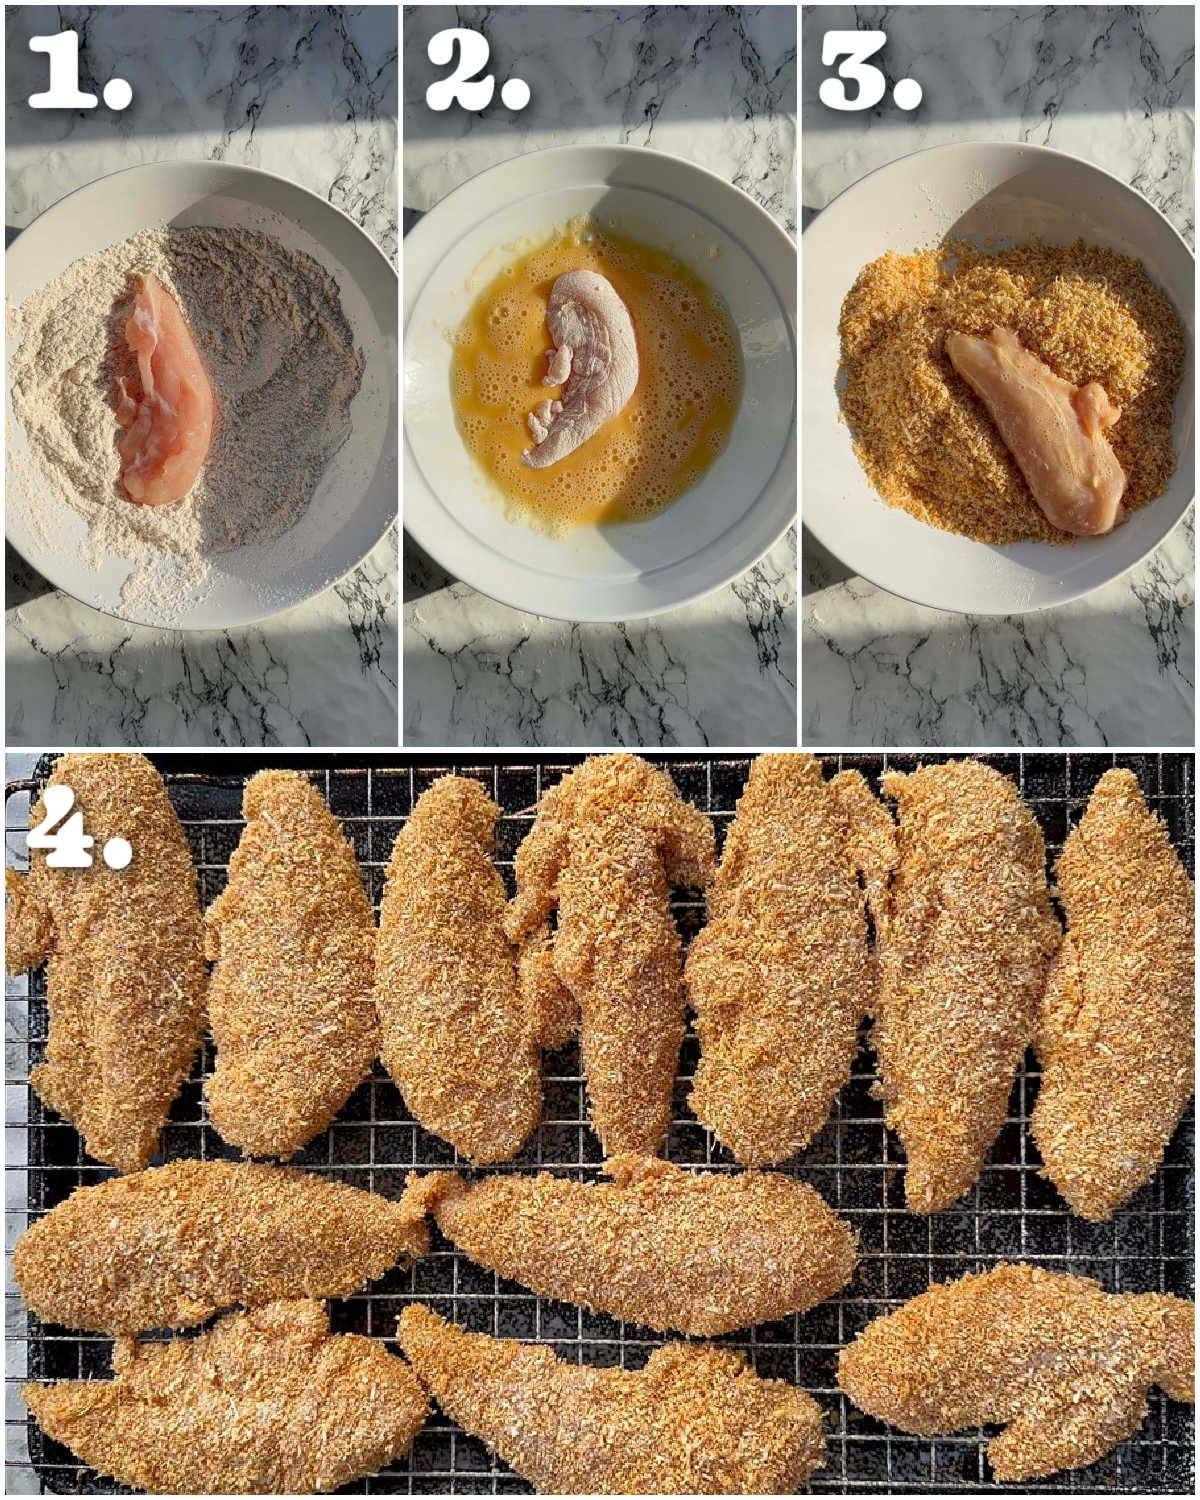
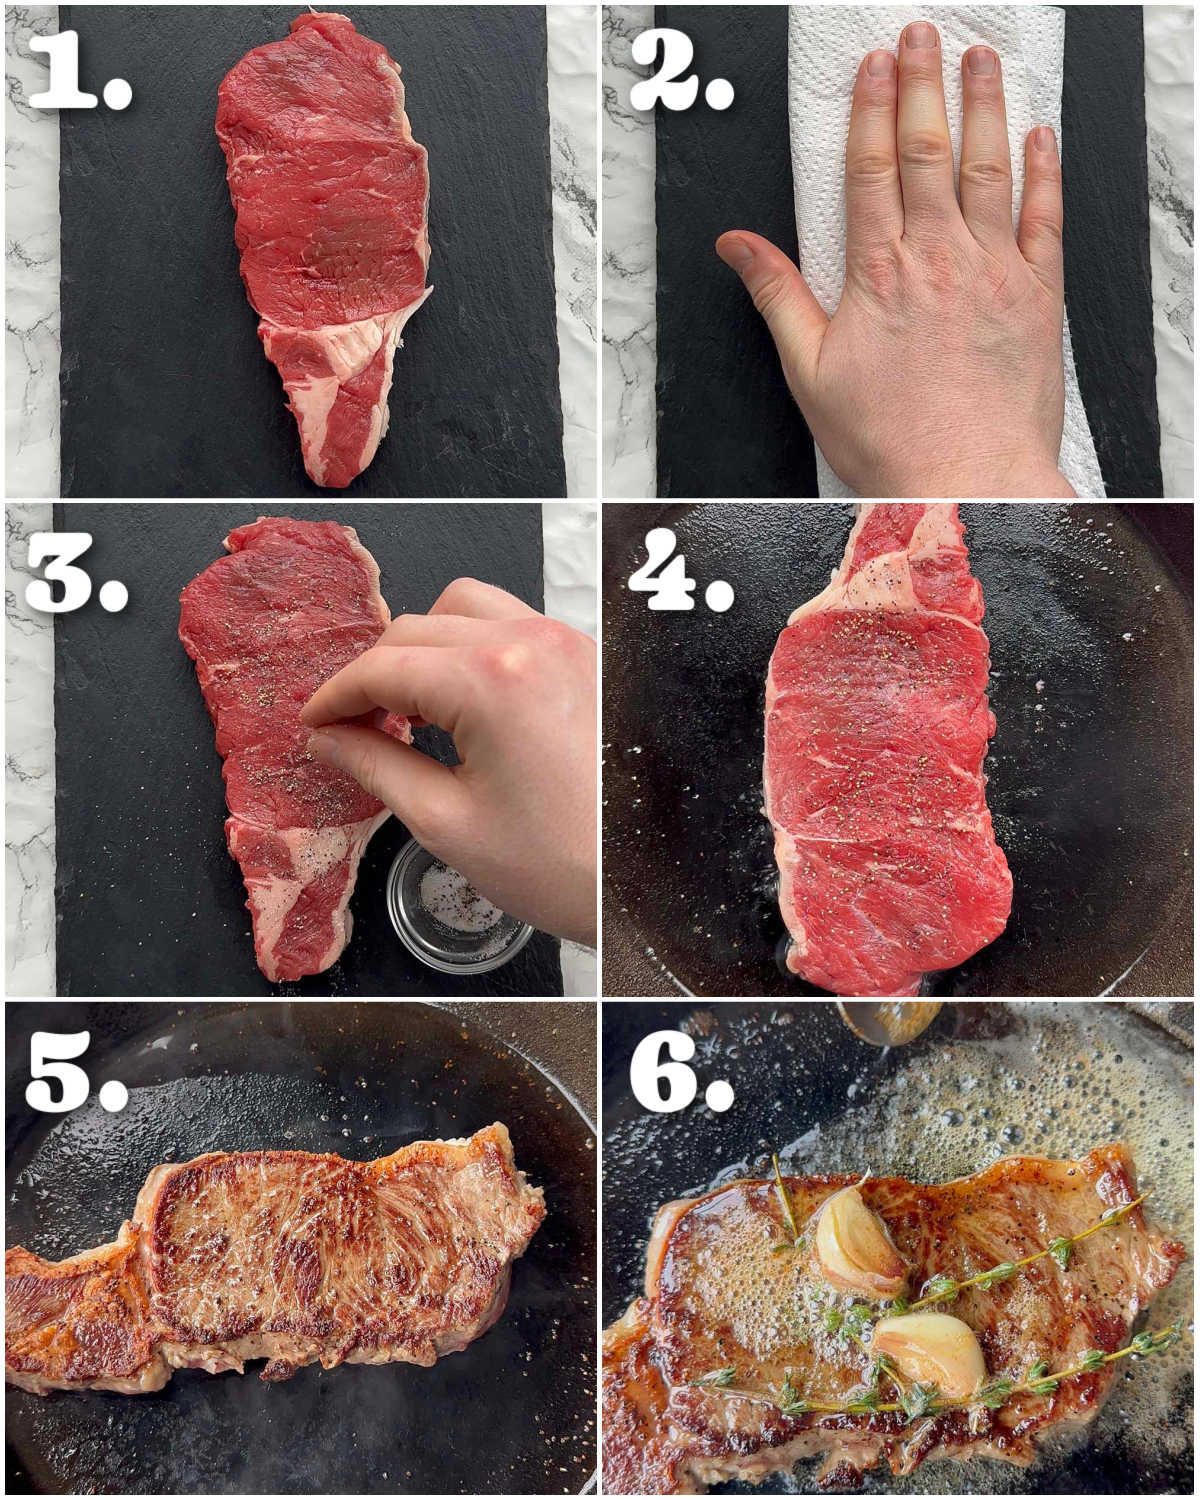
Process shots: slice beef (photo 1), pat dry then season (photo 2), fry in batches (photos 3&4).

4 step by step photos showing how to prepare beef stroganoff

Beef Stroganoff Sauce

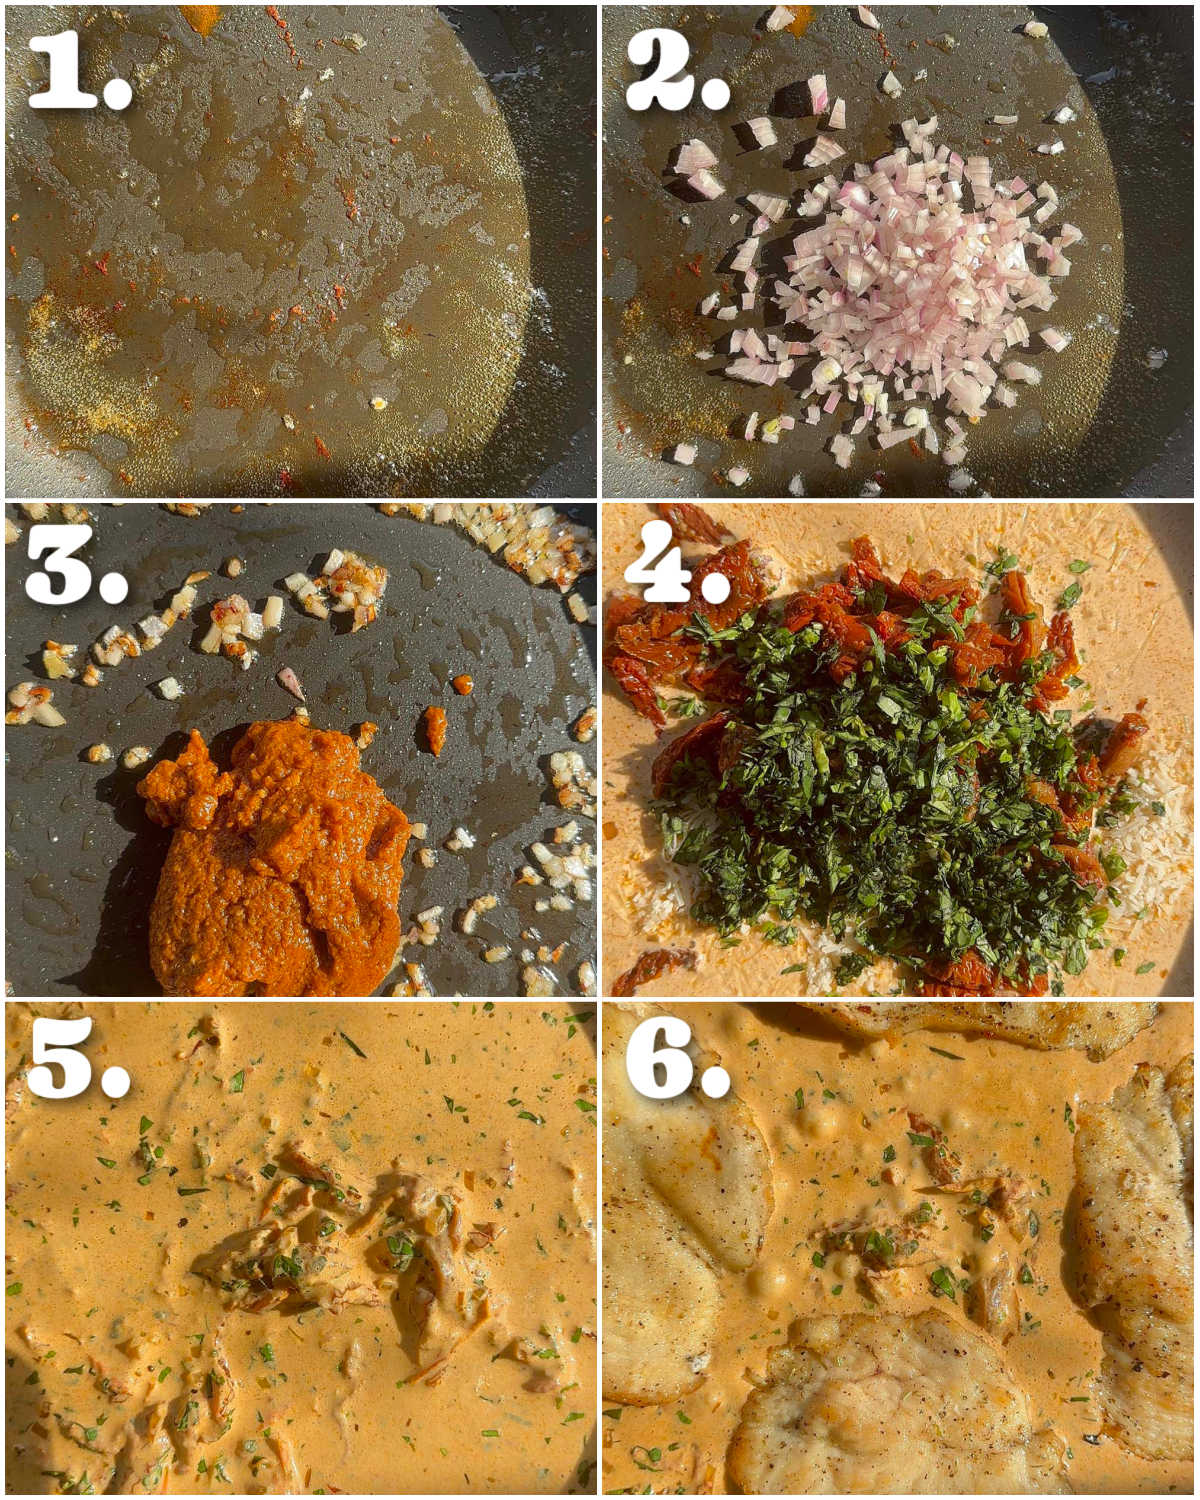
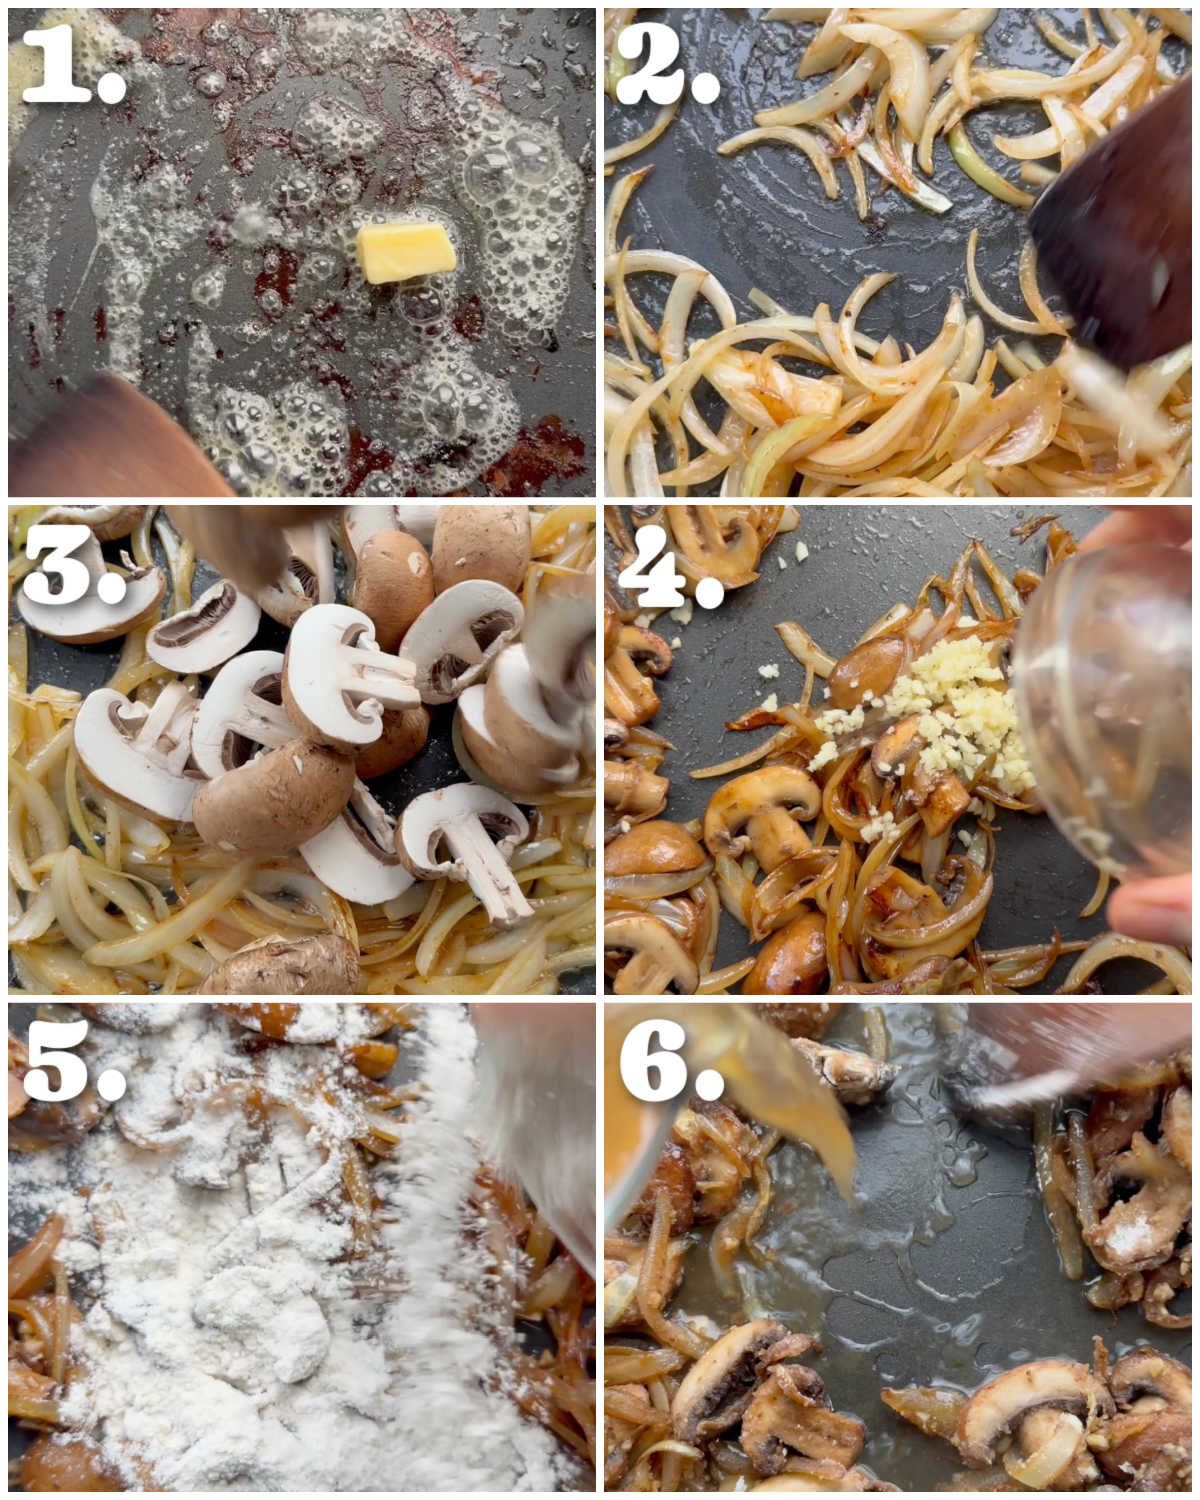
The sauce starts where the beef ends – all that fond in the pan that’s left from frying the beef? That’s bonus flavour just waiting to be used! When you fry the onions, the moisture they release will help lift up all the flavour.

Just like the beef, it’s important to get a nice brown crust on the mushrooms too, just to maximise their flavour. Try and make sure each slice gets direct contact with the pan to encourage some caramelisation.

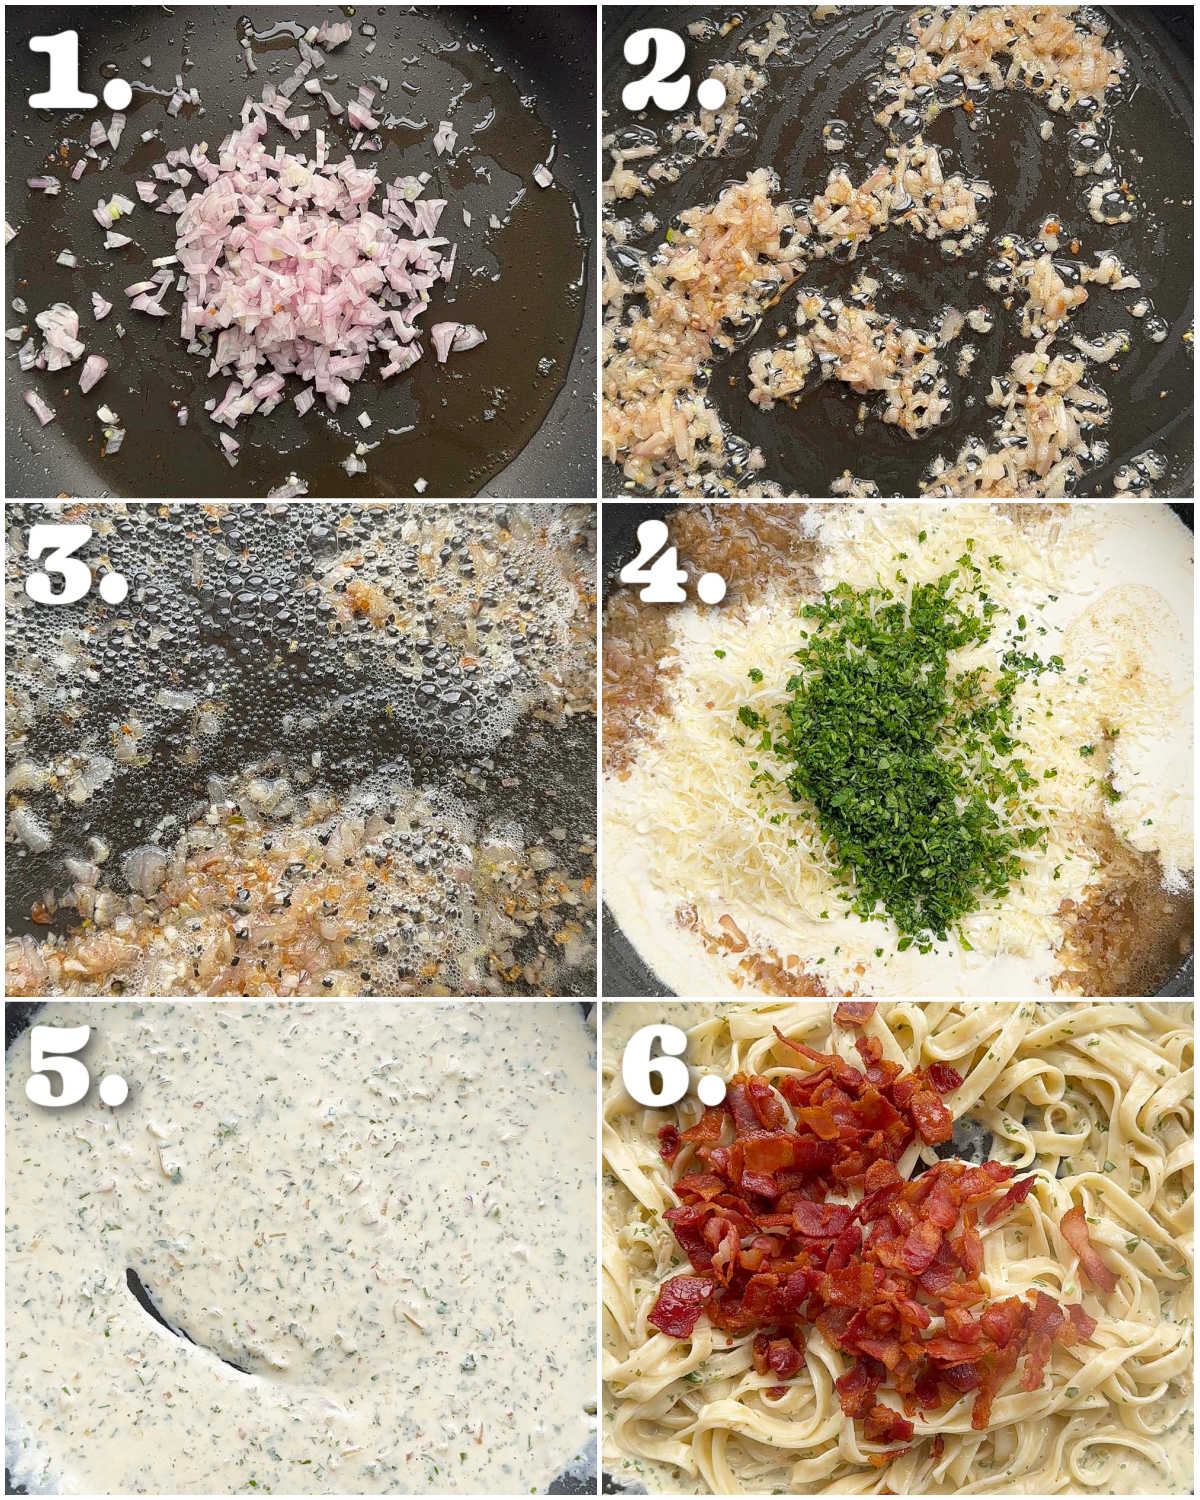
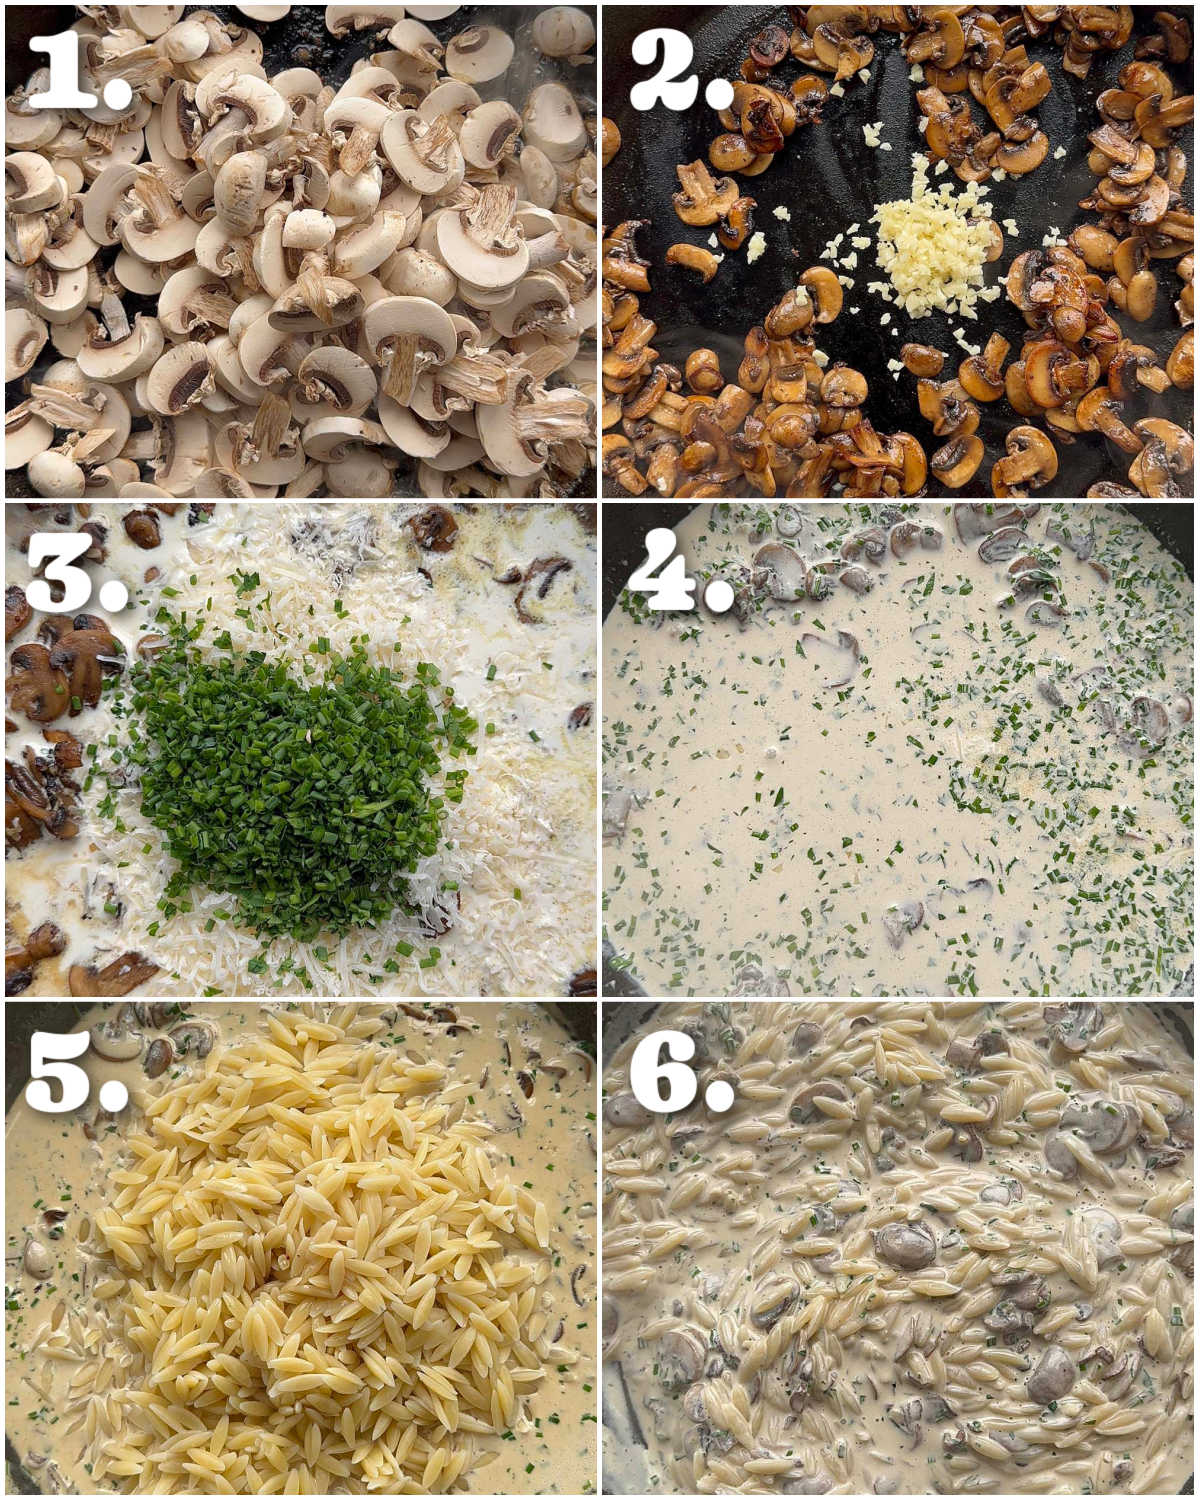
Process shots: melt butter (photo 1), fry onion (photo 2), fry mushrooms (photo 3), fry garlic (photo 4), stir in flour (photo 5), add stock (photo 6).

6 step by step photos showing how to make beef stroganoff

Two things to note as you create the sauce:

  • Whisk – as you pour in the stock, just make sure you give it a good whisk to ensure no lumps form.
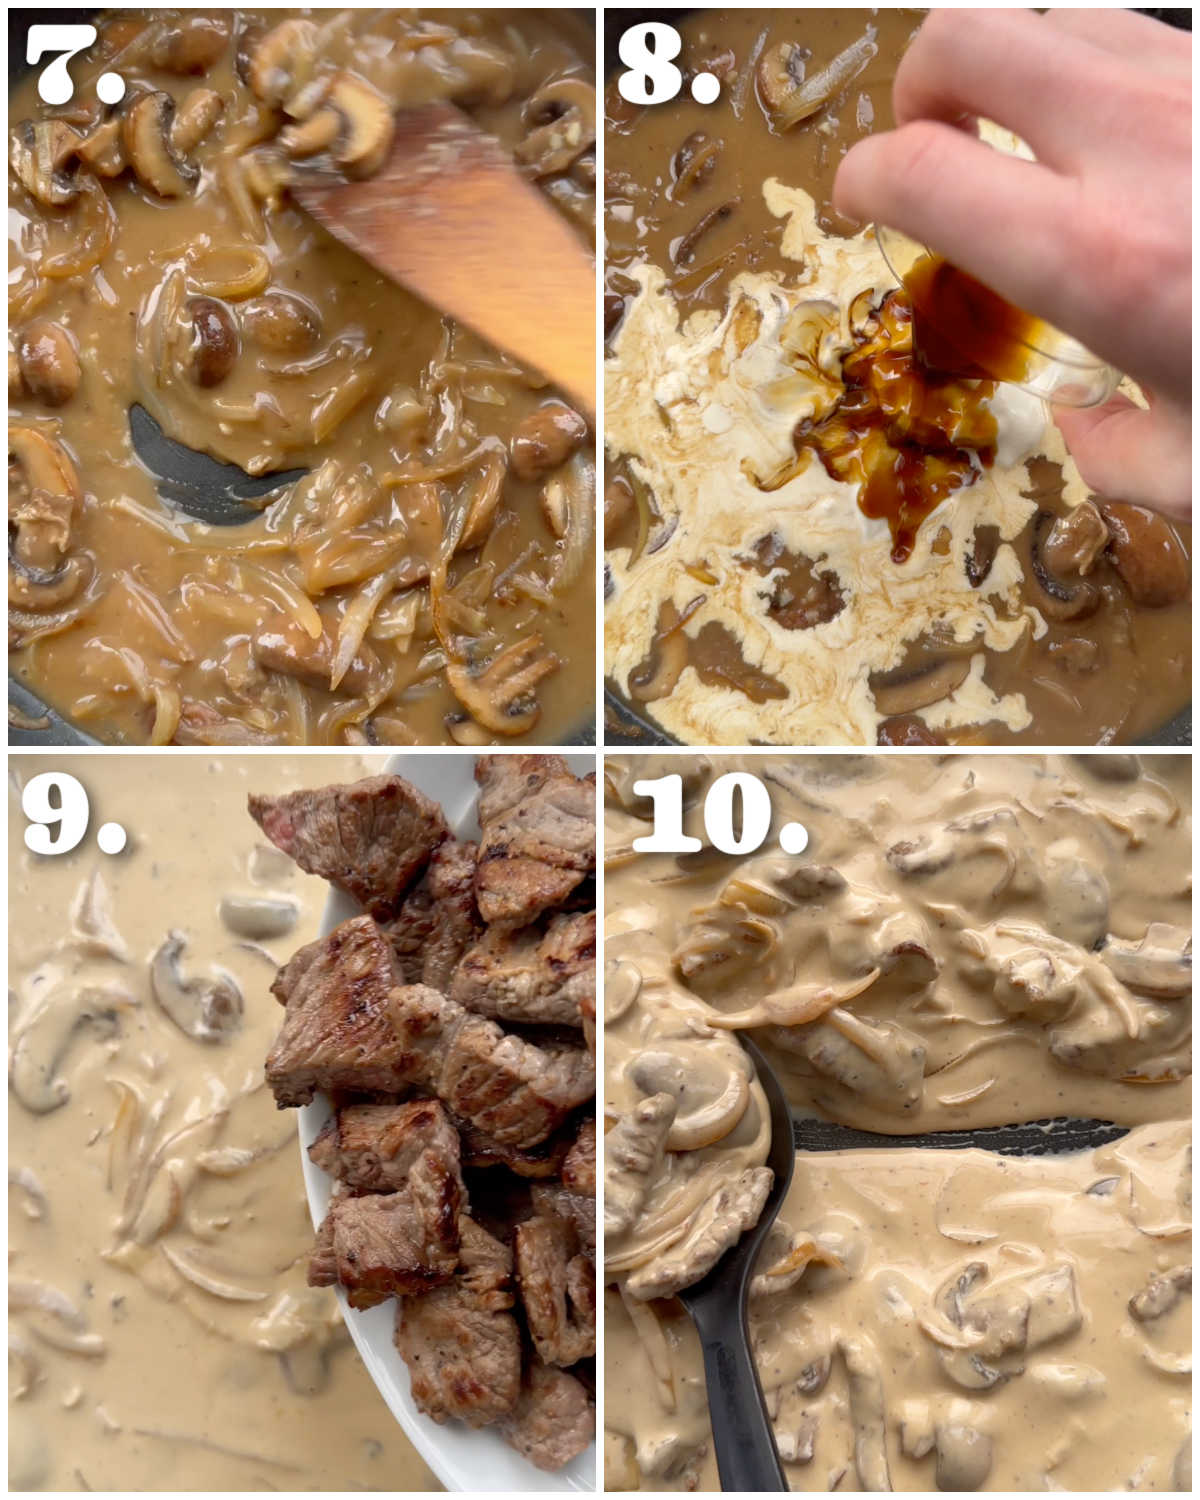
  • Room temp – keeping the sour cream at room temp before you add it is really important. Otherwise, you risk it curdling.

You’ll want the sauce at your desired consistency before you add the beef back in. The beef is cooked, so you don’t want to simmer it any longer than you need to, otherwise it’ll overcook and go chewy.

Recipe Tip

Making sure you’re using fall-fat sour cream and double/heavy cream is important to ensure you end up with a nice, rich sauce. Using low-fat sour cream can also increase its chance of curdling too.

Process shots: whisk stock (photo 7), add sour cream, double cream, Worcestershire sauce and Dijon (photo 8), stir and simmer (photo 9), stir in beef (photo 10).

4 step by step photos showing how to make beef stroganoff

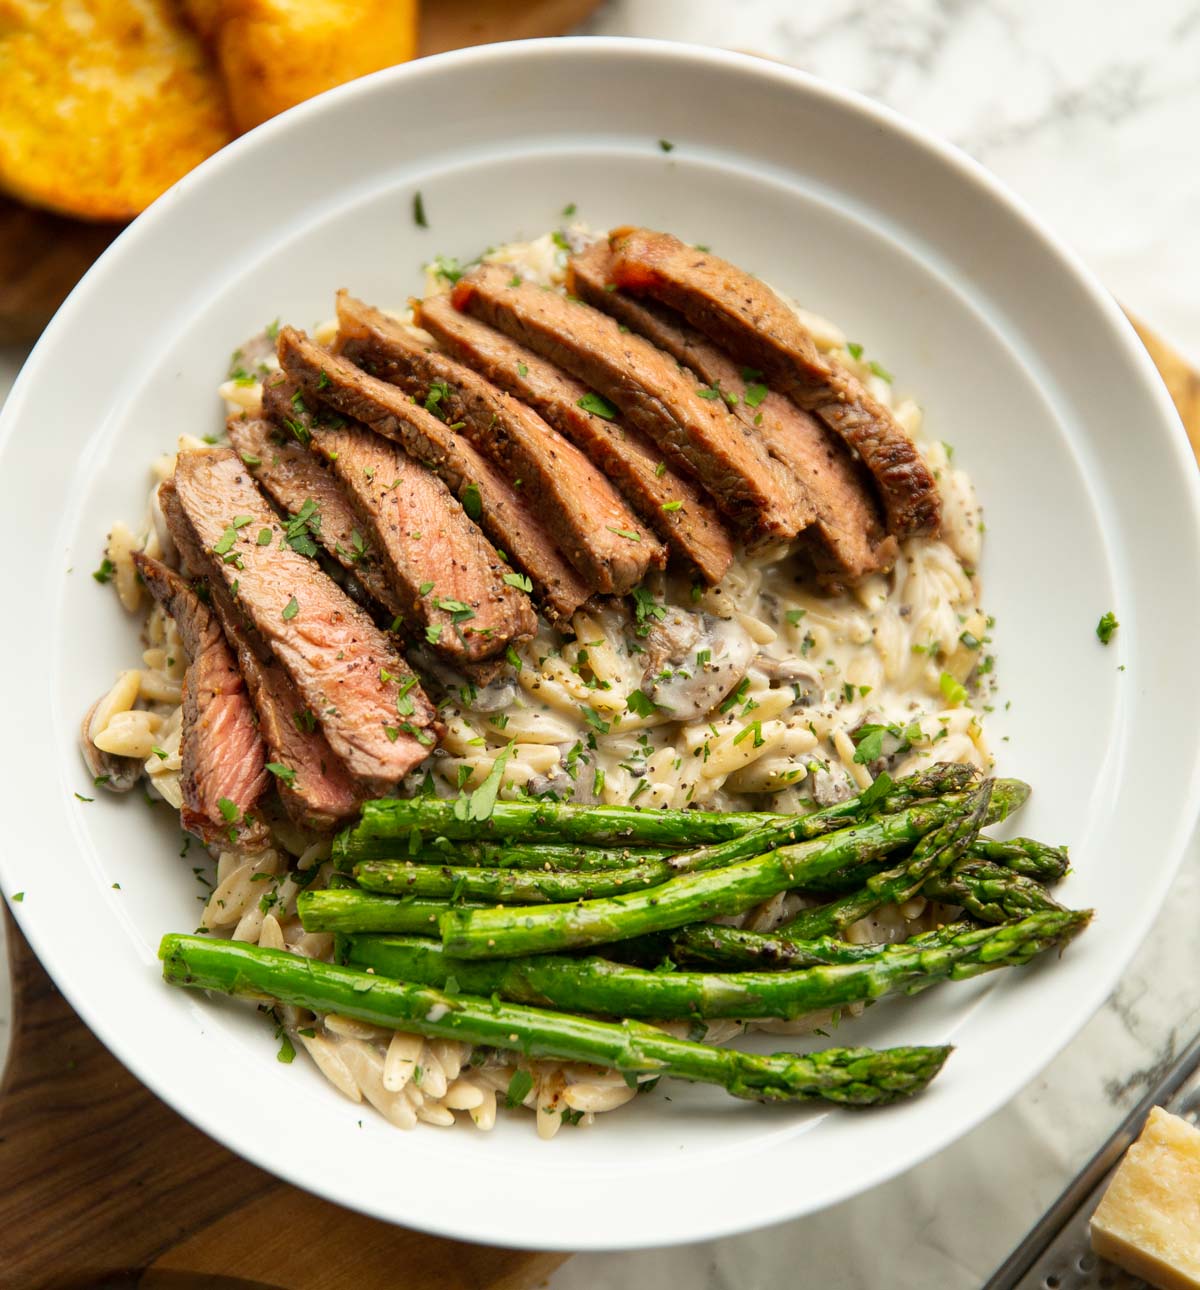
How to Serve Beef Stroganoff

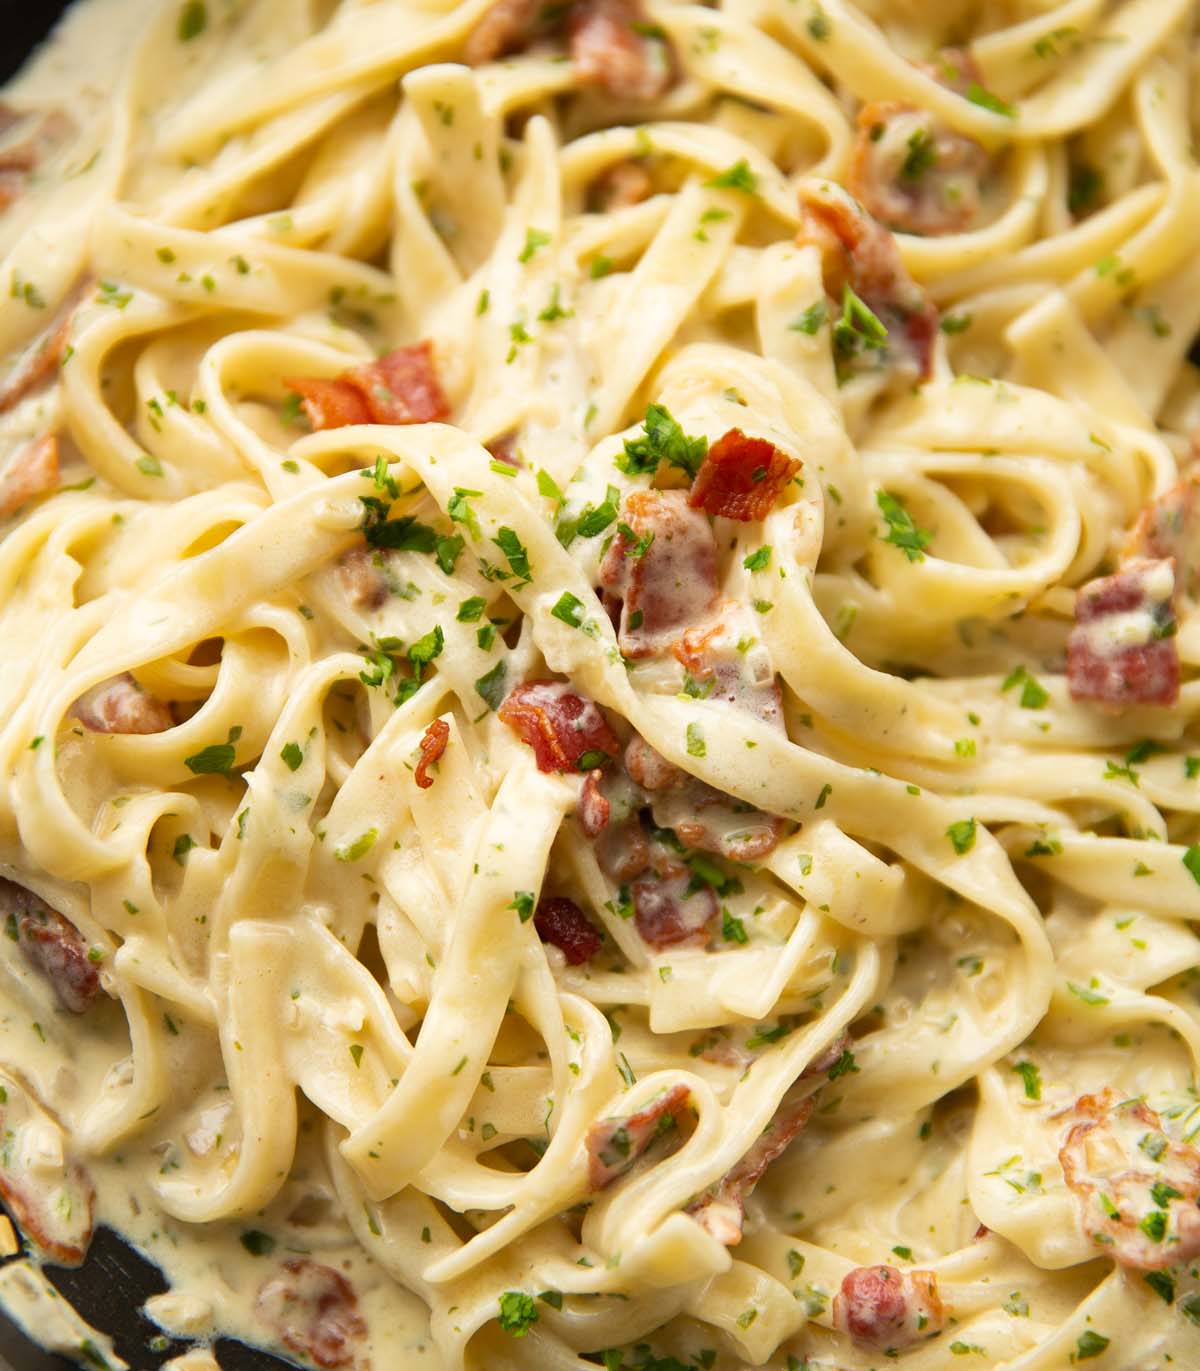
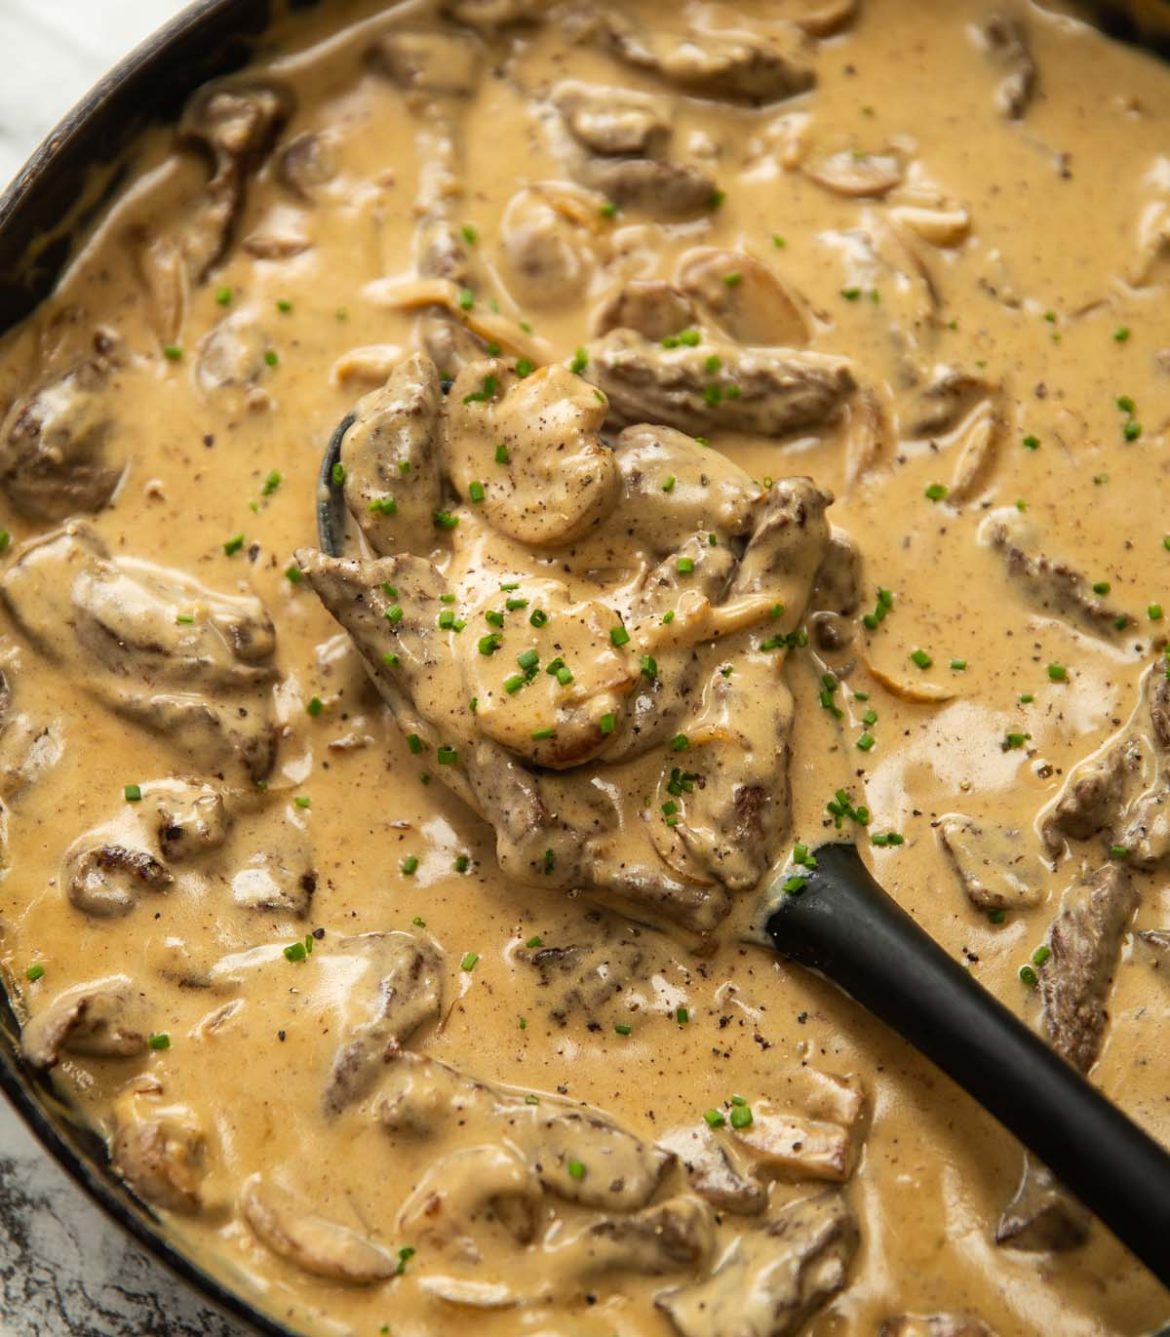
Once everything is combined, you’ll want to serve right away. The longer it sits, the thicker the sauce will get (plus you risk overcooking the beef). From there, I love adding some fresh chives for a final pop of colour and flavour.

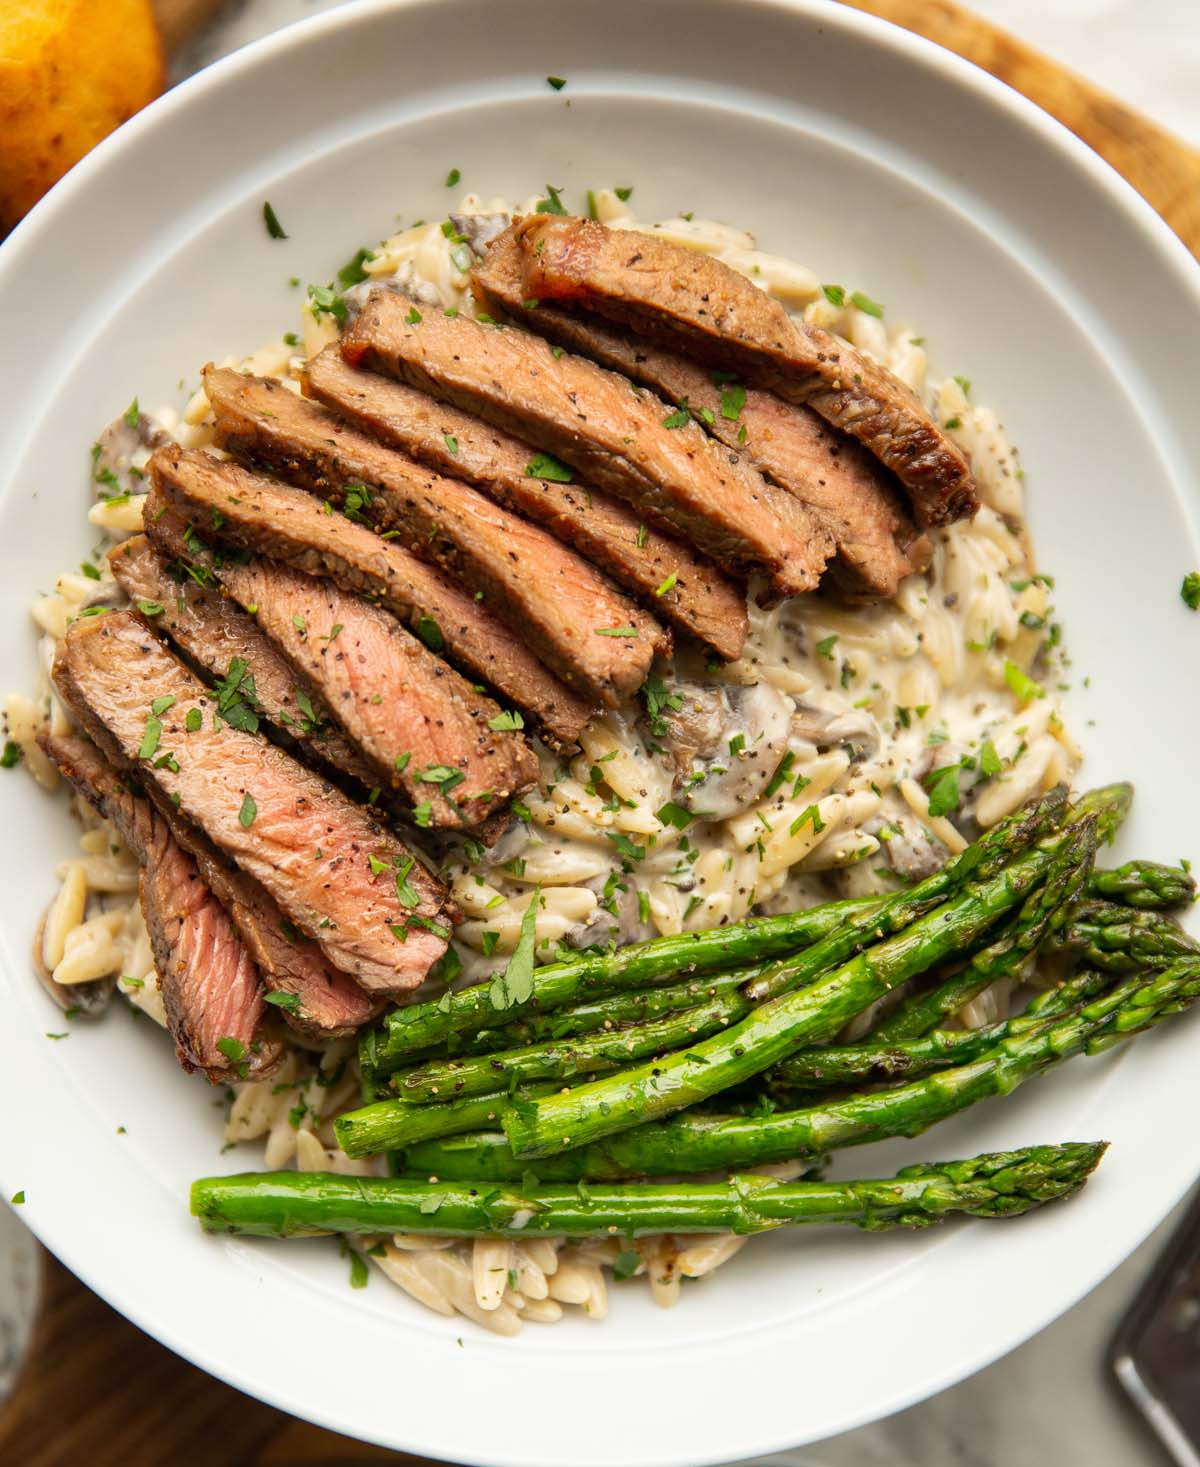
To serve, I typically go down 1 of 3 routes:

  • Mash – whip up some Mashed Potatoes and pour it over (my favourite option).
  • Bread – simply serve with some buttered crusty bread.
  • Rice or Pasta – serve it poured over some cooked rice or pasta.

Alrighty, let’s tuck into the full recipe for this beef stroganoff shall we?!

beef stroganoff served in white bowl with mashed potato

How to make Beef Stroganoff (Full Recipe & Video)

beef stroganoff served in white bowl with mashed potato

Print

Beef Stroganoff

#wprm-recipe-user-rating-1 .wprm-rating-star.wprm-rating-star-full svg * { fill: #343434; }#wprm-recipe-user-rating-1 .wprm-rating-star.wprm-rating-star-33 svg * { fill: url(#wprm-recipe-user-rating-1-33); }#wprm-recipe-user-rating-1 .wprm-rating-star.wprm-rating-star-50 svg * { fill: url(#wprm-recipe-user-rating-1-50); }#wprm-recipe-user-rating-1 .wprm-rating-star.wprm-rating-star-66 svg * { fill: url(#wprm-recipe-user-rating-1-66); }linearGradient#wprm-recipe-user-rating-1-33 stop { stop-color: #343434; }linearGradient#wprm-recipe-user-rating-1-50 stop { stop-color: #343434; }linearGradient#wprm-recipe-user-rating-1-66 stop { stop-color: #343434; }

Here I'll show you the easiest and most delicious way to make a classic Beef Stroganoff!
Course Dinner, Main Course
Cuisine Russian
Prep Time 15 minutes
Cook Time 20 minutes
Total Time 35 minutes
Servings 4
Calories 434kcal
Cost £4 / $5

Equipment

  • Sharp Knife & Chopping Board
  • Kitchen Roll/Paper Towels (to pat beef dry)
  • Large Pan & Wooden Spoon
  • Jug (for stock)

Ingredients

  • 500g / 1lb Steak, preferably close to room temp (see notes)
  • 2 tbsp Unsalted Butter
  • 1 medium White Onion, thinly sliced
  • 250g / 9oz Chestnut Mushrooms, sliced (not too thin)
  • 2 cloves of Garlic, finely diced
  • 2 tbsp Plain Flour
  • 360ml / 1 1/2 cups Beef Stock
  • 120ml / 1/2 cup Double/Heavy Cream, at room temp
  • 60ml / 1/4 cup Sour Cream, at room temp (see notes)
  • 1 tbsp Worcestershire Sauce
  • 1 tsp Dijon Mustard
  • Veg Oil, as needed
  • Salt & Black Pepper, to taste
  • finely diced Fresh Chives, to serve
  • Pasta, Rice or Mash, to serve (see notes)

Instructions

  • Slice off any large bits of fat from the beef, then thinly slice the meat, cutting any wide slices in half. Pat dry with kitchen paper, then generously season all over with salt and pepper.
  • Heat 1 tablespoon of oil in a large frying pan over a high heat. Once it’s nice and hot, add half the beef slices and quickly spread them out so each has direct contact with the pan. Leave to fry for 1 minute, then flip them over and fry for another minute. Remove and repeat with the second batch, adding a dash more oil if you need to. Don’t worry if they’re still a touch pink at this point. Remove the beef from the pan and set aside.
  • Lower the heat slightly to medium-high and melt in the butter. Add the onion and fry for 2 minutes until it just about starts to soften. Add the mushrooms and fry for around 5 more minutes until lightly browned and most of the moisture in the pan has evaporated. The mushrooms will immediately soak up any liquid, then they’ll begin to release it. Add the garlic and fry for another 30 seconds.
  • Stir in the flour, then gradually add the beef stock, stirring as you go to prevent lumps from forming. Stir in the cream, sour cream, Worcestershire sauce and mustard. Bring to a simmer and allow to gently bubble away until the sauce begins to thicken, around 5 minutes.
  • Stir in the beef alongside the resting juices and simmer for 1 minute, then remove the pan from heat and check for seasoning. You only need to simmer long enough to re-thicken the sauce and warm the beef through.
  • Serve with your carb of choice with a sprinkling of fresh chives.

Video

Notes

a) Steak – I typically use Rump, Sirloin or Ribeye. Doesn’t have to be an expensive cut! 

b) Sour Cream – it’s important to get the sour cream out of the fridge right at the start, as stirring through fridge-cold sour cream can sometimes cause it to curdle. It’ll likely split a little once added at first, but it will then come back together as you stir it.

c) Consistency – make sure the sauce is close to your preference before re-adding the beef. You don’t want to continue simmering the beef for too long as it can overcook.

d) Serving – I usually serve with Mashed Potato, but any carb should do the trick. If you’re doing rice or pasta, I generally do 75g/2.6oz per person. There should be plenty of sauce.

e) Cookbook– this recipe is featured in my debut cookbook ‘Comfy’.

f) Calories – whole recipe divided by 4 with no sides.

Nutrition

Calories: 434kcal | Carbohydrates: 11.89g | Protein: 42.58g | Fat: 24.94g | Saturated Fat: 15g | Polyunsaturated Fat: 1.146g | Monounsaturated Fat: 6.87g | Trans Fat: 0.458g | Cholesterol: 152mg | Sodium: 753mg | Potassium: 1013mg | Fiber: 1.3g | Sugar: 5.18g | Vitamin A: 630IU | Vitamin C: 4.6mg | Calcium: 67mg | Iron: 3.47mg

For more similar recipes check out these beauties:


The post The BEST Beef Stroganoff Recipe appeared first on Don't Go Bacon My Heart.

thai-cashew-chicken.jpg

Thai Cashew Chicken (so easy!)

I think you’ll be surprised at not only how delicious this Thai Cashew Chicken is, but also how easy it is to make!

This recipe was developed by my step-mum, who happens to be an incredible Thai home cook (yes, I was fed very well growing up). As such, this recipe is as authentic as it gets. Better still, it only requires simple store-bought ingredients! Follow me…

close up shot of Thai cashew chicken in wok with wooden spoon

Thai Cashew Chicken Ingredients

The ONLY tweak we made to this recipe was to switch out dried red chillies for fresh ones. This was just to keep in line for being able to buy everything at the supermarket. I find dried red chillies can sometimes be tricky to hunt down. Apart from that, these are the exact ingredients my step-mum has used for many, many years to make this incredible dish. Here’s what you’ll need:

  • Chicken – I highly recommend using chicken thigh. It’s much less prone to overcooking and drying out than breast is.
  • White Pepper – This is to season the chicken directly. It adds a lovely kick of spice.
  • Flour – This is to coat the chicken. It helps create a gorgeous, golden coating, which in turn, helps the sauce stick to the chicken.
  • Oil – Use a neutral-flavoured oil that’s suitable for frying (Vegetable, Sunflower).
  • Cashews – Make sure you’re using unsalted cashews. Keep them whole so they hold their own in the recipe.
  • Onion – This recipe uses white onions. They’re diced nice and chunky too.
  • Peppers – I use one red and one green, but realistically, you can use any colour.
  • Spring Onion – This is also kept nice and chunky. You’ll want to split the onions into ‘green soft’ end and ‘firm white’ end. This is because they cook at different rates.
  • Garlic – Lots of garlic for a good punch of flavour.
  • Soy Sauce – Some of this is used to season the chicken, the rest is added to the sauce.
  • Oyster Sauce – This is added at the end to create the sauce.
  • Sugar – This is also added at the end to help create a sweet, glossy sauce that sticks to the chicken.
  • Chillies – These are just regular red chillies you can get from the supermarket.

Recipe Tip

This recipe comes together quite quickly in the wok, so I recommend having everything ready to rock ‘n’ roll before you start cooking.

overhead shot of Thai cashew chicken ingredients with text labels

Chicken and Cashews

These are arguably the two standout ingredients, so it’s important to help them both shine. We’re actually going to fry the cashews before the chicken. This is so they can infuse the oil, which in turn, will wrap around the chicken as it fries. Here are a couple of notes on both the chicken and cashews:

  • Chicken – I highly recommend frying the chicken in two batches so it doesn’t stick together. Frying in batches will also give the chicken room to crisp up without steaming too much.
  • Cashews – These go from perfectly golden to burnt VERY quickly, so just be vigilant and keep stirring as you fry.

Process shots: coat chicken in soy sauce and white pepper (photo 1), coat in flour (photo 2), add cashews to oil (photo 3), fry then remove (photo 4), fry chicken in batches then remove (photos 5&6)

6 step by step photos showing how to make chicken and cashews

After you’ve fried the chicken and cashews, you can go ahead and remove most of the oil (just save some to fry the veg). From there, it’s just like a stir fry and comes together very quickly.

Thai Cashew Chicken Sauce

As discussed above, all you need is oyster sauce, soy sauce and sugar. These, alongside the excess oil, create a light, glossy sauce that wraps around the chicken. It’s not too much at all and really just pulls all the flavours together.

Process shots: add onion, peppers and garlic to wok (photo 7), fry (photo 8), fry chilli and firm part of spring onion (photo 9), add chicken and sauce (photo 10), add cashews and green part of spring onion (photo 11), toss (photo 12).

6 step by step photos showing how to make Thai cashew chicken

Thai Cashew Chicken FAQ

Can I use chicken breast?

As discussed, you’ll get better results with thigh, but you can substitute breast. Just be aware it’ll cook more quickly and won’t develop crust as well.

How spicy is this dish?

You get a nice kick of spice from the white pepper and chillies. If you aren’t good with spice, make sure you deseed the chillies.

Can I make it without a wok?

Yes, so long as you’ve got a large, deep pan to work with.

Thai chicken with cashews in wok with wooden spoon digging in

How to Serve Thai Cashew Chicken

You’ll want to serve as soon as you can, just so everything is hot, fresh and crisp. From there, I typically serve this with rice, but noodles would work too.

Looking for more authentic Thai recipes? Check out these beauties:

Alrighty, let’s tuck into the full recipe for this Thai cashew chicken shall we?!

close up shot of Thai cashew chicken served on rice

How to make Thai Cashew Chicken (Full Recipe & Video)

Thai chicken with cashews in wok with wooden spoon digging in

Print

Thai Cashew Chicken

#wprm-recipe-user-rating-3 .wprm-rating-star.wprm-rating-star-full svg * { fill: #343434; }#wprm-recipe-user-rating-3 .wprm-rating-star.wprm-rating-star-33 svg * { fill: url(#wprm-recipe-user-rating-3-33); }#wprm-recipe-user-rating-3 .wprm-rating-star.wprm-rating-star-50 svg * { fill: url(#wprm-recipe-user-rating-3-50); }#wprm-recipe-user-rating-3 .wprm-rating-star.wprm-rating-star-66 svg * { fill: url(#wprm-recipe-user-rating-3-66); }linearGradient#wprm-recipe-user-rating-3-33 stop { stop-color: #343434; }linearGradient#wprm-recipe-user-rating-3-50 stop { stop-color: #343434; }linearGradient#wprm-recipe-user-rating-3-66 stop { stop-color: #343434; }

I think you'll be surprised at not only how delicious this Thai Cashew Chicken is, but also how easy it is to make!
Course Dinner, Main Course
Cuisine Thai
Prep Time 15 minutes
Cook Time 20 minutes
Total Time 35 minutes
Servings 4
Calories 801kcal
Cost £3 / $4

Equipment

  • Sharp Knife & Chopping Board
  • Large Bowl & Tongs (for coating chicken)
  • Large Wok & Wooden Spoon (or a large pan)
  • Slotted Spoon (for removing cashews/chicken)

Ingredients

  • 600g / 1.3lbs boneless skinless Chicken Thighs, diced into bite-sized pieces (see notes)
  • 1 tsp White Pepper
  • 1 tbsp + 2 tsp Light Soy Sauce
  • 50g / 1/3 cup Plain Flour
  • 120ml / 1/2 cup Veg Oil (for frying)
  • 200g / 7oz Unsalted Cashew Nuts
  • 2 medium White Onions, halved then diced into quarters (pull layers apart)
  • 2 medium Peppers, I use 1 red 1 green (diced into pieces to similar size as the onion)
  • 4 cloves of Garlic, finely diced
  • 2 Red Chillies, deseeded if you want to reduce spice (see notes)
  • 3 Spring Onion, separated into firm white part and green part, then chopped into 2.5cm/1" pieces
  • 1 1/2 tbsp Granulated Sugar
  • 1 tbsp Oyster Sauce
  • Cooked Rice, for serving

Instructions

  • In a large mixing bowl, combine the chicken with the white pepper and 2 teaspoons of soy sauce. Mix in the flour until the chicken is fully coated.
  • Heat the oil in a wok or large, deep frying pan/wok over a medium-high heat for a few minutes. Once hot, add the cashews and fry until deep golden. Keep an eye on them, as they’ll burn quickly. Remove with a slotted spoon and place in a bowl to one side, leaving the oil behind.
  • Working in two batches, shake off any excess flour from the chicken and add it to the oil. Fry until golden and crisp on the outside and piping hot right through the centre (about 5 minutes per batch). Remove each batch with a slotted spoon and set aside. Discard all but around 2 tablespoons of oil (just eyeball it).
  • Add the peppers, onions and garlic and fry for a couple of minutes, then add the chilli and firm white parts of the spring onions and fry for a minute longer. Stir in the chicken, then stir in the sugar, oyster sauce and remaining 1 tablespoon of soy sauce. Toss in the cashews and the rest of the spring onion. The sugar should have fully dissolved and the sauce should have a glossy texture that just lightly coats everything. Serve and enjoy!

Video

Notes

a) Chicken – chicken thigh is the best option because you can build up a golden crust without the meat overcooking. Having said that, you can use breast if you’d prefer, it’ll just cook a lot quicker.

b) Flour – coating the chicken in flour is essential to not only ensure you build a crust on the chicken (i.e. more flavour), but also so the crust can absorb the sauce and help it cling to the chicken.

c) Chillies – traditionally, you’d use dried red chillies and keep them whole, but they’re trickier to get your hands on. I use the pre-packaged large red chillies you find in the supermarkets, which work just fine.

d) Cookbook – this recipe is featured in my debut cookbook ‘Comfy’.

e) Calories – whole recipe divided by 4, assuming half the oil is consumed (likely overestimate).

Nutrition

Calories: 801kcal | Carbohydrates: 31.81g | Protein: 35.93g | Fat: 60.77g | Saturated Fat: 12.862g | Polyunsaturated Fat: 17.086g | Monounsaturated Fat: 25.434g | Trans Fat: 0.2g | Cholesterol: 147mg | Sodium: 385mg | Potassium: 900mg | Fiber: 4.4g | Sugar: 12.79g | Vitamin A: 2093IU | Vitamin C: 83.5mg | Calcium: 63mg | Iron: 5.1mg

The post Thai Cashew Chicken (so easy!) appeared first on Don't Go Bacon My Heart.

creamy-bacon-pasta.jpg

Creamy Bacon Pasta (easy & delicious!)

This creamy bacon pasta is way too easy and delicious not to try!

For how simple this recipe is, I think you’re going to be surprised by just how tasty it is. Follow me…

close up shot of creamy bacon pasta in large white dish with silver fork

Creamy Bacon Pasta Ingredients

This recipe requires just a handful of ingredients, some of which you should hopefully have knocking about the kitchen already:

  • Pasta – I prefer using long-cut pasta to toss in the sauce, but you can use any variety you fancy. Here I use tagliatelle.
  • Wine – Any brand of dry white wine will do – doesn’t need to be expensive!
  • Bacon – I recommend using streaky bacon so you can use the excess fat in the sauce.
  • Chicken Stock – I make it using half a stock cube, but you can use ready-made if you’d prefer.
  • Garlic – Must be fresh (not the jarred stuff).
  • Parsley – This adds a fresh burst of flavour and a pop of colour.
  • Cream – Make sure it’s heavy/double cream so the sauce ends up thick and luscious.
  • Shallots – These add a savoury depth of flavour to the sauce.
  • Parmesan – This will be stirred through the sauce, although you can finish with more if you’d like.
overhead shot of creamy bacon pasta ingredients with text labels

Crispy Bacon

A bacon pasta recipe requires the bacon to shine, so here are a few tips to bring out the best in the bacon:

  • Streaky bacon – Aka regular bacon in the US. This is typically fattier than back bacon, so you get the bonus of the excess fat in the pan. Not only does this add flavour to the sauce, but it’s perfect to recycle and use for frying the shallots and garlic.
  • Cold pan – starting the bacon in a cold pan will help render down the fat more efficiently, which in turn, results in maximum crispiness. From there, I fry the bacon on a medium heat. I don’t recommend cranking up the heat – you want to gradually draw the fat out of the bacon.
  • Remove – while you could leave the bacon in the pan as you simmer the sauce, I much prefer removing it and adding it in at the end, just so it stays nice and crispy.

Ideally, you want around 1 tbsp of excess fat left in the pan. If there’s more, just discard it. If there’s less, just top up with oil or butter.

Process shots: add bacon to pan (photo 1), fry (photo 2), remove (photo 3), leave fat behind (photo 4).

4 step by step photos showing how to make crispy bacon

Creamy Bacon Pasta Sauce

Just like the bacon, we want to fry the shallots on a medium heat. This will give them a chance to soften and sweeten. From there, a quick fry of the garlic and we’ve completed the base flavour of the sauce.

White Wine

This sauce benefits from a splash of wine for a few different reasons:

  • Balance – The wine cuts through the richness of the sauce and helps balance everything.
  • Flavour – It adds a mellow background flavour.
  • Deglaze – It’s perfect for scraping any flavour from the pan.

Sauce Consistency

Once you’ve reduced the wine, we’ll create a sauce with cream, chicken stock, parmesan and parsley. You’ll want the sauce fairly thick because adding the pasta will thin it back out again.

Process shots: fry shallots (photo 1), fry garlic (photo 2), reduce wine (photo 3), add stock, cream, parsley and parmesan (photo 4), simmer (photo 5), add pasta and bacon (photo 6).

6 step by step photos showing how to make creamy bacon pasta

Creamy Bacon Pasta FAQ

do I have to add the wine?

Most of, if not all of the alcohol will burn off, but if you still can’t use it then use a non-alcoholic wine or leave it out altogether.

Can I substitute the cream?

Using double/heavy cream is important to create a thick sauce. Anything lighter will be too thin and may curdle with the wine.

What else could I add?

Mushrooms would go delightfully with this, as would chicken!

close up shot of creamy bacon pasta in large pan

Serving Creamy Bacon Pasta

Once the sauce thickens and clings to the pasta you’ll want to serve up right away. If the sauce over-thickens, you can simply toss in some more starchy pasta water.

If you’d like, you can go in with some extra parmesan and parsley too.

For the sister dish to this recipe check out my Tomato Bacon Pasta!

Alrighty, let’s tuck into the full recipe for this creamy bacon pasta shall we?!

close up shot of creamy bacon pasta in large white dish

How to make Creamy Bacon Pasta (Full Recipe & Video)

close up shot of creamy bacon pasta in large pan

Print

Creamy Bacon Pasta (easy & delicious!)

#wprm-recipe-user-rating-2 .wprm-rating-star.wprm-rating-star-full svg * { fill: #343434; }#wprm-recipe-user-rating-2 .wprm-rating-star.wprm-rating-star-33 svg * { fill: url(#wprm-recipe-user-rating-2-33); }#wprm-recipe-user-rating-2 .wprm-rating-star.wprm-rating-star-50 svg * { fill: url(#wprm-recipe-user-rating-2-50); }#wprm-recipe-user-rating-2 .wprm-rating-star.wprm-rating-star-66 svg * { fill: url(#wprm-recipe-user-rating-2-66); }linearGradient#wprm-recipe-user-rating-2-33 stop { stop-color: #343434; }linearGradient#wprm-recipe-user-rating-2-50 stop { stop-color: #343434; }linearGradient#wprm-recipe-user-rating-2-66 stop { stop-color: #343434; }

This creamy bacon pasta is way too easy and delicious not to try!
Course Dinner, Main Course
Cuisine Italian
Prep Time 10 minutes
Cook Time 25 minutes
Total Time 35 minutes
Servings 2
Calories 1031kcal
Cost £4 / $5

Equipment

  • Sharp Knife & Chopping Board
  • Large Pan & Wooden Spoon
  • Slotted Spoon & Kitchen Roll/Paper Towels (for removing bacon)
  • Large Pot & Tongs (for pasta)
  • Jug (for stock)
  • Fine Cheese Grater

Ingredients

  • 150g / 5.3oz Streaky Bacon, diced
  • 2 Shallots, finely diced
  • 1 large clove of Garlic, finely diced
  • 60ml / 1/4 cup Dry White Wine (see notes)
  • 200g / 7oz Long-Cut Pasta (see notes)
  • 80ml / 1/3 cup Chicken Stock
  • 160ml / 2/3 cup Double/Heavy Cream
  • 2 tbsp finely diced Fresh Parsley
  • 30g / 1/3 cup freshly grated Parmesan
  • Salt & Black Pepper, as needed

Instructions

  • Add the bacon to a large pan with the heat off. Turn the heat to medium and fry until crisp with the fat rendered down. Don't rush the process and crank up the heat. Remove the bacon with a slotted spoon and place it on kitchen roll/paper towels. If there's more than 1 tbsp fat in the pan remove excess.
  • Add the shallots to the leftover fat and gently sweat them down until soft and golden. Add the garlic and fry for another 30 seconds or so, then pour in the wine. Increase the heat slightly a simmer the wine for 3-4 minutes, or until it almost completely evaporates and the pungent smell of alcohol disappears.
  • Meanwhile, add the pasta to a large pot of salted boiling water and cook until al dente.
  • Lower the heat back down the medium and stir in the stock, cream, parmesan and parsley. Simmer for a few minutes, stirring as you go, until the sauce thickens. Check for seasoning and adjust if needed, then use tongs to transfer the cooked pasta straight from the pot into the sauce (embrace any excess water that comes with it). Toss to coat the pasta in the sauce, then add the bacon and continue tossing until the sauce thickens and clings to the pasta. If it over-thickens, just toss in a splash more pasta water.
  • Serve up with more parmesan and parsley if desired then tuck in and enjoy!

Video

Notes

a) Bacon – I recommend using streaky bacon for this recipe (regular bacon in the US). It’s fattier than back bacon, so you can render down the fat and use it to fry the shallots.

b) Wine – This helps cut through the richness of the sauce and will also add a very faint background flavour. Most of, if not all of the alcohol will burn off, but if you can’t use it then use non-alcoholic wine or leave it out.

c) Pasta – I like using long-cut pasta for this recipe (I use Tagliatelle here). I find it easier to toss and bind the sauce. You can use any type of pasta you fancy. For reference, 200g/7oz is the dry weight.

d) Stock – I use 1/2 a chicken Oxo cube to make 80ml / 1/3 cup stock. If you have ready-made stock obviously just measure that out. If you’re sensitive to salt you can use reduced-salt stock.

e) Calories – Whole recipe divided by 2 with no extra parmesan.

Nutrition

Calories: 1031kcal | Carbohydrates: 89.69g | Protein: 24.46g | Fat: 65.6g | Saturated Fat: 21.01g | Polyunsaturated Fat: 2.324g | Monounsaturated Fat: 10.339g | Trans Fat: 0.131g | Cholesterol: 123mg | Sodium: 718mg | Potassium: 896mg | Fiber: 11.8g | Sugar: 5.1g | Vitamin A: 1805IU | Vitamin C: 7.7mg | Calcium: 203mg | Iron: 1.93mg

For more similar recipes check out these beauties:

Creamy Pasta Recipes


The post Creamy Bacon Pasta (easy & delicious!) appeared first on Don't Go Bacon My Heart.

pretzel-chicken.jpg

Pretzel Crusted Chicken (& Honey Mustard Sauce)

Here I’ll share with you how to make crunchy and juicy pretzel chicken alongside a delicious bonus sauce!

I am absolute SUCKER for a bag of salted pretzels. If you’re the same and have never used them to coat chicken before, you’re in for a treat. Follow me…

close up shot of pretzel chicken drizzled with honey mustard sauce on small white plate

Crushed Pretzels

You’ll find bags of mini crunchy pretzels in pretty much any food store, often near the crisps/nuts etc. For reference, I usually get ‘Penn State Sea Salted Sharing Pretzels‘.

To crush the pretzels, I typically use a food processor for ease. Having said that, you could put the pretzels in a zip-lock bag and use a rolling pin or mallet to crush them. In all cases, you’re looking to turn the pretzels into a coarse crumb. If you see the photo you’ll see some smaller and some larger pieces, which is what we’re looking for.

Process shots: add pretzels to food processor (photo 1), blitz into a crumb (photo 2).

2 step by step photos showing how to crush pretzels

Pretzel Coated Chicken

For this recipe, we’ll be using chicken breast. To coat the chicken, we’ll first want to slice it through the centre to create 4 even-sized cutlets. This will allow the chicken to cook quicker and more evenly.

To coat the chicken we’ll be going through the classic stages of flour -> egg -> crumb. We’ll also be seasoning the flour and egg just to give the chicken some ‘umph’. Nothing special! Just some store-cupboard essentials.

Process shots: slice chicken (photos 1&2), coat in flour (photo 3), coat in egg (photo 4), coat in pretzels (photo 5).

5 step by step photos showing how to make pretzel crusted chicken

Recipe Tip

Really make sure you coat the chicken properly at each stage, especially with the pretzels. This will ensure you end up with a nice sturdy, crispy batter that won’t break apart when you cook it.

Crispy Pretzel Chicken

I did originally test this recipe by baking and also air frying the chicken. The truth is, neither came close to how delicious the chicken was when it was fried. The pretzel just ended up drying out and losing a lot of its crispiness.

Luckily we don’t need to deep fry the chicken, just shallow fry it. Enough oil to comfortably coat the base of the pan is all we need.

Once you’ve fried the chicken I recommend placing it on a wire rack. This will allow excess oil to drip off more efficiently than if you were to place it on kitchen roll/paper towels.

Process shots: add chicken to oil (photo 1), fry (photo 2), place on rack (photo 3).

3 step by step photos showing how to fry pretzel chicken

Honey Mustard Sauce

The chicken is awesome by itself, but a simple honey mustard sauce really takes it up several notches. Here’s what you’ll need:

  • Mayo – Full-fat for the best flavour!
  • Mustard – I use a combination of Dijon and Classic Yellow.
  • Honey – Of the ‘runny’ variety.
  • Vinegar – I recommend apple cider vinegar but white wine vinegar will make an okay sub.
  • Seasoning – I like to add a very small amount of onion and garlic powder, just to give it a little more depth of flavour.

You can absolutely change the ratios to suit your tastebuds by adjusting the mustard (for more heat), the mayo (to make it creamier) or the honey (to make it sweeter).

Recipe Tip

This sauce is perfect to make ahead of time! Just tightly store it in the fridge for 4-5 days and use when needed.

overhead shot of honey mustard sauce ingredients with text labels

Pretzel Crusted Chicken FAQ

Can I use different flavoured pretzels?

I’d stick with sea salt the first time and experiment from there. I have got my eyes on the sour cream and chives ones!

Can I make this ahead of time?

The chicken is definitely best served fresh! You could make it ahead of time, let it cool and tightly store in the fridge, then reheat in the oven until crisp and piping hot again. But, it won’t be quite as magical as fresh.

Do I have to make the sauce?

Nope! You can serve with any sauce you fancy. But I do recommend the honey mustard because it goes so deliciously.

close up shot of pretzel crusted chicken on honey mustard sauce on small white plate

Serving Pretzel Crusted Chicken

Although the pretzels are already salted, I love finishing with an extra pinch of flaky sea salt. I also love adding a few pinches of finely diced fresh chives too, for a pop of colour and flavour.

I often serve this for Dinner with a side salad and some Wedges. It also makes a really nice Lunch sliced up in a wrap too.

For more delicious coated chicken recipes check out my Cornflake Crusted Chicken, Pistachio Crusted Chicken and Dorito Crusted Chicken.

Alrighty, let’s tuck into the full recipe for this pretzel crusted chicken shall we!?

pretzel crusted chicken sliced in a wrap with salad

How to make Pretzel Crusted Chicken (Full Recipe & Video)

close up shot of pretzel chicken drizzled with honey mustard sauce on small white plate

Print

Pretzel Crusted Chicken (& Honey Mustard Sauce)

#wprm-recipe-user-rating-4 .wprm-rating-star.wprm-rating-star-full svg * { fill: #343434; }#wprm-recipe-user-rating-4 .wprm-rating-star.wprm-rating-star-33 svg * { fill: url(#wprm-recipe-user-rating-4-33); }#wprm-recipe-user-rating-4 .wprm-rating-star.wprm-rating-star-50 svg * { fill: url(#wprm-recipe-user-rating-4-50); }#wprm-recipe-user-rating-4 .wprm-rating-star.wprm-rating-star-66 svg * { fill: url(#wprm-recipe-user-rating-4-66); }linearGradient#wprm-recipe-user-rating-4-33 stop { stop-color: #343434; }linearGradient#wprm-recipe-user-rating-4-50 stop { stop-color: #343434; }linearGradient#wprm-recipe-user-rating-4-66 stop { stop-color: #343434; }

Here I'll share with you how to make crunchy and juicy pretzel chicken alongside a delicious bonus sauce!
Course Dinner, Main Course
Cuisine American, Western
Prep Time 25 minutes
Cook Time 10 minutes
Total Time 35 minutes
Servings 4
Calories 380kcal
Cost £4 / $5

Equipment

  • Food Processor or Zip-Lock Bag & Rolling Pin (for crushing pretzels)
  • Small Mixing Bowl (for sauce)
  • Sharp Knife & Chopping Board
  • 3 Large Shallow Dishes
  • Large Tray & Wire Rack
  • Large Pan & Tongs (preferably cast-iron/heavy-based)
  • Kitchen Thermometer

Ingredients

Sauce

  • 5 tbsp full-fat Mayo
  • 3 tbsp Honey
  • 1 tbsp Dijon Mustard
  • 1 tbsp Classic Yellow Mustard
  • 1 tsp Apple Cider Vinegar
  • 1/8 tsp EACH: Onion Powder, Garlic Powder

Chicken

  • 100g / 3.5oz Pretzels (see notes)
  • 2x 250g/9oz Chicken Breasts
  • 35g / 1/4 cup Plain Flour
  • 2 Eggs, beaten
  • 2 tsp Paprika
  • 3/4 tsp Salt
  • 1/2 tsp EACH: Garlic Powder, Onion Powder, Oregano, Black Pepper
  • 1/4 tsp Cayenne Pepper
  • 180ml / 3/4 cup Veg Oil (or as needed)
  • Flaky Sea Salt, to serve
  • finely diced Fresh Chives, to serve

Instructions

  • Combine all of the sauce ingredients and adjust seasoning if needed. You can easily tweak the heat with mustard, sweetness with honey and creaminess with mayo to suit your tastebuds.
  • Place the pretzels in a food processor and blitz to a coarse crumb texture. Alternatively you can place them in zip-lock bag and crush them with a rolling pin.
  • Line up 3 large shallow dishes: the first with flour, second with beaten eggs and the third with crushed pretzels. In a small bowl combine the paprika, salt, onion & garlic powder, oregano, black pepper & cayenne pepper. Mix half into the flour and half into the pretzels.
  • Horizontally slice the chicken breasts right through the centre to create 4 even-sized cutlets. Take one cutlet and coat it in flour, then egg and finish with the pretzels. Make sure you thoroughly coat at each stage (namely the pretzels). Place on a tray and repeat with the remaining cutlets.
  • Add enough oil to comfortably coat the base of a pan and turn the heat to medium. Heat the oil to 180C/350F (a crumb should rapidly sizzle) then carefully place in two cutlets. Fry for 3-4mins on each side, or until deep golden, visibly crisp and piping hot/white through the centre, then place on a wire rack. Top up oil if needed and bring back to temp then repeat.
  • Serve with a pinch of sea salt and chives then tuck in with the sauce drizzled on top or as a dip to one side. Enjoy!

Video

Notes

a) Sauce – Feel free to make this ahead of time and tightly store in the fridge until needed. 

b) Pretzels – I use ‘Penn State Baked Original Sea Salted Pretzels’. I also love finishing with a pinch of sea salt to really highlight the gorgeous saltiness of the pretzels. When you crush them, you’re looking for some fine crumb with so more coarse pieces (see video/photos for reference).

c) Frying – I did test with baking and air frying and they didn’t come close to shallow frying. The pretzel coating just dries out and doesn’t crisp up as well. A medium heat should give you a nice crispy coating, but just use your best judgement if you need to tweak it a little higher or lower (you can peak underneath after a minute or so to see how it’s looking).

d) Serving – I often serve this for Dinner with a side salad and some Wedges. It also makes a really nice Lunch sliced up in a wrap too.

e) Calories – Per cutlet assuming 2 tsp oil soaked up. Slight overestimate as not all the flour, egg and pretzel is used. The whole sauce is 682 calories.

Nutrition

Calories: 380kcal | Carbohydrates: 27.92g | Protein: 34.17g | Fat: 14.12g | Saturated Fat: 1.954g | Polyunsaturated Fat: 3.913g | Monounsaturated Fat: 7.314g | Trans Fat: 0.045g | Cholesterol: 153mg | Sodium: 842mg | Potassium: 444mg | Fiber: 1.6g | Sugar: 0.8g | Vitamin A: 771IU | Vitamin C: 0.6mg | Calcium: 38mg | Iron: 3.33mg

The post Pretzel Crusted Chicken (& Honey Mustard Sauce) appeared first on Don't Go Bacon My Heart.

tuna-melt.jpg

Classic Tuna Melt

Here I’ll show you my favourite way to make the absolute classic Tuna Melt!

I would say a tuna melt is a guilty pleasure of mine, but I eat it FAR too regularly to be labeled that. There’s many different ways you can make this classic, but here I’ll show you the easiest and most delicious way. Follow me…

3 tuna melt halves stacked on each other on wooden chopping board with crisps

Tuna Melt Filling

Admittedly when I first starting making tuna melts many moons ago, the filling would just consist of tuna and mayo. I mean, it’s nothing to shake a stick at, but there have definitely been some improvements over the years. For the best tuna melt filling here’s what you’ll need:

  • Tuna – I use tuna in brine for the extra saltiness, but spring water or oil will work just fine.
  • Mayo – must be full-fat for the best flavour!
  • Dijon – this adds a gentle warmth and enhances the flavours of the cheese too.
  • Lemon Juice – brightens up the filling and pairs delightfully with fish in general.
  • Gherkins – or Cornichons. In the US you’re looking for Dill Pickles (or Bread & Butter Pickles). These add a little texture and a gorgeous tart flavour.
  • Parsley – adds a fresh burst of flavour.
  • Spring Onion – pairs perfectly with the tuna and adds a good punch of flavour.
  • Seasoning – salt and black pepper to taste.

Recipe Tip

I recommend using tuna chunks over flakes. Flakes can sometimes turn a little mushy onces you’ve mixed everything together. Chunks hold their structure a little better.

overhead shot of tuna melt filling ingredients with text labels

When it comes to making the filling, I actually like to mix every except the tuna. I then like to fold the tuna in until everything is combined. This helps everything evenly distribute without mixing the tuna into a mush.

You can make this filling ahead of time, just consider two things:

  • Depending on how well you drained the tuna it might end up a little watery the longer it sits. Just give it a good stir before you load up the sandwiches. If on the other hand, it’s looking a little dry, just stir through a dollop of mayo to bring it back to life.
  • The filling will be fridge cold, so I recommend letting it sit for 30 mins or so before you use it, just so it warms through properly as the sandwiches toast.

Process shots: add sauce ingredients to bowl (photo 1), mix (photo 2), add tuna (photo 3), mix (photo 4).

4 step by step photos showing how to make tuna melt filling

Tuna Melt

Alrighty, filling done and dusted. There’s just a couple of things to consider when making the sandwich.

The Bread

For a toastie/grilled cheese, you’ll want a sturdy bread like Sourdough. Here I’ve actually used a Pain De Campagne, which was fairly sturdy and worked quite nicely.

The Cheese

I love using a 50/50 mix of Cheddar and Red Leicester. You could use mozzarella for a nice cheese pull, it just doesn’t have as much flavour.

Process shots: spread bread with butter (photo 1), flip (photo 2), add cheddar (photo 3), add tuna (photo 4), add Red Leicester (photo 5), add bread and spread with butter (photo 6).

6 step by step photos showing how to make a tuna melt

Pan-Fried Tuna Melt

To get that gorgeous golden crust a tuna melt has got to be pan-fried. I recommend using a medium-heat and no higher. Too high and the bread burns before the cheese melts and too low and the filling gets too gooey and the bread won’t have a nice crunch.

Process shots: add sandwiches to pan (photo 1), fry both sides (photo 2).

2 step by step photos showing how to pan fry a tuna melt

Tuna Melt FAQ

How do I make sure the filling isn’t watery?

The key is draining the tuna well. In the past I’ve just given it a quick drain and the excess water just eventually separates in the filling and turns it watery.

Can I air fry the sandwich instead?

You’ll get a much better crust in the pan, but you can air fry if you’d prefer. Check out my Air Fryer Ham & Cheese Toastie for guidance.

Can I use mayo instead of butter for the outside?

You could use mayo if you’d prefer. I’m just a butter purist and you’re already using mayo for the filling, so it’s nice to have the rich, buttery flavour on the outside.

What else could I add to the filling?

There’s all sorts of things you could add, but I’d highly recommend trying the recipe as stated. From there, common additions are red onion (instead of spring onion), fresh dill (in replacement or with the parsley), celery, capers and slice tomato.

close up shot of 3 tuna melt halves stacked on each other on wooden board

Serving a Tuna Melt

I like hot sauce alongside to serve, just so you get pops of spice, as opposed to the spice being straight through the centre. My favourite brand is Cholula. This is of course optional though. I also love serving with crisps, some of which do make their way inside the sandwich (the new Salt & Pepper Sensations works amazingly).

For the sister recipe to this, check out my Classic Chicken Melt!

Alrighty, let’s tuck into the full recipe for this tuna melt shall we?!

close up overhead shot of hand opening tuna melt showing filling

How to make a Tuna Melt (Full Recipe & Video)

3 tuna melt halves stacked on each other on wooden chopping board with crisps

Print

Classic Tuna Melt

#wprm-recipe-user-rating-1 .wprm-rating-star.wprm-rating-star-full svg * { fill: #343434; }#wprm-recipe-user-rating-1 .wprm-rating-star.wprm-rating-star-33 svg * { fill: url(#wprm-recipe-user-rating-1-33); }#wprm-recipe-user-rating-1 .wprm-rating-star.wprm-rating-star-50 svg * { fill: url(#wprm-recipe-user-rating-1-50); }#wprm-recipe-user-rating-1 .wprm-rating-star.wprm-rating-star-66 svg * { fill: url(#wprm-recipe-user-rating-1-66); }linearGradient#wprm-recipe-user-rating-1-33 stop { stop-color: #343434; }linearGradient#wprm-recipe-user-rating-1-50 stop { stop-color: #343434; }linearGradient#wprm-recipe-user-rating-1-66 stop { stop-color: #343434; }

Here I'll show you my favourite way to make the absolute classic Tuna Melt!
Course Lunch
Cuisine American, Western
Prep Time 15 minutes
Cook Time 10 minutes
Total Time 25 minutes
Servings 3 sandwiches
Calories 834kcal
Cost £3 / $4

Equipment

  • Sharp Knife & Chopping Board
  • Small Mixing Bowl
  • Cheese Grater
  • Bread Knife
  • Large Pan & Spatula/Turner

Ingredients

  • 80g / 1/3 cup full-fat Mayo
  • 2 tsp Lemon Juice
  • 1 tsp Dijon Mustard
  • 1/8 – 1/4 tsp Salt & Black Pepper (see notes)
  • 2 tbsp finely diced Gherkins/Pickles
  • 1 heaped tbsp very finely diced Fresh Parsley
  • 2 Spring Onions, finely diced
  • 2x 150g/5oz cans of Tuna Chunks in brine (see notes)
  • 6 medium-large slices of Bread (see notes)
  • 120g / 4oz Cheddar, grated
  • 120g / 4oz Red Leicester, grated (sub more cheddar)
  • Butter, as needed
  • Hot Sauce, to serve (optional)

Instructions

  • In a small mixing bowl combine the mayo, Dijon, lemon juice, parsley, pickles, spring onion and salt & pepper. Drain the tuna well then stir it through the sauce until everything is evenly combined. Adjust seasoning if desired.
  • Butter one side of each slice of bread then flip them over. Top with cheddar, then the tuna, followed by the Red Leicester. Add a second slice of bread on top and spread with butter.
  • 2-3 at a time add the sandwiches to a large pan over medium heat. Fry both sides until deep golden and crisp with the cheese melted in the middle. If the bread starts to cook too quickly before the cheese melts just lower the heat.
  • Slice in half and enjoy! I like a few lashings of hot sauce as I go.

Video

Notes

a) Tuna – I recommend tuna chunks over tuna flakes, just so the filling doesn’t end up too mushy. This is also the reason I mix everything first and then fold the tuna in, just so everything gets evenly distributed without the tuna breaking up too much. For reference, 150g/5oz is the net weight, and the drained weight is typically 100g/3.5oz. It’s important to drain the tuna well so the filling isn’t watery.

b) Seasoning – If using tuna in brine I find 1/8 tsp salt does the trick. If you’re using tuna in spring water or oil you might find you need more. I like a good amount of black pepper, just to add a little spice, but just work to taste.

c) Bread – Something firm like Sourdough works nicely. 

d) Serving – I like hot sauce alongside, just so you get pops of spice, as opposed to the spice being straight through the centre. My favourite brand is Cholula. This is optional. I also love serving with crisps, some of which do make their way inside the sandwich (the new Salt & Pepper Sensations works amazingly).

e) Calories – Whole recipe divided by 3 assuming 1 tbsp butter per sandwich.

Nutrition

Calories: 834kcal | Carbohydrates: 32.93g | Protein: 38.1g | Fat: 61.28g | Saturated Fat: 26.481g | Polyunsaturated Fat: 14.667g | Monounsaturated Fat: 14.691g | Trans Fat: 1.476g | Cholesterol: 147mg | Sodium: 1387mg | Potassium: 295mg | Fiber: 1.9g | Sugar: 5.15g | Vitamin A: 1403IU | Vitamin C: 3.8mg | Calcium: 653mg | Iron: 3.62mg

For more similar recipes check out these beauties:

Delicious Tuna Recipes


The post Classic Tuna Melt appeared first on Don't Go Bacon My Heart.

lemon-butter-chicken-skewers.jpg

Air Fryer Lemon Butter Chicken Skewers

These Lemon Butter Chicken Skewers are juicy, flavoursome and so simple to make!

Lemon and butter is such an under-appreciated combination and pairs so beautifully with chicken. If you’ve not had lemon butter chicken before then give these skewers a go – you won’t have a single regret! Follow me…

four lemon butter chicken skewers on small white plate

Lemon Chicken Marinade

To inject some flavour into the chicken, we’re going to whip up a really simple marinade. A main ingredient here will of course be the lemon (using both the juice and zest) alongside some oil, mayonnaise, garlic and some store-cupboard spices/seasoning. The mayo works as a binder and also helps tenderise the chicken a little more.

You only need to marinate the chicken for around 30 minutes. Because the marinade is quite acidic, it can turn the chicken tough and chewy if it’s marinated for much longer. 30 minutes will work wonders though – promise!

For this recipe, I recommend using boneless skinless chicken thighs. It’s much more difficult to overcook than chicken breast. Also, because thigh is much fattier, you can get the chicken a little crispy on the outside, whilst keeping the inside soft and tender.

Process shots: add marinade ingredients to bowl (photo 1), whisk to combine (photo 2), add chicken (photo 3), stir then marinate (photo 4).

4 step by step photos showing how to marinate lemon chicken

Recipe Tip

If the chicken is straight out of the fridge, you can cover and leave it at room temp to marinate. This will take the chill off the chicken and help it cook through more evenly.

Lemon Butter Chicken Skewers

Once the chicken has bathed in the marinade, you can thread it and can start cooking it in the air fryer. Whilst they’re cooking, we can get cracking on with the butter.

Lemon Butter

The skewers are going to be great by themselves, but what isn’t improved by being doused in butter? Alongside some lemon juice, seasoning and parsley, this butter really takes the skewers to the next level!

Basting the chicken

I like to mostly cook the chicken and then baste it a couple of times towards the end. Once they’re cooked, you can then baste them whilst they’re hot with the leftover butter. You’ll want it close to room temp so it’s easy to brush.

Process shots: add butter ingredients to bowl (photo 1), mix (photo 2), cook skewers (photo 3), baste in butter (photo 4).

4 step by step photos showing how to make lemon butter chicken skewers
close up shot of 3 lemon chicken skewers in air fryer

Lemon Butter Chicken Skewers FAQ

How lemony are these chicken skewers?

The lemon flavour is definitely apparent, but it’s more on the subtle side. This is the safe option so you can squeeze over more at the end if you’d like.

Can I use chicken breast?

Breast is less fatty than thigh, so it will be less juicy and flavoursome. You could use breast, just keep an eye on the timings so it doesn’t overcook.

Do I have to soak the skewers?

I use bamboo skewers and never soak them beforehand. They should only take around 15 minutes to cook, so they won’t burn. You can of course use metal skewers.

How do I know when the chicken is cooked?

It should be lightly charred and piping hot right through the centre. I recommend using a thermometer and checking it reaches 165F/74C.

Can I make these ahead of time?

I wouldn’t make the chicken ahead of time but you can certainly whip up the butter and tightly store it in the fridge until needed.

close up overhead shot of hand holding lemon butter chicken skewer

Serving Lemon Butter Chicken Skewers

Before you do the final basting of butter, if your air fryer was clean beforehand, I recommend brushing over all the leftover flavour in the base so nothing goes to waste!

Here I’ve served with orzo and asparagus. For the orzo, I just cooked it until al dente, then drained and tossed it with butter, parmesan and some starchy pasta water. Almost like an orzo alfredo! It doesn’t have to be crazy flavoursome as it will soak in some of the lemony butter. The parmesan did go really nicely though.

For more air fryer skewer recipes check out my Garlic Parmesan Chicken Skewers, Salmon Skewers and Chicken Souvlaki!

Alrighty, let’s tuck into the full recipe for this lemon butter chicken shall we!?

overhead shot of lemon butter chicken on small white plate with orzo and asparagus

How to make Lemon Butter Chicken Skewers (Full Recipe & Video)

close up overhead shot of hand holding lemon butter chicken skewer

Print

Air Fryer Lemon Butter Chicken Skewers

#wprm-recipe-user-rating-5 .wprm-rating-star.wprm-rating-star-full svg * { fill: #343434; }#wprm-recipe-user-rating-5 .wprm-rating-star.wprm-rating-star-33 svg * { fill: url(#wprm-recipe-user-rating-5-33); }#wprm-recipe-user-rating-5 .wprm-rating-star.wprm-rating-star-50 svg * { fill: url(#wprm-recipe-user-rating-5-50); }#wprm-recipe-user-rating-5 .wprm-rating-star.wprm-rating-star-66 svg * { fill: url(#wprm-recipe-user-rating-5-66); }linearGradient#wprm-recipe-user-rating-5-33 stop { stop-color: #343434; }linearGradient#wprm-recipe-user-rating-5-50 stop { stop-color: #343434; }linearGradient#wprm-recipe-user-rating-5-66 stop { stop-color: #343434; }

These Lemon Butter Chicken Skewers are juicy, flavoursome and so simple to make!
Course Dinner, Main Course
Cuisine Greek
Prep Time 15 minutes
Cook Time 15 minutes
Marinating Time 30 minutes
Total Time 1 hour
Servings 4 skewers
Calories 396kcal
Cost £3 / $4

Equipment

  • Sharp Knife & Chopping Board
  • Medium Sized Mixing Bowl & Whisk (for marinade)
  • 4x 20cm / 8" Skewers (see notes)
  • Air Fryer
  • Small Mixing Bowl & Brush (for butter)

Ingredients

Chicken

  • zest of a Lemon (typically ~1 tsp)
  • 2 tbsp Lemon Juice
  • 1 tbsp Mayonnaise (see notes)
  • 1 tbsp Olive Oil
  • 2 large cloves of Garlic, finely grated
  • 1 1/2 tsp Dried Oregano
  • 3/4 tsp EACH: Paprika, Salt
  • 1/2 tsp Black Pepper
  • 640g / 1.4lb boneless skinless Chicken Thighs, sliced into bite-sized pieces

Butter

  • 75g / 5 tbsp Butter, softened
  • 1 tbsp very finely diced Fresh Parsley
  • 2 tsp Lemon Juice (see notes)
  • 1/4 tsp EACH: Paprika, Black Pepper
  • 1/8 tsp Salt, or to taste

Instructions

  • In a medium-sized mixing bowl whisk together the marinade ingredients then stir in the chicken until evenly coated. Cover and leave to marinate for 30 minutes (I keep it at room temp if the chicken is just out of the fridge).
  • Thread the chicken onto 4 skewers, ensuring you leave a gap at both ends. Make sure the pieces are nice and compact so they stay nice and juicy. Place in the air fryer and brush over any leftover marinade left in the bowl (thoroughly wash the brush after). Cook for 13 minutes at 200C/400F. Meanwhile, combine all of the butter ingredients in a small mixing bowl.
  • After 13 minutes, flip the skewers (I find this easiest with tongs) and brush over around 1/4 of the butter (just eyeball it). Cook for another minute, then flip them again and brush over another 1/4 of the butter. Cook again for a final minute, or until lightly charred and cooked right through the centre (internal temp should reach at least 165F/74C).
  • Remove the skewers and if your air fryer was clean before starting, brush over any melted butter in the base, then liberally brush over the remaining lemon butter (don't waste any flavour!). If you want them more lemony then just squeeze over a little more lemon juice.

Video

Notes

a) Lemon Zest – When zesting the lemon make sure you don’t use any of the pith (white part) as this is bitter. Just the bright yellow skin.

b) Lemon Juice – As per the recipe, these are more on the subtle side of lemon, just to be safe. Feel free to squeeze over more lemon juice at the end!

c) Mayonnaise – This helps bind the marinade and also tenderises the chicken a little. It doesn’t make the chicken taste ‘mayonnaisey’ at all. If you don’t have mayo just use plain yoghurt or just sub with oil.

d) Marinating Time – The marinade is very acidic, so you don’t want to marinate the chicken for too long otherwise it’ll turn rubbery, especially because the chicken is diced into small pieces. I find 30 minutes is fine, which I do at room temp. You’ll want to marinate in the fridge if you’re going over 30 minutes, but I’d recommend stopping at 60 minutes.

e) Serving – I served with orzo and asparagus. For the orzo, I just cooked until al dente, then drained and tossed it with butter, parmesan and some starchy pasta water. Almost like an orzo alfredo! It doesn’t have to be crazy flavoursome as it will soak in some of the lemony butter. The parmesan did go really nicely though.

f) Calories – Per skewer.

Nutrition

Calories: 396kcal | Carbohydrates: 2.13g | Protein: 32.63g | Fat: 28.19g | Saturated Fat: 12.29g | Polyunsaturated Fat: 4.23g | Monounsaturated Fat: 9.146g | Trans Fat: 0.623g | Cholesterol: 170mg | Sodium: 793mg | Potassium: 404mg | Fiber: 0.5g | Sugar: 0.37g | Vitamin A: 885IU | Vitamin C: 10.6mg | Calcium: 38mg | Iron: 2.06mg

The post Air Fryer Lemon Butter Chicken Skewers appeared first on Don't Go Bacon My Heart.

creamy-sun-dried-tomato-chicken.jpg

Creamy Sun Dried Tomato Chicken

This creamy sun dried tomato chicken is drenched in the most irresistible sauce and couldn’t be easier to make!

This recipe is ‘fancy’ enough for company but easy enough for a simple weeknight dinner. Follow me…

overhead shot of creamy sun dried tomato chicken in pan garnished with fresh basil

Sun Dried Tomato Chicken

For this recipe, we’ll be using chicken breast. Whilst you could use thigh, the sauce is quite rich already, so I find a leaner cut of chicken more suitable for this recipe.

Slicing the chicken

A really important step is horizontally slicing the chicken right through the centre to create 4 even-sized cutlets. This will not only ensure the chicken cooks quicker, but more importantly, more evenly too.

Dredging the chicken

After you’ve sliced the chicken, you’ll want to dredge it through seasoned flour. This will not only ensure the chicken builds up a nice golden crust as it fries, but the crust will also absorb the sauce and help it clings to the chicken, as opposed to just sliding off. This step is a game-changer, so don’t skip it.

Cooking the chicken

In order to build up that gorgeous crust we speak off, the best method is pan-frying. I love frying the chicken in sun dried tomato oil, just to really highlight that flavour. It’s literally just the excess oil from the jar – nothing fancy.

Process shots: slice chicken (photos 1&2), dredge chicken (photos 3&4), cook chicken (photos 5&6)

6 step by step photos showing how to fry chicken breasts

Creamy Sun Dried Tomato Sauce

The sauce itself is made up of cream and stock. The flavour is then deepened with parmesan and shallots.

Sun Dried Tomato Pesto

Typically with recipes similar to this I’d go in with some tomato paste, but since this is sun dried tomato chicken, I actually love adding in a good dollop of sun dried tomato pesto. It adds so much flavour and really highlights the sun dried tomatoes in this recipe.

Alongside the above ingredients, we’ve got some sliced sun dried tomatoes and fresh basil.

Process shots: remove chicken (photo 1), fry shallots (photo 2), add pesto (photo 3), add stock, cream, parmesan, tomatoes and basil (photo 4), stir and simmer (photo 5), add chicken (photo 6).

6 step by step photos showing how to make creamy sun dried tomato chicken

Sun Dried Tomato Chicken FAQ

wHERE DO I FIND sun dried tomato pesto?

You’ll find it in all major supermarkets. You can also make your own Homemade Sun Dried Tomato Pesto!

How do I know when the chicken is cooked?

You’re looking for a light golden exterior with the inside white and piping hot. It won’t take long, typically a few minutes on each side. Keep in mind it’ll carry on cooking as it rests and when added back to the sauce.

Can I make this ahead of time?

This is definitely best served fresh!

close up shot of spatula lifting sun dried tomato chicken in pan

Serving Creamy Sun Dried Tomato Chicken

After you’ve drenched the chicken in the sauce, serve up right away. You don’t want it to sit in the pan too long otherwise you risk it overcooking.

Here I’ve served with small air-fried potatoes and a side salad, but do check out my Sides for more inspo!

Alrighty, let’s tuck into the full recipe for this creamy sun dried tomato chicken shall we?!

close up overhead shot of creamy sun dried tomato chicken breast on small white plate with potatoes and salad

How to make Creamy Sun Dried Tomato Chicken (Full Recipe & Video)

close up shot of spatula lifting sun dried tomato chicken in pan

Print

Creamy Sun Dried Tomato Chicken

#wprm-recipe-user-rating-6 .wprm-rating-star.wprm-rating-star-full svg * { fill: #343434; }#wprm-recipe-user-rating-6 .wprm-rating-star.wprm-rating-star-33 svg * { fill: url(#wprm-recipe-user-rating-6-33); }#wprm-recipe-user-rating-6 .wprm-rating-star.wprm-rating-star-50 svg * { fill: url(#wprm-recipe-user-rating-6-50); }#wprm-recipe-user-rating-6 .wprm-rating-star.wprm-rating-star-66 svg * { fill: url(#wprm-recipe-user-rating-6-66); }linearGradient#wprm-recipe-user-rating-6-33 stop { stop-color: #343434; }linearGradient#wprm-recipe-user-rating-6-50 stop { stop-color: #343434; }linearGradient#wprm-recipe-user-rating-6-66 stop { stop-color: #343434; }

This creamy sun dried tomato chicken is drenched in the most irresistible sauce and couldn't be easier to make!
Course Dinner, Main Course
Cuisine Italian, Western
Prep Time 20 minutes
Cook Time 15 minutes
Total Time 35 minutes
Servings 4
Calories 598kcal
Cost £3 / $4

Equipment

  • Sharp Knife & Chopping Board
  • Large Shallow Dish (for dredging chicken)
  • Large Pan & Tongs
  • Wooden Spoon
  • Jug (for stock)
  • Fine Cheese Grater (for parmesan)
  • Kitchen Roll/Paper Towels (for drying sun dried tomatoes)

Ingredients

Chicken

  • 2x 250g/9oz Chicken Breasts, take out the fridge 15-30 mins before needed
  • 1/4 cup / 35g Plain Flour
  • 1 1/2 tsp Italian Seasoning
  • 1 tsp EACH: Garlic Powder, Salt
  • 1/2 tsp Black Pepper
  • 2 tbsp Sun Dried Tomato Oil (from the jar)

Sauce

  • 1 Echalion/Banana Shallot, finely diced (sub 2 small regular shallots)
  • 60g / 1/4 cup Sun Dried Tomato Pesto (see notes)
  • 180ml / 3/4 cup EACH: Chicken Stock, Double/Heavy Cream
  • 125g / 1 cup / 4oz Sun Dried Tomatoes, thinly sliced and patted dry to remove excess oil
  • 30g / 1/3 cup freshly grated Parmesan
  • 1/2 small bunch of Fresh Basil, finely chopped

Instructions

  • Horizontally slice both chicken breasts right through the centre to create 4 even-sized breasts.
  • In a large shallow dish combine the flour, Italian seasoning, garlic powder, salt and pepper. One by one dredge the breasts through the flour to fully coat, then give them a shake and place to one side.
  • Add the oil to a large pan over medium-high heat and once hot, add in the chicken. Fry both sides for a few minutes until golden on the outside and just about cooked through the centre. Remove from the pan and add to a plate to one side. Lower the heat to medium.
  • Add the shallot to the leftover oil and fry until soft and golden. Stir in the pesto then stir in the stock and cream. Add the basil, parmesan and sun dried tomatoes and give it all a good stir to bind the oils with the sauce.
  • Simmer for a couple of minutes until the sauce starts to thicken, then stir in any resting juices from the chicken and check for seasoning. Add the chicken and coat it in the sauce to gently warm it through, then serve up and enjoy!

Video

Notes

a) Chicken – Slicing the chicken is important to ensure it cooks quicker and more evenly. Depending on how thick the cutlets are, they’ll only take around 3 minutes each side (4 maximum) until the chicken is cooked through the centre. It’ll carry on cooking slightly as it rests and when added back to the pan.

b) Oil – Just use 2 tbsp oil from the jar of sun dried tomatoes to fry the chicken (or sub regular olive oil – not a huge deal). Just be aware the oil can spit a lot as the chicken fries, so if you have an oil splatter guard then definitely use it here. It’s important to remove the excess oil from the sun dried tomatoes because there will already be plenty of oil from the chicken and pesto.

c) Sun Dried Tomato Pesto – I typically pick up a jar from the shops (I use Sacla). I do have a Homemade Sun Dried Tomato Pesto if you want to make a big batch!

d) Serving – Here I’ve served with small air fried potatoes and a side salad, but do check out my Sides for more inspo!

e) Calories – Whole recipe divided by 4 with no sides.

Nutrition

Calories: 598kcal | Carbohydrates: 26.47g | Protein: 39.63g | Fat: 38.53g | Saturated Fat: 14.867g | Polyunsaturated Fat: 3.9g | Monounsaturated Fat: 16.615g | Trans Fat: 0.012g | Cholesterol: 161mg | Sodium: 775mg | Potassium: 1663mg | Fiber: 4.6g | Sugar: 14.75g | Vitamin A: 1362IU | Vitamin C: 14.6mg | Calcium: 208mg | Iron: 4.27mg

For more similar recipes check out these beauties:

Creamy Chicken Breast Recipes


The post Creamy Sun Dried Tomato Chicken appeared first on Don't Go Bacon My Heart.

garlic-butter-parmesan-chicken-tenders.jpg

Garlic Parmesan Chicken Tenders

These chicken tenders are baked until golden and crisp, then coated in the most irresistible garlic parmesan butter.

I really wanted to create some gorgeous garlic parmesan chicken without the need for deep frying and well, here we are. Crispy and loaded with flavour by using just the oven! Follow me…

close up shot of garlic butter parmesan chicken tender on wire rack above black tray

Panko Breadcrumbs

One of the keys to these tenders being so crispy is the use of Panko. These are Japanese breadcrumbs and they’re perfect because they’re big and airy, meaning they come out super crisp once cooked.

Pre-toasting the breadcrumbs

Because we’re not frying the breadcrumbs, we want to give them a head start before coating the chicken in them. By giving them a quick bake beforehand, they’ll already be light golden before they go back in the oven with the chicken, meaning they’ll be perfectly golden by the time the chicken is cooked.

Did you know?

You’ll find Panko in most major supermarkets in the Asian section.

Process shots: spray baking tray with oil (photo 1), add breadcrumbs (photo 2), shake (photo 3), bake (photo 4).

4 step by step photos showing how to toast panko breadcrumbs

Crispy Baked Parmesan Tenders

We’re going to be working the parmesan into the tenders in 3 different layers:

  • Layer 1 – Mixed in with the breadcrumbs. This will offer a good amount of flavour and also help them crisp up.
  • Layer 2 – Mixed in with the garlic butter. The residual heat from the cooked tenders will lightly melt the butter/parmesan.
  • Layer 3 – Sprinkled over the top at the end. This is optional, but I typically sprinkle over a handful at the end, just for good measure!

When it comes to coating the tenders, we’re going for the classic flour, egg and breadcrumbs. Just make sure you thoroughly coat the tenders at each stage and work one by one (tedious, I know, but worth it).

Top Tip!

Place the tenders on a wire rack on top of the tray. This will help the air circulate around the chicken and help the tenders crisp up more efficiently.

Process shots: coat chicken in seasoned flour (photo 1), coat in beaten egg (photo 2), coat in seasoned parmesan breadcrumbs (photo 3), bake on wire rack (photo 4).

4 step by step photos showing how to bake parmesan chicken tenders

Garlic Parmesan Butter

The butter is simply made with garlic, parsley and parmesan. I recommend getting the butter to a point where it’s softened, but not completely melted. A little creamy if you will. I find this to be the perfect texture to coat the tenders.

Coating the tenders

A lot of recipes completely melt the butter and then toss the tenders with it in a bowl. However, I find that not only does this risk the breading coming off, but tenders completely lose their crispiness. Plus, you don’t really get a great coverage.

Instead, I like to ‘dab’ the butter on top of the tenders once fresh out of the oven. This means the breading stays on, the majority of the tender is still crisp and you get a perfect layer of garlic parmesan butter across the top of each tender.

Process shots: add butter, parmesan, parsley and garlic to bowl (photo 1), mix (photo 2), coat tenders (photo 3).

3 step by step photos showing how to make garlic parmesan chicken tenders

Garlic Parmesan Chicken Tenders FAQ

Can I make these ahead of time?

You could make the butter and tenders separately, then brush the butter on upon reheating the tenders.

How garlicky are these?

There are 3 cloves of garlic in the butter, but because they’re raw and finely grated the tenders do come out pretty garlicky. If you know you love garlic, try with 3 and do more next time if you want to.

Do I have to use fresh garlic in the butter?

Yes! Don’t use pickled garlic or garlic powder, it’ll throw off the flavour.

close up shot of hand holding garlic parmesan chicken tender above wire rack

Serving Garlic Parmesan Chicken Tenders

To serve I love finishing with more parmesan and parsley, just for good measure. These make the perfect Finger Food or even as a Dinner with a Side!

After more garlic parmesan goodness? Check out my Air Fryer Garlic Parmesan Chicken Skewers!

Alrighty, let’s tuck into the full recipe for these garlic parmesan chicken tenders shall we?!

garlic parmesan chicken tenders on small white plate on wooden board

How to make Garlic Parmesan Chicken Tenders (Full Recipe & Video)

garlic parmesan chicken tenders on small white plate on wooden board

Print

Garlic Parmesan Chicken Tenders

#wprm-recipe-user-rating-7 .wprm-rating-star.wprm-rating-star-full svg * { fill: #343434; }#wprm-recipe-user-rating-7 .wprm-rating-star.wprm-rating-star-33 svg * { fill: url(#wprm-recipe-user-rating-7-33); }#wprm-recipe-user-rating-7 .wprm-rating-star.wprm-rating-star-50 svg * { fill: url(#wprm-recipe-user-rating-7-50); }#wprm-recipe-user-rating-7 .wprm-rating-star.wprm-rating-star-66 svg * { fill: url(#wprm-recipe-user-rating-7-66); }linearGradient#wprm-recipe-user-rating-7-33 stop { stop-color: #343434; }linearGradient#wprm-recipe-user-rating-7-50 stop { stop-color: #343434; }linearGradient#wprm-recipe-user-rating-7-66 stop { stop-color: #343434; }

These chicken tenders are baked until golden and crisp, then coated in the most irresistible garlic parmesan butter.
Course Main Course, Side Dish, Starter
Cuisine Western
Prep Time 20 minutes
Cook Time 25 minutes
Total Time 45 minutes
Servings 4
Calories 512kcal
Cost £2.50 / $3

Equipment

  • Large Baking Tray & Wire Rack
  • 3 Large Shallow Dishes (for coating chicken)
  • Fine Cheese Grater (for parmesan)
  • Sharp Knife & Chopping Board
  • Small Bowl & Brush (for butter)

Ingredients

Tenders

  • 600g / 1.3lb Chicken Tenders (see notes)
  • 75g / 1 1/4 cups Panko Breadcrumbs (see notes)
  • 30g / 1/3 cup freshly grated Parmesan
  • 50g / 1/3 cup Plain Flour
  • 2 Eggs, beaten
  • 1 tsp EACH: Salt, Paprika
  • 1/2 tsp Garlic Powder
  • 1/4 tsp EACH: Onion Powder, Black Pepper
  • Oil Spray, as needed

Butter

  • 100g / 7 tbsp Butter, softened
  • 20g / 1/4 cup freshly grated Parmesan, plus more to serve
  • 1 tbsp very finely diced Fresh Parsley, plus more to serve
  • 3 cloves of Garlic, very finely grated then mashed into a paste with the side of your knife (see notes)
  • Salt & Black Pepper, to taste

Instructions

  • Preheat the oven to 180C/350F.
  • Lightly spray a large baking tray then sprinkle over the breadcrumbs. Give the tray a shake so they're evenly dispersed, then spray the top. Bake in the oven for 5-8 minutes, or until the breadcrumbs are golden (please be vigilant as they'll burn quickly). Remove from the oven and place in one of the shallow dishes. Raise the oven temp to 200C/400F.
  • In a small pot or bowl combine 1 tsp salt and paprika, 1/2 tsp garlic powder and 1/4 tsp onion powder and black pepper.
  • Line up 3 large shallow dishes: the first with the flour and half of the seasoning mix, the second with 2 beaten eggs and the third with the breadcrumbs, parmesan and the rest of the seasoning. Place the baking tray at the end with an oiled wire rack on top.
  • Take a tender and coat it in the flour, then egg, then in the breadcrumbs and place on the wire rack. Make sure you thoroughly coat at each stage (especially the last). Repeat with all the tenders then spray them with oil. Bake in the oven for 15-20 minutes until golden and crisp and white/piping hot through the centre (smaller ones typically 15 minutes, very large ones more like 20 minutes – just be careful you don't overcook them).
  • Meanwhile, combine all of the garlic butter ingredients in a small bowl. You want the butter to be soft enough to brush, but not completely melted. A little creamy if you will. Pop in the microwave for 5 second blasts until you reach this consistency. Season with a pinch of salt and pepper (to taste).
  • Once the tenders are cooked, use a brush to dab the butter over the top side of all of the tenders. Serve with extra parmesan and parsley (measure with love). Enjoy!

Video

Notes

a) Tenders – You’ll find packs of chicken tenders in most supermarkets (sometimes called ‘chicken breast mini fillets’. If you can’t find any, just grab some chicken breast and slice it into strips (you’ll probably get 12 or so strips from 600g/1.3lb breast).

b) Panko – These are Japanese breadcrumbs, which you’ll find in most supermarkets. They’re perfect because they’re big and airy, meaning they crisp up really nicely. It’s important to give them a pre-bake in the oven. This gives them a head start and results in them being perfectly crisp by the time the tenders are cooked.

c) Garlic – This must be fresh – don’t use pre-diced pickled garlic. It’ll throw off the flavour. If you don’t have a microplane or fine grater, just dice it as finely as you can, then use the side of your knife to spread/mash it into a paste as best you can. This will help the garlic evenly distribute through the butter and ensure there are no big lumps. The garlic will very lightly ‘cook’ from the residual heat of the tenders, but 3 cloves will still result in the tenders being pretty garlicky. Even if you love lots of garlic, try 3 the first time around then increase next time if you want to.

d) Calories – Slight overestimate as not all the flour, egg and breadcrumbs are used.

Nutrition

Calories: 512kcal | Carbohydrates: 21.87g | Protein: 40.18g | Fat: 28.63g | Saturated Fat: 15.325g | Polyunsaturated Fat: 2.642g | Monounsaturated Fat: 7.795g | Trans Fat: 0.86g | Cholesterol: 238mg | Sodium: 1188mg | Potassium: 468mg | Fiber: 0.9g | Sugar: 1.24g | Vitamin A: 871IU | Vitamin C: 0.7mg | Calcium: 174mg | Iron: 3.32mg

For more similar recipes check out these beauties:

Delicious Chicken Tender Recipes


The post Garlic Parmesan Chicken Tenders appeared first on Don't Go Bacon My Heart.

creamy-garlic-mushroom-orzo-steak.jpg

Steak with Creamy Garlic Mushroom Orzo

Juicy steak served with a dreamy, creamy, garlicky mushroom orzo – this really is the dinner of dreams!

If you’re looking for a hearty and delicious dinner for two, you’ve landed in the right spot. Follow me…

creamy garlic mushroom orzo and steak served in white bowl with asparagus

Preparing Steak Orzo

For this recipe we’ll be using one (preferably 10oz) steak. It’s thinly sliced and ends up being the perfect amount to serve over the orzo, without the orzo becoming a side to the steak.

Although everyone might have their own preference for preparing steak, I’ve popped down 6 of my best tips that might help you along the way:

Tips for the perfect steak

  1. Room Temp – Although disputed, I find that getting the steak out of the fridge at least 30 minutes before frying is crucial to relax the meat and prevent it from seizing up in the pan.
  2. Dry – Patting the steak dry will remove moisture, which will help prevent the steaks from steaming when they hit the pan, which in turn helps the steak build a nice crust.
  3. Seasoning – A generous seasoning of salt and pepper is all you need to bring out the best flavour in the meat.
  4. Hot hot hot! – Make sure your pan is absolutely smoking hot (literally). This will ensure you get a nice crust on the steak without overcooking the inside.
  5. Baste – Basting the steaks in butter adds a lovely rich flavour and ensures they don’t dry out. I also add some fresh thyme and garlic for a boost of flavour.
  6. Rest – It’s very important to rest the steak after it’s fried so it can retain its moisture. Don’t slice into it straight away or all the juices will pour out.
What kind of steak should I use?

I used a Ribeye, but you can use your favourite cut. In all cases, If there’s a strip of fat you’ll want to trim it or render down the fat in the pan

Process shots: get steak to room temp (photo 1), pat dry (photo 2), season (photo 3), add to pan (photo 4), fry then flip (photo 5), baste then remove (photo 6).

6 step by step photos showing how to prepare steak

Creamy Garlic Mushroom Orzo

This pairs so beautifully with the steak and comes together so easily.

Garlic Mushrooms

Once you’ve removed the steak you’ll go straight in with the mushrooms so they can fry in all that leftover goodness. I recommend slicing them thinly so they cook quickly, just to reduce the time the steak is sat there. You’ve got the garlic-infused butter from the steak, but I also go in with some more diced with the mushrooms, just for good measure!

What kind of mushrooms should I use?

I like to use button mushrooms because they’re small and blend in with the orzo nicely, but in reality, you can use any variety you like.

Creamy Orzo

I like to cook the orzo in a separate pot and then finish it off in the sauce. As you stir the orzo through the sauce, the excess starch will help create a gorgeously creamy, glossy sauce.

What should the final consistency be like?

The consistency should be similar to a risotto. If it’s at all watery just continue simmering and stirring until it thickens up. If you over-thicken it, you can easily loosen it up with some pasta water (just discard what you don’t use).

Process shots: fry mushrooms (photo 1), fry garlic (photo 2), add stock, cream, herbs and parmesan (photo 3), simmer and stir (photo 4), add orzo (photo 5), simmer and stir (photo 6).

6 step by step photos showing how to make creamy garlic mushroom orzo

Serving Steak and Orzo

I love thinly slicing the steak and placing it on top of the orzo. I also serve with some asparagus, which you can pan-fry at the very beginning (more on this in the recipe card below). This is quite a rich and hearty dish, but you could add some Garlic Bread if you fancy!

For another creamy garlic steak pasta recipe check out my Boursin Steak Pasta!

For more delicious orzo recipes check out my Best Orzo Recipes!

Alrighty, let’s tuck into the full recipe for this steak and creamy mushroom orzo shall we?!

steak with creamy mushroom orzo in white bowl with asparagus

How to make Steak with Mushroom Orzo (Full Recipe & Video)

creamy garlic mushroom orzo and steak served in white bowl with asparagus

Print

Steak with Creamy Garlic Mushroom Orzo

#wprm-recipe-user-rating-4 .wprm-rating-star.wprm-rating-star-full svg * { fill: #343434; }#wprm-recipe-user-rating-4 .wprm-rating-star.wprm-rating-star-33 svg * { fill: url(#wprm-recipe-user-rating-4-33); }#wprm-recipe-user-rating-4 .wprm-rating-star.wprm-rating-star-50 svg * { fill: url(#wprm-recipe-user-rating-4-50); }#wprm-recipe-user-rating-4 .wprm-rating-star.wprm-rating-star-66 svg * { fill: url(#wprm-recipe-user-rating-4-66); }linearGradient#wprm-recipe-user-rating-4-33 stop { stop-color: #343434; }linearGradient#wprm-recipe-user-rating-4-50 stop { stop-color: #343434; }linearGradient#wprm-recipe-user-rating-4-66 stop { stop-color: #343434; }

Juicy steak served with a dreamy, creamy, garlicky mushroom orzo – this really is the dinner of dreams!
Course Dinner, Main Course
Cuisine Italian, Western
Prep Time 15 minutes
Cook Time 15 minutes
Total Time 30 minutes
Servings 2
Calories 1161kcal
Cost £5 / $6

Equipment

  • Sharp Knife & Chopping Board
  • Paper Towels/Kitchen Roll (for drying steak)
  • Large Cast-Iron or Heavy-Based Pan & Tongs
  • Wooden Spoon
  • Jug (for stock)

Ingredients

Steak

  • 1x 285g/10z Ribeye Steak, at room temp (see notes)
  • 1 tbsp Veg Oil
  • 1 heaped tbsp Unsalted Butter (~25g)
  • 2 large cloves of Garlic, left in skins and lightly smashed with the side of your knife
  • 2-3 sprigs of Fresh Thyme
  • 100g / 3.5oz Fine Asparagus, woody ends removed (optional)

Orzo

  • 1 cup / 200g uncooked Orzo (see notes)
  • 200g / 7oz Button Mushrooms, thinly sliced (see notes)
  • 2 large cloves of Garlic, finely diced
  • 180ml / 3/4 cup Double/Heavy Cream (leave at room temp)
  • 120ml / 1/2 cup Chicken Stock
  • 30g / 1/3 cup freshly grated Parmesan, plus more to serve if desired
  • 1 tbsp finely diced Fresh Parsley, plus more to serve if desired
  • 1 tbsp finely diced Fresh Chives
  • Salt & Black Pepper, as needed

Instructions

  • Optional: Add a large cast-iron/heavy-based pan over medium-high heat with a splash of oil. Add the asparagus and fry until it begins to soften and lightly char. Season with a pinch of salt and pepper, then remove and wipe out the pan if needed. Turn the heat to high.
  • Pat the steak dry then generously season both sides with salt and pepper. Once the pan is piping hot (you may see wisps of smoke) add the oil and leave for 5-10 seconds. Add the steak and cook for around 2 minutes and 30 seconds, then flip and cook for another 1 minute and 30 seconds. Add the butter, thyme and whole garlic cloves and baste the steak for 1 further minute. Remove and place to one side, leaving the excess fat behind. Lower the temp slightly to medium-high.
  • At this point add the orzo to salted boiling and cook until al dente (give it a good stir as it's prone to sticking). I recommend taking a couple of mins off the packet time so it can finish cooking in the sauce. Drain when needed, retaining a cup of the starchy pasta water.
  • Add the mushrooms to the leftover fat in the pan and fry until they soften and build up a golden crust. Add the diced garlic and fry for 20 seconds or so (careful it doesn't burn). Lower the heat to medium then stir in the stock, cream, parmesan, chives and parsley. Simmer and stir for a few mins until the sauce begins to thicken.
  • Add the drained orzo alongside a splash of starchy water and the resting juices from the steak. Simmer and stir until the sauce goes nice and thick and clings to the orzo. If the sauce dries out before the orzo cooks just stir through some more starchy water (discard any unused) and simmer a little longer. Check for seasoning and adjust with salt and pepper if needed.
  • Very thinly slice the steak with your knife at an angle and against the natural grain of the meat. Top the orzo with the steak and asparagus (if using), finish with parmesan and parsley if desired then serve and enjoy!

Video

Notes

a) Steak – For this recipe I’ve gone for a 10oz steak, so you both end up with a good amount of steak. I use Ribeye, but you can use your favourite cut.

b) Mushrooms – You’ll want to slice the mushrooms quite thinly, just so they cook quickly. I like to use button mushrooms because they’re small and blend in with the orzo nicely, but in reality, you can use any variety you like.

c) Timings – My steak was a little over 2cm thick and found 2 min 30 secs each side ended with it being medium-rare. Just use your best judgment to cook the steak to your liking based on its weight and thickness.

d) Orzo – I’d usually cook the orzo in the sauce, but it takes a little time and you don’t want the steak to go cold. As such, I mostly cook it in a separate pan then just finish it off the sauce until perfectly tender. You can sub other pasta if you’d prefer not to use orzo.

e) Consistency – The consistency should be similar to a risotto. If it’s at all watery just continue simmering and stirring until it thickens up. If you over-thicken it, you can easily loosen it up with some pasta water (just discard what you don’t use).

f) Asparagus – This is optional, but it does make a nice accompaniment to the meal.

g) Calories – Whole recipe divided by 2 with no extra parmesan.

Nutrition

Calories: 1161kcal | Carbohydrates: 92.11g | Protein: 49.97g | Fat: 68.83g | Saturated Fat: 35.906g | Polyunsaturated Fat: 7.384g | Monounsaturated Fat: 20.639g | Trans Fat: 0.986g | Cholesterol: 234mg | Sodium: 479mg | Potassium: 888mg | Fiber: 13.2g | Sugar: 6.43g | Vitamin A: 2378IU | Vitamin C: 7.4mg | Calcium: 217mg | Iron: 5.48mg

The post Steak with Creamy Garlic Mushroom Orzo appeared first on Don't Go Bacon My Heart.

classic-fish-pie-744x817.jpg

Classic Fish Pie

Here I’ll show you how to make the British classic that is Fish Pie!

I feel like this recipe has been a long time coming and I really have no reason as to why I haven’t uploaded it yet! So, without further ado, it’s fish pie time. Follow me…

classic fish pie served in heart shaped baking dish with green beans in background

Creamy Fish Pie Filling

The filling is really easy to make. I know a lot of fish pie recipes put all sorts in – eggs, gherkins, fennel – I’ve even seen mushrooms! I like to keep it fairly simple and let the fish shine in a creamy sauce. Here’s what you’ll need:

  • Leek – this adds a gorgeous flavour and makes a nice savoury anchor to the sauce.
  • Butter & flour – create a roux to thicken the sauce.
  • Milk & cream – create the creamy sauce.
  • Herbs – parsley and chives bring the sauce to life without overpowering the fish.
  • Seasoning – I use a vegetable Oxo/Bouillon cube to add more savoury depth of flavour, alongside salt, white pepper and nutmeg.
  • Fish – diced into bite-sized pieces.

What fish goes into a fish pie?

The world is really your oyster here (excuse the pun). I opt for salmon, cod, smoked haddock and prawns.

Do you have to pre-cook the fish?

Some recipes poach the fish beforehand, but I find adding the raw fish to the sauce produces the most tender results at the end.

Sauce consistency

The sauce needs to be pretty thick so the mash doesn’t sink. The sauce won’t thicken and reduce more when it’s under the mash in the oven.

Process shots: fry leek in butter (photo 1), stir in flour (photo 2), stir in milk and cream (photo 3), stir in herbs and seasoning (photo 4), simmer (photo 5), stir in fish (photo 6).

6 step by step photos showing how to make fish pie filling

Mashed Potato Fish Pie

This ain’t no pastry pie, we’re going full mash for full comfort! Here’s what you’ll need for the mash:

  • Potatoes – any sort of floury/baking potatoes like a Russet or Maris Piper.
  • Butter – what’s mashed potato without butter?
  • Cream – not too much otherwise you’ll be left with sloppy mash.
  • Cheese – some cheddar cheese really brings this pie to life.
  • Mustard – I love adding a dollop of English mustard for a punch of flavour.
  • Salt – make sure the mash is well seasoned!

Steam drying the potatoes

After you’ve boiled the potatoes, allow them to steam dry for a little while to remove some unwanted moisture. You want the mash fairly firm otherwise it’ll sink into the filling when baked.

Process shots: add butter, cream, cheese, mustard and salt to boiled potatoes (photo 7), mash (photo 8), add filling to baking dish (photo 9), add mash then bake (photo 10).

4 step by step photos showing how to make fish pie

Fish Pie FAQ

How do I prevent the mash from sinking into the filling?

As I mentioned, letting the potatoes steam dry for 5 or so minutes is important to allow unwanted water to escape, which would otherwise weigh the mash down and sink it into the filling. It’s also important that the sauce is nice and thick.

How do I make sure the filling isn’t watery?

If it’s watery in the sense that the sauce is just thin, then again just make sure it’s nice and thick beforehand. If it’s actual water floating in the filling then this can be down to the fish itself. I recommend thoroughly patting it dry beforehand then just give it a simmer in the sauce for 1-2 minutes to help bind any excess water into the sauce.

How do I make sure the fish is perfectly cooked?

It’s unlikely it’ll be undercooked, but if you find it’s still not cooked through after baking you can loosely add foil on top of the pie and continue baking. The key to the fish not being overcooked is making sure you don’t completely cook it in the pan before it bakes. Fish cooks quickly so I don’t poach/pre-cook it before I add it to the sauce.

close up shot of creamy fish pie with portion taken out showing filling

Serving Fish Pie

Just let the pie sit for 5 or so minutes before tucking in, just so it can retain its shape. I love finishing with extra fresh chives too.

I served with some green beans, but you can add any kind of veg you fancy (peas are a traditional option). It’s pretty hearty though so don’t feel like you need a side!

Alrighty, let’s tuck into the full recipe for this fish pie shall we?!

overhead shot of fish pie served on small white plate with green beans

How to Fish Pie (Full Recipe & Video)

classic fish pie served in heart shaped baking dish with green beans in background

Print

Classic Fish Pie

#wprm-recipe-user-rating-2 .wprm-rating-star.wprm-rating-star-full svg * { fill: #343434; }#wprm-recipe-user-rating-2 .wprm-rating-star.wprm-rating-star-33 svg * { fill: url(#wprm-recipe-user-rating-2-33); }#wprm-recipe-user-rating-2 .wprm-rating-star.wprm-rating-star-50 svg * { fill: url(#wprm-recipe-user-rating-2-50); }#wprm-recipe-user-rating-2 .wprm-rating-star.wprm-rating-star-66 svg * { fill: url(#wprm-recipe-user-rating-2-66); }linearGradient#wprm-recipe-user-rating-2-33 stop { stop-color: #343434; }linearGradient#wprm-recipe-user-rating-2-50 stop { stop-color: #343434; }linearGradient#wprm-recipe-user-rating-2-66 stop { stop-color: #343434; }

Here I'll show you how to make the British classic that is Fish Pie!
Course Dinner, Main Course
Cuisine British
Prep Time 25 minutes
Cook Time 50 minutes
Total Time 1 hour 15 minutes
Servings 5 – 6
Calories 667kcal
Cost £4 / $5

Equipment

  • Sharp Knife & Chopping Board
  • Potato Peeler
  • Large Pot, Colander & Potato Masher (for mash)
  • Large Pan & Wooden Spoon
  • Kitchen Roll/Paper Towels
  • Jug (for stock/cream)
  • Suitably Sized Baking Dish and Tray
  • Serving Spoon

Ingredients

Mash

  • 1kg / 2.2lb Baking Potatoes, peeled & diced into chunks
  • 100g / 1 cup Cheddar, grated
  • 60ml / 1/4 cup Double/Heavy Cream
  • 2 heaped tbsp Butter (~50-60g)
  • 1 tsp English Mustard
  • 1/2 tsp Salt, or to taste

Filling

  • 3 tbsp / 45g Butter
  • 1 large Leek, white/light green part finely diced
  • 3 tbsp Plain Flour
  • 480ml / 2 cups Milk (I use semi-skimmed)
  • 120ml / 1/2 cup Double/Heavy Cream
  • 2 tbsp finely diced Fresh Chives, plus more to serve if desired
  • 2 tbsp finely diced Fresh Parsley
  • 1x Vegetable Oxo/Bouillon Cube, crumbled
  • 1/2 tsp Salt, or to taste
  • 1/4 tsp White Pepper
  • 1/8 tsp Ground Nutmeg
  • 450g / 1lb boneless skinless Fish, diced into bite-sized pieces (see notes)
  • 165g / 6oz Jumbo King Prawns, sliced into 3 pieces

Instructions

Mash

  • Add the diced potato to a large pot of heavily salted cold water then bring to a boil. Cook until the potatoes are knife tender (timings will depend on the size of potatoes so just be vigilant). Drain and leave in the colander for 5 or so minutes to allow steam to escape, then mash in the pot with the cheese, cream, mustard, butter and salt.

Filling

  • Melt the butter in a large pan over medium-high heat then add the diced leek. Sweat it right down until it softens and begins to colour, then lower the heat to medium and stir in the flour. Gradually pour in the milk and cream, whisking as you go to avoid lumps, then stir in the chives, parsley, Oxo, salt, pepper and nutmeg.
  • Bring to a gentle simmer then turn the heat to low and cook until the sauce thickens (typically anywhere between 5-10 minutes, although it might already be quite thick so could take less). Pat the fish dry then stir it all through the sauce for a minute or so. The sauce should be fairly thick but not so thick it won't stir/pour.

Pie

  • Preheat the oven to 180C/350F.
  • Pour the filling into into a baking dish and leave for 5 or so mins until a skin forms over the top (helps prevent the mash from sinking). Gently top with the mash a dollop at a time then rough the top with a fork. Try and make sure there's minimal gaps so the filling doesn't leak too much.
  • Place the baking dish on a tray then bake in the oven for 35 minutes, or until golden and crisp on top, bubbling around the edges and piping hot through the centre (you can use a thermometer to check). The fish should be opaque and flaky.
  • Rest for 5 or so mins to help the pie retain its shape then tuck in and enjoy with extra chives if desired!

Video

Notes

a) What kind of fish to use? – I used a fish pie mix which was salmon, cod and smoked haddock. I added an extra salmon fillet alongside the king prawns. You could also use pollock, trout or other types of fish that flake easily into large chunks, just make sure it all comes to around 600g/1.3lb. I recommend using some sort of smoked fish as it adds loads of flavour to the filling.

b) How to prevent the mash from sinking – Letting the spuds steam dry for 5 or so minutes is important to allow unwanted moisture to escape, which would otherwise weigh down the mash and sink it into the filling. It’s also important that the sauce is nice and thick, as it allows it to rest in the dish and form a skin (aka a ‘barrier’).

c) How to make sure the filling isn’t watery – Just make sure you pat the fish dry. I recommend stirring the fish through for a minute or so, just help some of the excess moisture blend into the thickened sauce. Just don’t simmer the fish too long that it cooks.

d) How to ensure the fish is perfectly cooked – It’s unlikely it’ll be undercooked, but if you find it’s still not cooked through after baking you can loosely add foil on top of the pie and continue baking. The key to the fish not being overcooked is making sure you don’t completely cook it in the pan before it bakes. Fish cooks quickly so I don’t poach/pre-cook it before I add it to the sauce.

e) Serving – I served with some green beans, but you can add any kind of veg you fancy (peas is a traditional option). It’s pretty hearty though so don’t feel like you need a side!

f) Calories – Whole recipe divided by 5.

Nutrition

Calories: 667kcal | Carbohydrates: 47.71g | Protein: 34.29g | Fat: 38.16g | Saturated Fat: 23.129g | Polyunsaturated Fat: 1.849g | Monounsaturated Fat: 10.131g | Trans Fat: 0.937g | Cholesterol: 219mg | Sodium: 1362mg | Potassium: 1364mg | Fiber: 5g | Sugar: 8.36g | Vitamin A: 1929IU | Vitamin C: 44mg | Calcium: 352mg | Iron: 2.59mg

For more similar recipes check out these beauties:

Delicious Pie Recipes


The post Classic Fish Pie appeared first on Don't Go Bacon My Heart.