Inspired by the classic Croque Madame, this Madame Crumpet is the tastiest brunch you’ll ever make!
Just to make sure we’re all on the same wave length, a Croque Madame is essentially a hot toasted ham and cheese sandwich with a fried egg on top. It’s got French origins and was first seen around Cafes in Paris. Today we’re making it crumpet style in the most delicious way possible! Follow me…
Béchamel Sauce
One of the most iconic layers of a Croque Madame is the béchamel sauce, and this crumpet version is no exception. Here’s what you’ll need:
Butter, Flour, Milk – AKA a ‘roux’. This is to form the the base of the béchamel sauce.
Gruyere – This has got a sweet nutty flavour which takes this layer through the roof!
Nutmeg – This brings out the nutty tones of the gruyere.
White Pepper – White pepper is a classic addition to béchamel because it blends in better than black pepper.
You actually want this to be fairly thick, since you’ll be spread it over the crumpets. Too thin and it’ll just drip off!
Process shots: melt butter (photo 1), stir in flour to form paste (photo 2), stir in gruyere (photo 3), stir in seasoning (photo 4).
Madame Crumpet
Okay, here’s where things get fun. Sure, if we’re talking technically this should really be called a ‘Crumpet Madame’, but ‘Madame Crumpet’ sounds a whole lot sassier and you know it Also no, this isn’t a sandwich either, but that’s beside the point.
Madame Crumpet Layers
Crumpet – Toasted in a toaster or either side under the grill.
Butter – Mix butter with dijon mustard. Dijon is a key component of a classic Croque, the butter helps mellow it out and also helps it seep/melt into the crumpet.
Ham – Fold/tear it to fit neatly on the crumpet.
Béchamel – Plonked straight on top of the ham.
Parmesan – This helps it go golden, bubbly and delicious!
Process shots: toast crumpets then spread with dijon butter (photo 1), add ham (photo 2), add béchamel (photo 3), add parmesan then cook under the grill until golden (photo 4).
Don’t forget the egg!
One of the key ingredients in a Croque Madame is the fried egg on top. You can cook it to preference, but I like mine sunny side up, just for all that yolky goodness.
Do I have to add an egg?
I do recommend it as this crumpet version is pretty brunchy. However you can leave it off like a Croque Monsieur if you’d prefer.
Process shots: melt in butter (photo 1), fry eggs then season with salt and pepper (photo 2).
Serving Madame Crumpet
As I mentioned, I usually serve these for Brunch, typically by themselves but you could add some Hash Browns if you wanted to go wild!
Medium Non-Stick Pan, Whisk & Wooden Spoon (for bechamel)
Large Non-Stick Pan & Spatula/Turner (for eggs)
Small Pot (for dijon butter)
Fine Cheese Grater
Toaster (optional, can use grill)
Ingredients
6Crumpets
6Eggs
6slices ofHam
1 cup / 240mlMilk,at room temp
3/4 cup / 75gGruyere,finely grated
1/3 cup / 30gParmesan,finely grated
5tbspButter
2tbspFlour
1tspDijon Mustard
1/8tsp EACH:White Pepper, Nutmeg
Salt,to taste
Instructions
In a small pot combine 2 tbsp butter with 1 tsp dijon mustard. Place to one side.
In a non-stick pan over medium heat melt in 2 tbsp butter. Stir in 2 tbsp flour to form a paste, then gradually add in milk, whisking as you go to ensure no lumps form. Once thickened, turn heat to low and stir in gruyere, then season with nutmeg, white pepper and salt. Remove from heat.
Toast crumpets in a toaster or under the grill, then spread with the dijon butter (don't feel like you have to use it all). Top with ham, then spread over the béchamel sauce. Top with parmesan then place under the grill under golden and bubbly.
Whilst they're cooking, melt 1 tbsp butter into a pan over medium heat and crack in eggs (you may need to do this in batches). Fry to desired texture then season with salt and pepper.
Top crumpets with an egg each then tuck in and enjoy!
Video
Notes
a) Do I have to add an egg? – Nope! You can make a Monsieur Crumpet instead and leave it off. I do recommend it though, just for that yolky goodness 🙂
b) Gruyere – I highly recommend using Gruyere, not only is it most traditional in a Croque Madame, but it’s got a gorgeous nutty flavour that goes amazingly in a bechamel sauce. If you don’t have it, you can sub Cheddar.
If you loved this Madame Crumpet Recipe then be sure to Pin it for later! Already made it or got a question? Give me a shout in the comments and pick up your free ecookbook along the way!
Scrambled eggs are great, but cheesy scrambled eggs are even better. Plus they couldn’t be easier to make!
Looking for an easy and delicious way to level up your scrambled egg game? Look no further. Follow me…
Scrambled Eggs with Cheese
Eggs and cheese have been happening under our noses since, well, forever. Think Omelettes, think Frittatas, think Breakfast Sandwiches. It’s just this time we’re binding the cheese and eggs together to make a glorious marriage of flavours.
Cheesy Scrambled Eggs Ingredients
Eggs – Large and fresh.
Cheddar – Make sure this is finely grated, just so it melts into the eggs easier.
Cream Cheese – This not only adds another subtle layer of cheesiness, but it also adds a creaminess to the texture of the eggs.
Chives – Add a hit of flavour and pop of colour to garnish.
Salt and Pepper – To taste.
How many eggs should I use for one serving of scrambled eggs?
3 eggs per person. Here we’re using 6, so this recipe feeds two.
Can I use different types of cheese?
Other than cheddar, I’ve used Monterey Jack in this recipe which worked well. Ideally you want something with a similar melty texture to cheddar, like Swiss or Gouda.
Preparing Cheesy Scrambled Eggs
The easiest way to get the smoothest eggs is beating with a whisk. You can use a fork, it just requires a bit more elbow grease.
Next up is seasoning. Firstly, no black pepper at this point, it will discolour the eggs and turn them a little grey. We’ll add this when serving. I like a pinch of salt at this point, then you can adjust with more when serving if needed.
Making Cheesy Scrambled Eggs
In general, when making scrambled eggs, the key is low and slow. For my Perfect Scrambled Eggs I recommend spending up to 10mins gently scrambling the eggs. Now you don’t want to be quite so excessive with cheesy scrambled eggs, because you run the risk of the cheese splitting, but the general idea of frying on low heat is preferable. It gives the eggs a far richer flavour, and a much more smooth and velvety texture.
The key to velvety scrambled eggs is making big circular motions with the spatula, as opposed to lots of tiny rapid ones. You want nice big long curds.
I also recommend taking the eggs off the heat when they’re nearly done. You want them still a touch runny, they’ll continue cooking from carry over heat as they rest.
Serving Cheesy Scrambled Eggs
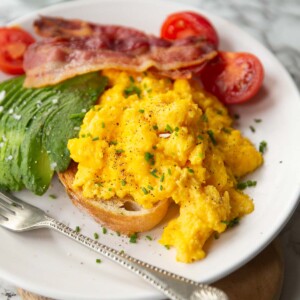
When it’s time to serve up, go in with a good pinch of black pepper and fresh chives. These eggs are awesome on toast – here I’ve added some crispy bacon, sliced avocado and tomatoes.
After another delicious way to spruce up scrambled eggs? Check out my Chorizo Scrambled Eggs!
Alrighty, let’s tuck into the full recipe for these Cheesy Scrambled Eggs Shall we?
How to make Cheesy Scrambled Eggs (Full Recipe & Video)
Crack 6 eggs in to a bowl, then add a pinch of salt and whisk until smooth.
Add 2 tbsp cream cheese to a non-stick pan over low heat. Use your spatula to melt and spread the cheese across the pan, then pour in the beaten eggs. Sprinkle over cheddar, then begin gently stirring the eggs.
Ensure the heat stays nice and low, and make long strides with the spatula (not rapid tiny ones). After a few minutes the cheese should melt and blend in with the eggs. The eggs should start to turn into a thick custardy texture, with smaller curds forming. At this point stir in a circular motion to form larger curds. Try and prevent the eggs catching on the pan.
When the eggs have formed into large soft curds, but still very slightly runny, take off the heat. Serve up with chives and black pepper!
Video
Notes
a) Low ‘n’ Slow – Patience is key here, just so the cheese gets a chance to melt and bind with the eggs. There’s nothing worse than tough, dry scrambled eggs, so don’t crank up the heat to speed things up. It can take around 5mins for the eggs to scramble over low heat.
b) Cheese – Cheddar works best here, but other similar melty cheeses like Monterey Jack work well. In both cases just make sure it’s finely grated to help it melt easier. I highly recommend adding the cream cheese as it adds a nice creaminess and a subtle cheesy flavour too, but if you don’t have it sub for butter.
c) Serving – Chives are key for a pop of colour and hit of flavour (they pair beautifully with both eggs and cheese). Always great on toast, here I’ve served with avocado, bacon and tomatoes too.
d) Calories – Shared between two using large eggs:
If you loved this Cheesy Scrambled Eggs Recipe recipe then be sure to pin it for later! Already made them or got a question? Give me a shout in the comments below and pick up your free ecookbook along the way!
Here I’ll share with you some simple tips and tricks to making the perfect fried egg on toast!
Egg on toast comes in many a formation, but arguably none more delicious than the classic fried egg on toast. A simple dish it may be, there are certainly some simple ways to turn it up a few notches. Follow me…
Egg and Bacon on Toast
Oh, come on. Is it even legal to have fried egg and toast without bacon?! All jokes aside, the bacon actually plays an important role in this recipe.
Low ‘n’ Slow
By frying the bacon low and slow, you’ll render down all the fat. Doing this will not only leave you with gorgeously crispy bacon, but the excess fat in the pan is what you’ll use to fry the eggs and bread (more on this in just a sec).
What kind of Bacon to use?
In the UK you’re looking for streaky bacon (which I guess in the US is regular bacon). This tends to have more fat than back bacon, and the more fat the better for this recipe. Plus, streaky bacon is typically skinnier than back bacon, meaning you still get all the flavour, but without it overshadowing the fried egg, which realistically is the star of the show.
Process shots: add bacon to pan (photo 1), fry over low-medium until crisp with the fat rendered (photo 2).
The Perfect Fried Egg
Admittedly fried eggs are tricky to mess up, but there are a few tips to help you get the perfect fried egg.
Tips for the perfect fried egg
Start with bacon – As discussed, the best fried eggs are cooked in bacon fat
Fresh Egg – I find the fresher the egg, the more compact it is. Older eggs usually go thin and spill across the pan.
Room Temp – Not a deal-breaker, I just find eggs that are room temp tend to cook a little more evenly.
Temp – Increase the heat from low-medium for the bacon to around a medium. Make sure the pan is hot before you crack the egg, just so the instant heat helps keep the egg compact.
Close to pan – Try and crack the egg close to the pan. Too high and you risk the yolk breaking upon impact.
Baste in Butter – Basting the eggs in butter will not only ensure they cook evenly, but will also wrap them in gorgeous bacon/buttery goodness.
Do I have to make the eggs sunny-side-up?
I do recommend it, just because runny egg yolk is life. But you could have them over easy, medium or hard if you’d prefer. I’ve added a section on that in the recipe card.
Process shots: remove bacon and increase heat (photo 1), crack in eggs (photo 2), add butter (photo 3), baste egg whites (photo 4).
Once the eggs are cooked, remove them from the pan and leave all the butter and bacon grease behind. That stuff is now officially liquid gold. From there, you can toast the bread in the pan to soak up all that goodness.
What kind of Bread to use?
I usually go for a loaf of Artisan style bread. Sourdough also works nicely too. I don’t recommend soft sandwich bread for this recipe; invest in a good quality loaf to create the best edible platform for your egg
Process shots: add bread to pan (photo 1), toast both sides (photo 2).
Fried Egg on Toast
Alrighty, bacon, egg and toast are all done and dusted, just two more ingredients to discuss:
Chilli Jam – This balances out the saltiness of the bacon and richness of the butter/egg yolk with a hit of sweetness and a gentle kick of spice. You’ll find it in most stores, or most definitely a Farmer’s market!
Chives – These add a final hit of flavour and a pop of colour.
Process shots: spread toast with chilli jam (photo 1), add bacon (photo 2), add egg (photo 3), season then sprinkle with chives (photo 4).
Serving Fried Egg on Toast
I usually whip this up for Brunch on the weekend. It’s perfect as it is, but if you wanted to take things up a notch you could serve with Hash Browns or Breakfast Potatoes!
Alrighty, let’s tuck into the full recipe for this fried egg on toast shall we!?
How to make Fried Egg on Toast (Full Recipe & Video)
Sharp Knife & Chopping Board or Scissors (for chives)
Spoon (for basting eggs)
Ingredients
2medium slices ofArtisan Bread(or bread of choice)
4slices ofStreaky Bacon
2freshEggs,at room temp
2tbspChilli Jam(see notes)
1/2tbspButter
2tsp finely dicedFresh Chives
Salt & Pepper,to taste
Instructions
Add bacon to a non-stick pan over low-medium heat. Fry until the fat has rendered down and the bacon is crisp. Remove from pan, leaving the fat behind. Increase heat to medium.
Carefully crack the eggs into the pan, making sure you crack them nice and close to the pan. Add in the butter and begin basting the egg whites. This adds a buttery flavour, but more importantly, this will help cook the tops of the eggs (just don't baste the yolks).
Once the egg whites are opaque, remove the eggs from the pan then add the bread. Toast both sides in the leftover fat, then remove.
Spread the toast with chilli jam then top with bacon and fried egg. Finish with a good pinch of salt & pepper and fresh chives. Enjoy!
Video
Notes
a) Chilli Jam – This is a key ingredient as it balances out the saltiness of the bacon and richness of the butter/egg yolk, by adding sweetness and a touch of spice. You’ll find chilli jam in almost all supermarkets/grocery stores or even farmer’s markets. The one I use here is from Sainsbury’s.
b) Do I have to have a runny yolk? – Nope, you don’t have to make sunny side up eggs, you could make them over easy instead. It’s the same process up until the egg whites are NEARLY cooked. Once they’re all nearly cooked (a little ring of uncooked white around the yolk) flip them over and cook for 30 seconds or so. For over medium or hard just flip the eggs sooner and cook longer on the flipped side (until the yolk is to your preference).
c) Bread – I usually grab a loaf of Artisan style bread from the bakery section at the supermarket. Sourdough also works nicely. I wouldn’t recommend soft sandwich bread for this recipe; invest in a good quality loaf to create the best edible platform for your egg 🙂
If you loved this Egg on Toast Recipe then be sure to pin it for later! Already made them or got a question? Give me a shout in the comments below and pick up your free ecookbook along the way!
These Caprese Style Baked Eggs are totally delicious and so simple to make!
This dish is very similar to a classic Shakshuka, but with an Italian twist. It uses simple ingredients and is super easy to whip up. Follow me…
Bring on the bread!
My edible tool of choice for this dish is of course bread. I love toasting it so you get that gorgeous crisp/gooey contrast.
What kind of bread to use?
I recommend using something like a baguette and slicing it up, just so the slices are the perfect size for dunking. Stay away from soft sandwich bread – you want something firm to give you a sturdy dunk!
How do I toast the bread?
Just lightly brush both sides with oil, then toast both sides under the grill on a baking tray. You could also toast in a frying pan if you’d prefer.
Process shots: brush sliced baguette with oil (photo 1), grill, then brush and grill the other side (photo 2).
Tomato Baked Eggs
The baked eggs themselves are actually really simple to whip up and only require a handful of simple ingredients. Just a few notes…
Chopped Tomatoes
These make up the base of the sauce, so try and use some good-quality tomatoes. You’ll want to season well with salt & pepper; I also like to add some sugar to balance out the acidity of the tomatoes.
Sun Dried Tomatoes
To really emphasize the tomato aspect, and to bulk out the dish, I love adding sun dried tomatoes. They go nice and plump/juicy as they simmer in the sauce and add such gorgeous flavour. You can also use the oil from the jar to fry the garlic too, which is always a bonus!
Simmering the sauce
Really important to simmer the sauce for around 20mins. This will not only give the opportunity for the flavours to deepen and marry together, but it’ll also reduce the sauce so it’s nice and thick. Because nobody likes watery baked tomatoes!
Process shots: add garlic and oil to oven-safe pan (photo 1), fry (photo 2), add in chopped tomatoes, sun dried tomatoes, water, basil and seasoning (photo 3), simmer to reduce (photo 4), crack in eggs (photo 5), bake (photo 6).
Tomato Baked Eggs FAQ
Do I have to toast the bread?
Strictly speaking no. If you’re not, I recommend big chunks of buttered bread
What if I don’t have an oven-safe dish?
If your pan isn’t suitable for baking, you can add on a lid and allow the steam to poach the eggs and cook them through. However, my preferred method is baking.
How do I know when the eggs are cooked?
You’ll notice the whites turning opaque and the yolk should turn a little wrinkly. I recommend staying on the side of caution and taking them out slightly early as they’ll carry on cooking slightly once out of the oven. You can always add them back in, but once the yolk is set, there’s no going back!
Serving Tomato Baked Eggs
Once they’re out of the oven, I like to dot over some roughly torn mozzarella, then drizzle with balsamic glaze and garnish with fresh basil leaves. From there, you can tuck straight in with the toast!
I like serving this for Brunch or Lunch, but honestly, it’s so good for any meal of the day!
In a large cast iron/oven-safe skillet over medium heat, add 2 tbsp sun dried tomato oil. Add garlic and fry for a couple of mins until it starts to tinge with colour, then pour in the chopped tomatoes. Fill one of the cans up halfway with water, give it a swill, then pour into the second can and swill that out too. Pour into the pan then add sun dried tomatoes, basil, sugar, salt & pepper.
Give it all a good stir, then simmer for 20mins. This is important to marry the flavours and reduce the sauce.
Meanwhile, add sliced bread to a tray and brush one side with oil. Place under the grill and broil until crisp. Flip the slices over, brush with oil and place back under the grill until the other side is crisp. Place to one side and preheat the oven to 180C/350F.
Once the sauce has reduced, check for seasoning and adjust if needed. Use your wooden spoon to make a well/dent in the sauce. Crack an egg into the well, then repeat with the remaining eggs. Place the skillet in the oven for 7-10mins, or until the whites are just about cooked through and the yolk is still a little runny. Check regularly after 6-7mins as they'll cook quickly, and keep in mind they'll carry on cooking a little more once out of the oven.
Season the eggs with a pinch of salt & pepper. Dot over the torn mozzarella, then drizzle over the balsamic glaze and finish with a sprinkle of basil. Tuck in with toast and enjoy!
Video
Notes
a) Mozzarella – You could bake the mozzarella with the eggs, I just much prefer it freshly torn on top. In both cases though it’s important to soak up as much moisture from the mozzarella as possible, otherwise it’ll turn everything watery as it warms up.
b) Bread – You could also toast the bread in a pan instead of under the grill. You don’t have to toast the bread at all – in which case I recommend big hunks of buttered bread.
c) Balsamic Glaze – You can use Homemade Balsamic Glaze or store-bought. Either way, just make sure it’s balsamic glaze, not straight balsamic vinegar, otherwise it’ll spoil the dish!
d) Calories – Whole recipe divided by 3 without bread.
If you loved this Tomato Baked Eggs Recipe then be sure to Pin it for later! Already made it or got a question? Give me a shout in the comments and pick up your free ecookbook along the way!
Here I’ll share with you some game-changing tips and tricks to making the most delicious Quiche Lorraine imaginable!
Can you believe this is the first quiche recipe I’ve ever uploaded?! For a self-proclaimed comfort foodie, I’m disappointed it’s taken me this long. But, the wait is worth it, I promise. Follow me…
Homemade Quiche Crust
Aka shortcrust pastry. It’s not often you’ll see me making pastry on this blog, but for shortcrust I can make an exception, given how simple it is to make.
It’s actually one of the first things I ever learned to cook back in D&T at school and it’s a method that’s stuck with me ever since. Whilst you can use a food processor, which I’ll give instructions for in the recipe card below, I’m pretty old school and prefer making it by hand. You know, just to feel at one with the food.
Shortcrust Pastry Ingredients
Flour – Plain/All Purpose flour does the trick.
Butter – I prefer unsalted butter with added salt, but you can use salted if that’s what you’ve got on hand.
Salt – Always remember to season your pastry!
Water – Must be cold (see below).
Keeping everything cold
The key to great shortcrust pastry is ensuring the butter stays cold. This is what creates that iconic flaky/crumbly texture. In order to keep the butter cold, you’ll want to work fairly quickly so the butter doesn’t melt and turn the dough greasy. Using cold water is essential too, as is handling the dough as little as possible.
Minimal handling
You don’t want to knead the dough or squeeze it too much, as this will develop gluten and result in a firm pastry. Also, the more handling, the warmer the dough gets.
Process shots: whisk salt & flour then add cold butter (photo 1), rub into a crumb-like texture (photo 2), cut/mix in water (photo 3), form dough (photos 4&5), tightly wrap and chill (photo 6).
Blind Baking
Blind baking the pastry helps give it a kickstart before you add the filling. It’ll partially cook, which helps prevent the filling from soaking into the dough and causing it to go soggy.
What can I use to blind-bake the pastry?
You’ll first want a layer of baking paper or foil, then on top of that, you want something that will weigh it down and won’t burn in the oven. Pie beads or dry beans are great – here I opt for uncooked rice.
Once you’ve rolled out the dough and added it to the pie dish, you’ll want to prick the base with a fork. This will help prevent air bubbles from forming, which in turn causes the pastry to crack as it cooks.
Process shots: roll out dough (photo 1), add to greased dish (photo 2), trim then prick (photo 3), add pie weight and bake (photo 4).
Quiche Lorraine Filling
The fillings for a classic Quiche Lorraine are fairly minimal, but they all work together so well to create the most delicious quiche! Here I’m just frying off some bacon and then using the leftover fat to fry some shallots.
For the cream filling you’ll want a base of eggs and double/heavy cream, alongside a simple seasoning mix. Double cream is essential for its thick texture, which will easily set as the quiche bakes. Plus it adds a gorgeous richness to the quiche – and let me tell you this quiche is RICH.
Process shots: fry bacon (photos 1&2), fry shallots (photos 3&4), add cream, eggs, nutmeg, salt and pepper to bowl (photo 5), whisk (photo 6).
Quiche Lorraine
The final piece of the quiche puzzle is, of course, cheese. For this recipe, I LOVE a 50/50 combo of Cheddar and Gruyere. The Cheddar adds a real punch of flavour, whilst the Gruyere adds a gorgeous nutty flavour.
Layering the quiche
The perfect quiche is one where the fillings are evenly distributed. At the end of the day, quiches are gonna quiche, so there will be some sinkage. But, to help prevent this I recommend layering the fillings. Here I do bacon & shallots, then cheese, then cream. Repeat and you’re good to go.
Process shots: bake pie uncovered (photo 1), create one layer (photo 2), create second layer (photo 3), bake (photo 4).
Quiche Lorraine FAQ
How do I know when the quiche is cooked?
The top will be golden and the centre will be just about set (you can check with a knife). It will still jiggle a little and will carry on cooking as it rests.
Can I use store-bought pastry?
Sure! Just roll out the pastry and continue the recipe.
How do I prevent the pastry from cracking?
This can sometimes happen when blind-baking. Poking holes will help, as will making sure the oven temp is correct (too high and it’ll burn/crack). I’ve added a note on this in the recipe card below!
Serving Quiche Lorraine
Once out of the oven, let the quiche rest, then garnish with chives and more bacon! Here I’ve served with Chips and a side salad, but it’s honestly pretty perfect as it is.
Large Mixing Bowl & Knife (preferably keep both in the fridge until needed)
Cling Film (for resting pastry)
Rolling Pin
23-25cm / 9-10" Pie Dish (see notes)
Baking Paper or Foil + Pie Weights (see notes)
Sharp Knife & Chopping Board
Frying Pan & Wooden Spoon (for bacon/shallots)
Mixing Bowl & Whisk (for cream/eggs)
Cheese Grater
Ingredients
Pastry
200g / 7ozPlain/All Purpose Flour,plus a pinch more for rolling dough
100g / 3.5ozCOLDUnsalted Butter,diced into small cubes (plus a knob more for greasing dish)
1/2tspSalt
2 – 3tbsp COLDWater,or as needed
Filling
220g / 8ozBacon,diced
2largeShallots,finely diced
3largeEggs
300ml / 1 1/4 cupDouble/Heavy Cream
1/8 tspEACH:Salt, White Pepper, Ground Nutmeg
60g / 2ozGruyere,grated
60g / 2ozCheddar,grated
finely dicedFresh Chives,to garnish
Instructions
Whisk the flour and salt together in a large mixing bowl. Add the butter and use your finger tips to rub the butter into the flour until a crumb-like texture with no large lumps. Try and work quick so the butter stays cold.
Add in 2 tbsp cold water and use a knife to cut and mix the water into the flour. Once the water is well distributed the crumbs should start to clump together. Pick up a small amount and check if it is able to mould into dough. If the dough is too crumbly you can mix in more water 1 tsp at a time. Form the dough into a ball then shape into a large disk and tightly wrap it in cling film. Rest in the fridge for at least an hour (up to overnight).
Lightly flour a clean surface and roll out the dough until it comfortably covers the rim of the pie dish. Grease the dish with butter then carefully place in the pastry, gently pressing it into the base of the dish. Trim excess pastry then prick the base all over with a fork. I recommend placing it back in the fridge for 15mins or so to cool back down at this point. Preheat oven to 180C/350F.
Add foil or baking paper on top of the pastry and weigh down with pie weights, ensuring they cover the whole base. Place in the oven for 20 minutes. Remove from the oven and carefully remove the pie weights and baking paper/foil. Place back in the oven for 5-10mins until light golden. Check after 5 mins and remove if it's golden and/or air bubbles are forming.
During this time fry the bacon over medium heat until crispy with the fat rendered down. Remove and dry on kitchen roll, then remove all but a couple of tsp of fat from the pan. Fry the shallots in the leftover fat until soft and golden, then remove and place to one side with the bacon (set some of the bacon aside to garnish). In a medium-sized mixing bowl whisk together the eggs, cream, salt, pepper and nutmeg until smooth and well-combined.
Sprinkle half of the bacon & shallots into the pie, then top half of the cheese and half of the cream. Repeat then place in the oven for 25-30 minutes, or until golden on top and just about set in the centre (check with a knife to see if it's set – keep in mind it will carry on cooking slightly as it rests). The quiche should jiggle a little. Rest for 10mins before serving up. Garnish with bacon and chives then tuck in and enjoy!
Video
Notes
a) Homemade pastry – The aim of the game is to work fairly quickly and keep everything cold. The tiny shards of cold butter are what make the pastry perfectly crumbly/flaky. You don’t want to knead the dough or squeeze it too much, as this will develop gluten and result in firm pastry. Lastly, don’t add too much water either. Just enough to form the dough. Less water will result in a shorter, more crumbly pastry, but it will be more difficult to handle. It’s about striking a balance to create a dough that’s easy to work with, but that still comes out with the perfect texture, hence why you want to add the water a tiny amount at a time.
b) Using a food processor – Pulse the flour and salt once or twice, then pulse in the butter until rubbed into the flour. Keep the motor on and slowly pour in the water until a ball forms. Only use enough water to form the ball. Proceed with recipe from there.
c) Pre-made pastry – You can use 1-2 sheets of pre-rolled shortcrust pastry, just press them together to join them in the baking dish. You can also use a slab of pastry and roll it out. You likely need about 300g/10.5oz, which is the weight of the homemade dough here.
d) Blind baking – Blind baking the pastry will partially cook it and help prevent it from going soggy when the cream is added. You can use pie beads, or even rice like I use here. I’ve even seen sugar being used – anything that will cover the whole base of the pastry and won’t burn in the oven!
e) Pie dish – Mine is 25cm/10″ and the pastry fits perfectly. It’s on the slightly thinner side, but I prefer it that way. My dish fairly shallow, so you can use a regular 23cm/9″ dish which will work too.
f) Troubleshooting Pastry – If the pastry begins to crack as it blind bakes, you can patch it up with a 1:1 mix of flour and water, which will essentially work as a glue. Just dab over the crack and bake for another minute or so to set.
g) Make ahead/leftovers – Always best eaten fresh, but you can bake it then allow to completely cool and tightly store in the fridge for a few days or freezer long-term. I recommend bring to room temp then covering and baking at 180C/350F for 10-15mins, or until piping hot again (thaw in the fridge if frozen). You could bake straight from the fridge but I’d recommend baking at 160C/320F to help bake through more evenly. You can also eat it cold. I find it a little firm so I bring it to room temp beforehand.
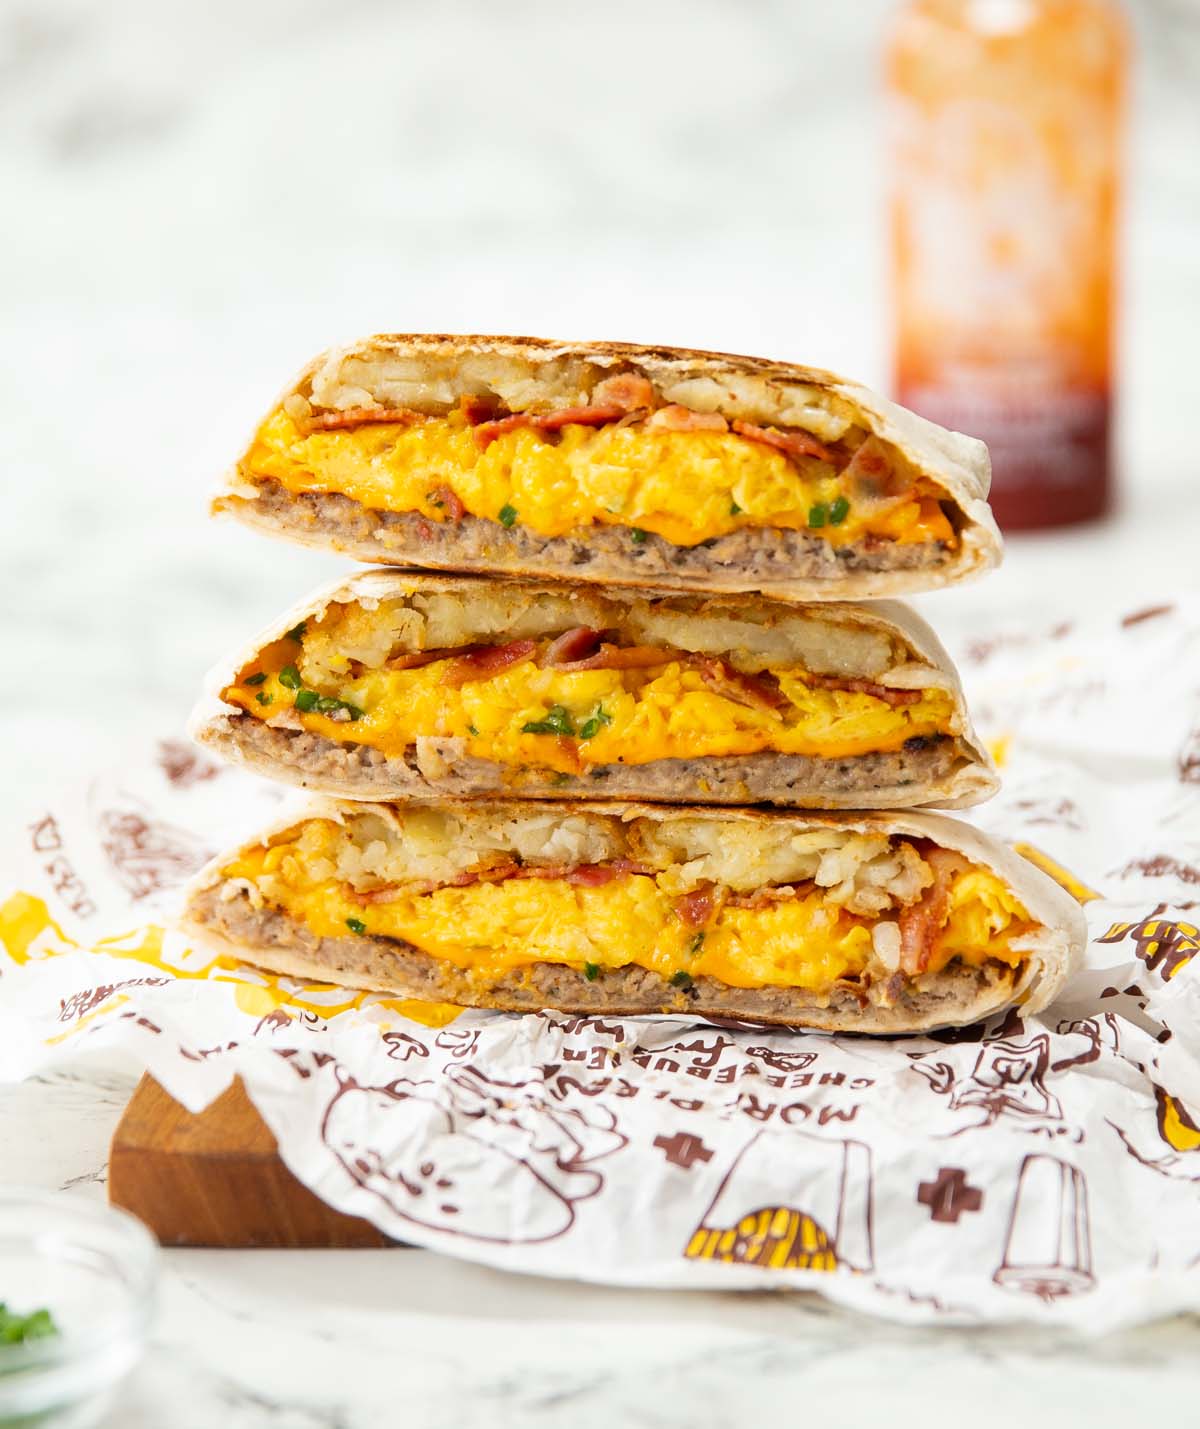
These breakfast crunchwraps are hearty, filling, delicious and so easy to make!
Now this is truly something getting out of bed for. You know me, I’m more of a dinner kinda guy, but this breakfast just does something to me. And honestly? It’s way too easy and delicious not to try. Follow me…
Breakfast Crunchwrap Ingredients
These crunchwraps don’t require too many ingredients. But please don’t be fooled – they are still incredibly hearty and filling. The full quantities are in the recipe card below, but just to quickly talk through each ingredient:
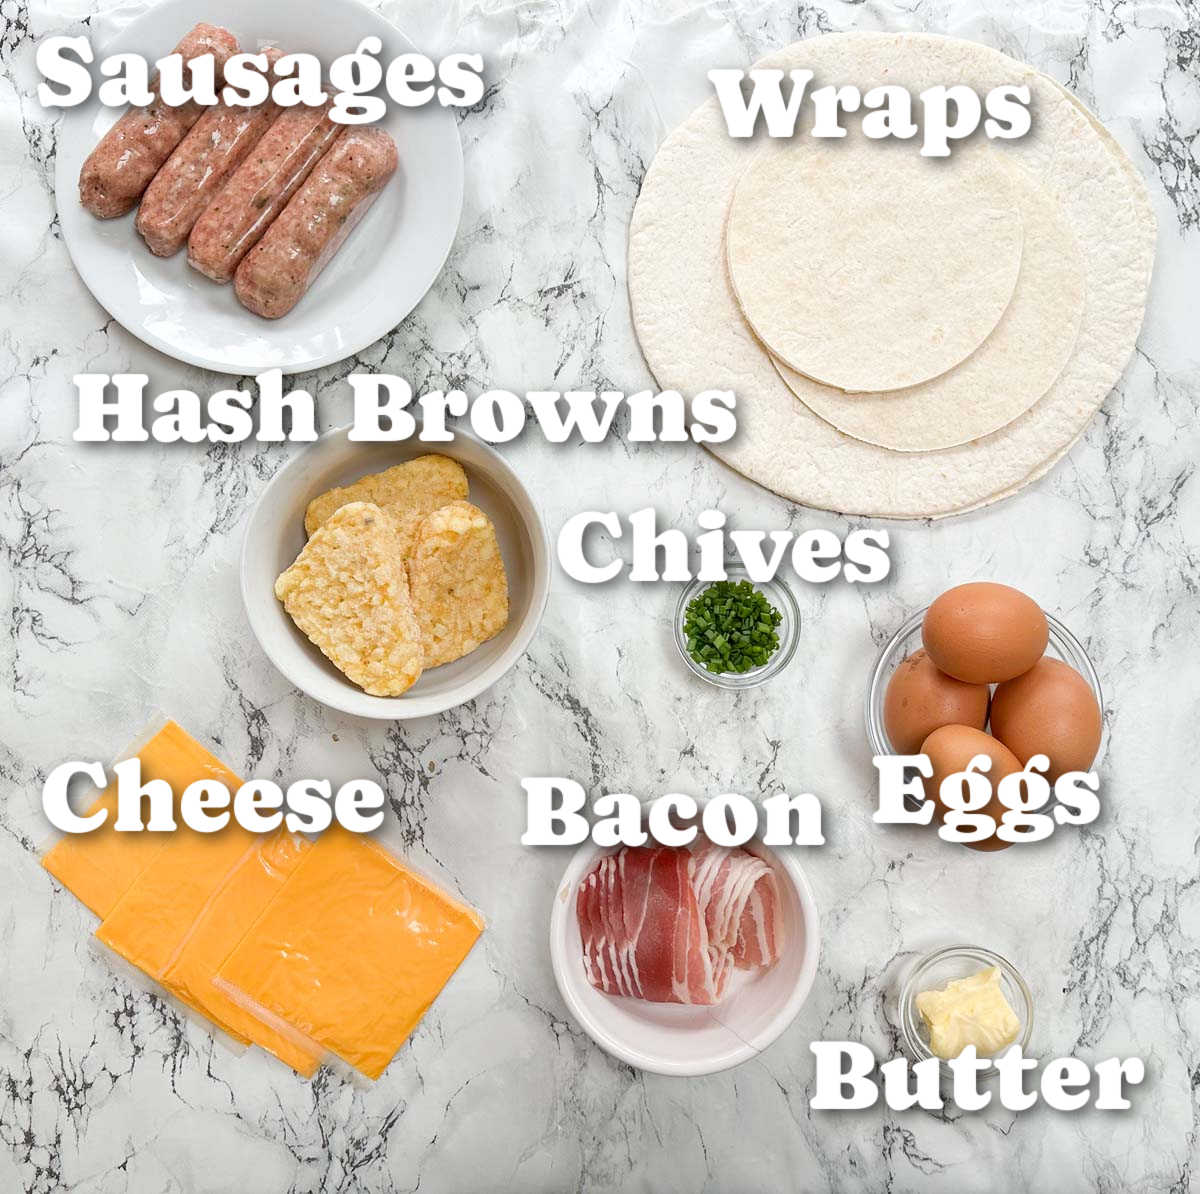
Wraps – You’ll want to use flour tortillas for this recipe and will need a couple of large ones and a couple of small ones. I typically just buy one large pack and slice out the smaller ones.
Sausages – I recommend a ‘neutral’ flavour, something like a classic Cumberland. You’ll to squeeze the meat out of the skins, so you could use a pack of ready minced/ground sausage meat if you’d prefer.
Hash Browns – I use frozen hash browns, but you could go wild and make your own hash browns. I typically cook them in the air fryer, but you could use the oven if you’d prefer.
Bacon – I recommend using streaky bacon, just so you can render down the fat and use it to fry the sausage. I use unsmoked, but you can use smoked if you’d prefer.
Cheese – Yep, we’re using American/plastic cheese! It gives the whole wrap a McDonald’s vibe. If you’re truly against it you can of course use a more sophisticated cheese.
Eggs – These will be scrambled, so you’ll just need to beat them with a pinch of salt and pepper.
Butter – This is to fry the eggs.
Chives – These pair beautifully with the eggs and add a nice pop of flavour and colour.
Smash Sausage Tortilla
To cook the sausage, we’re using the same technique as my Smash Sausage Tacos. That is to spread the sausage meat over a tortilla and cook it meat-side-down. ‘Why are we doing this?’ I hear you cry. Good question –
You could cook the sausage meat directly in the pan and crumble it up. But, you’ll find it doesn’t stay inside the crunchwrap very well after you slice it, and is more prone to falling out.
You can get a nice crust on the sausage by cooking it on the tortilla directly, which you can then add the cheese directly to let it melt.
You’ll be using the smaller tortilla for this and will cook it in the leftover bacon fat. Just to make use of that liquid gold!
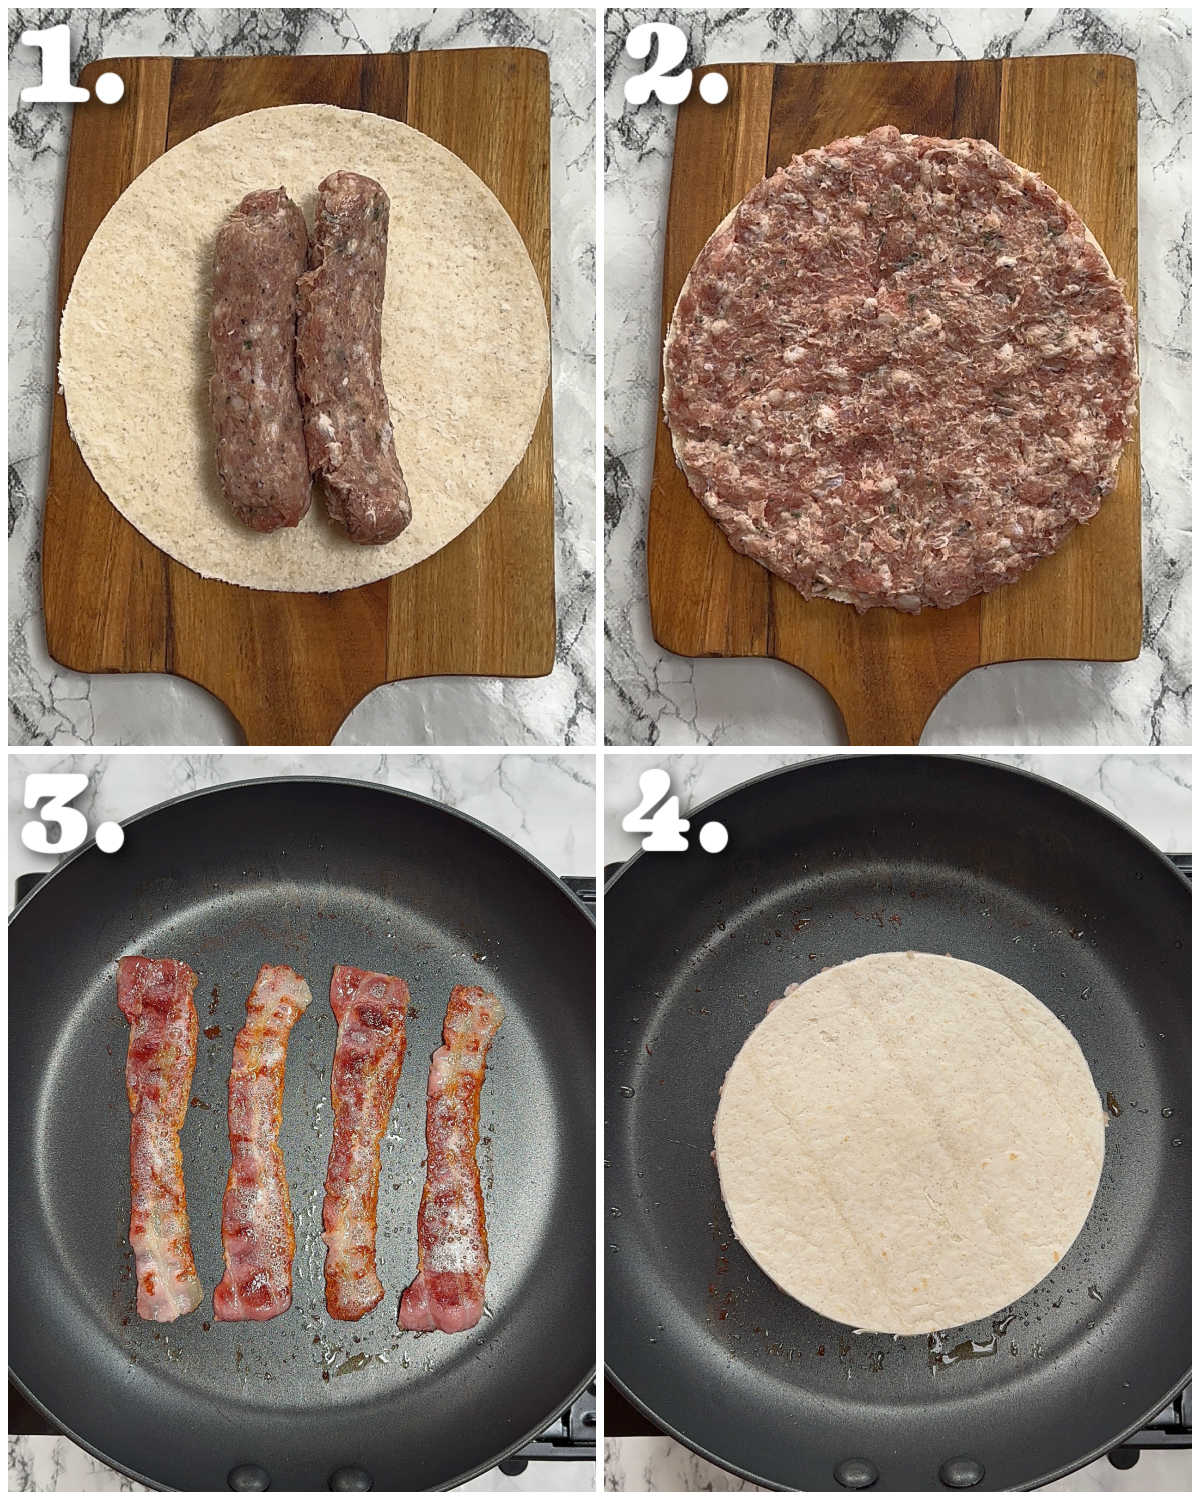
Process shots: remove sausage meat from skins and add to small tortilla (photo 1), spread over (photo 2), fry bacon then remove (photo 3), fry sausage meat (photo 4).
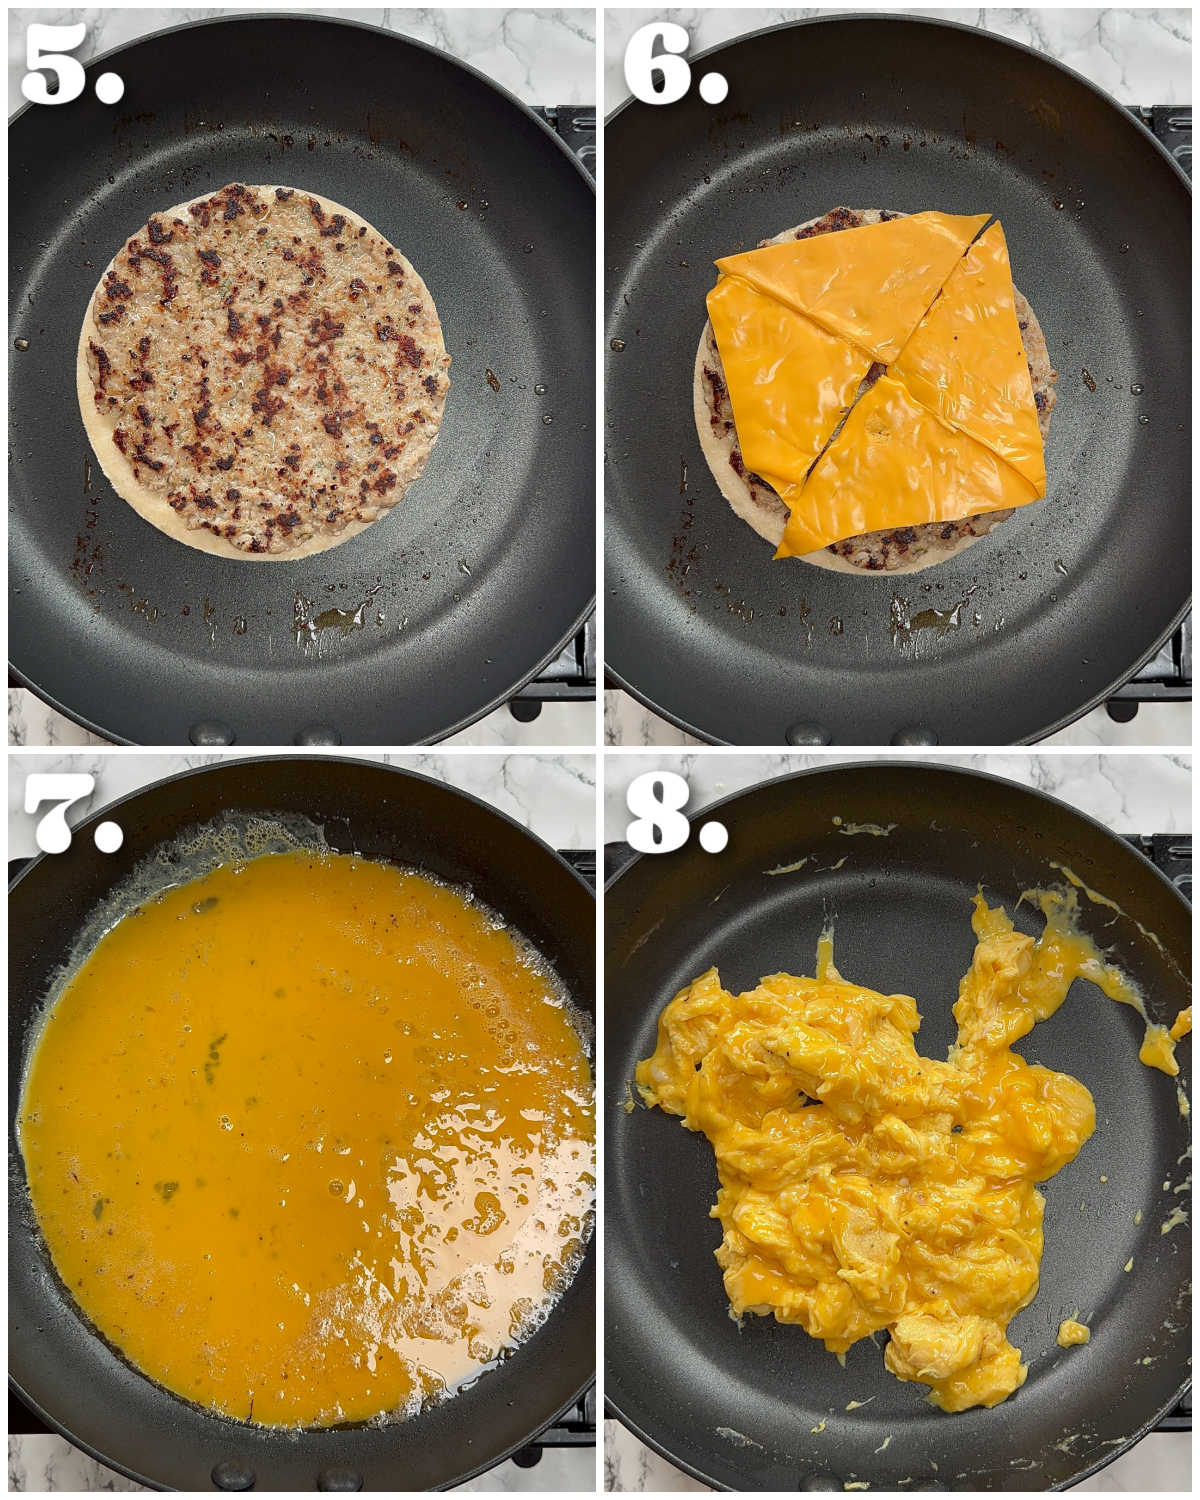
Once you’ve built up a nice crust and the sausage is cooked through (you can peek to check), flip it over, add the cheese then remove.
From there, you can go ahead and scramble the eggs. When doing so, it’s important to leave them slightly under-done. They should be firm enough to hold their shape, but still a little runny. This is because they’ll carry on cooking as they rest and when you cook the crunchwrap.
Process shots: flip tortilla (photo 5), add cheese then remove (photo 6), add beaten eggs (photo 7), scramble then remove (photo 8).
How to stack a Breakfast Crunchwrap
Making the crunchwraps is pretty straightforward. Just a few tips:
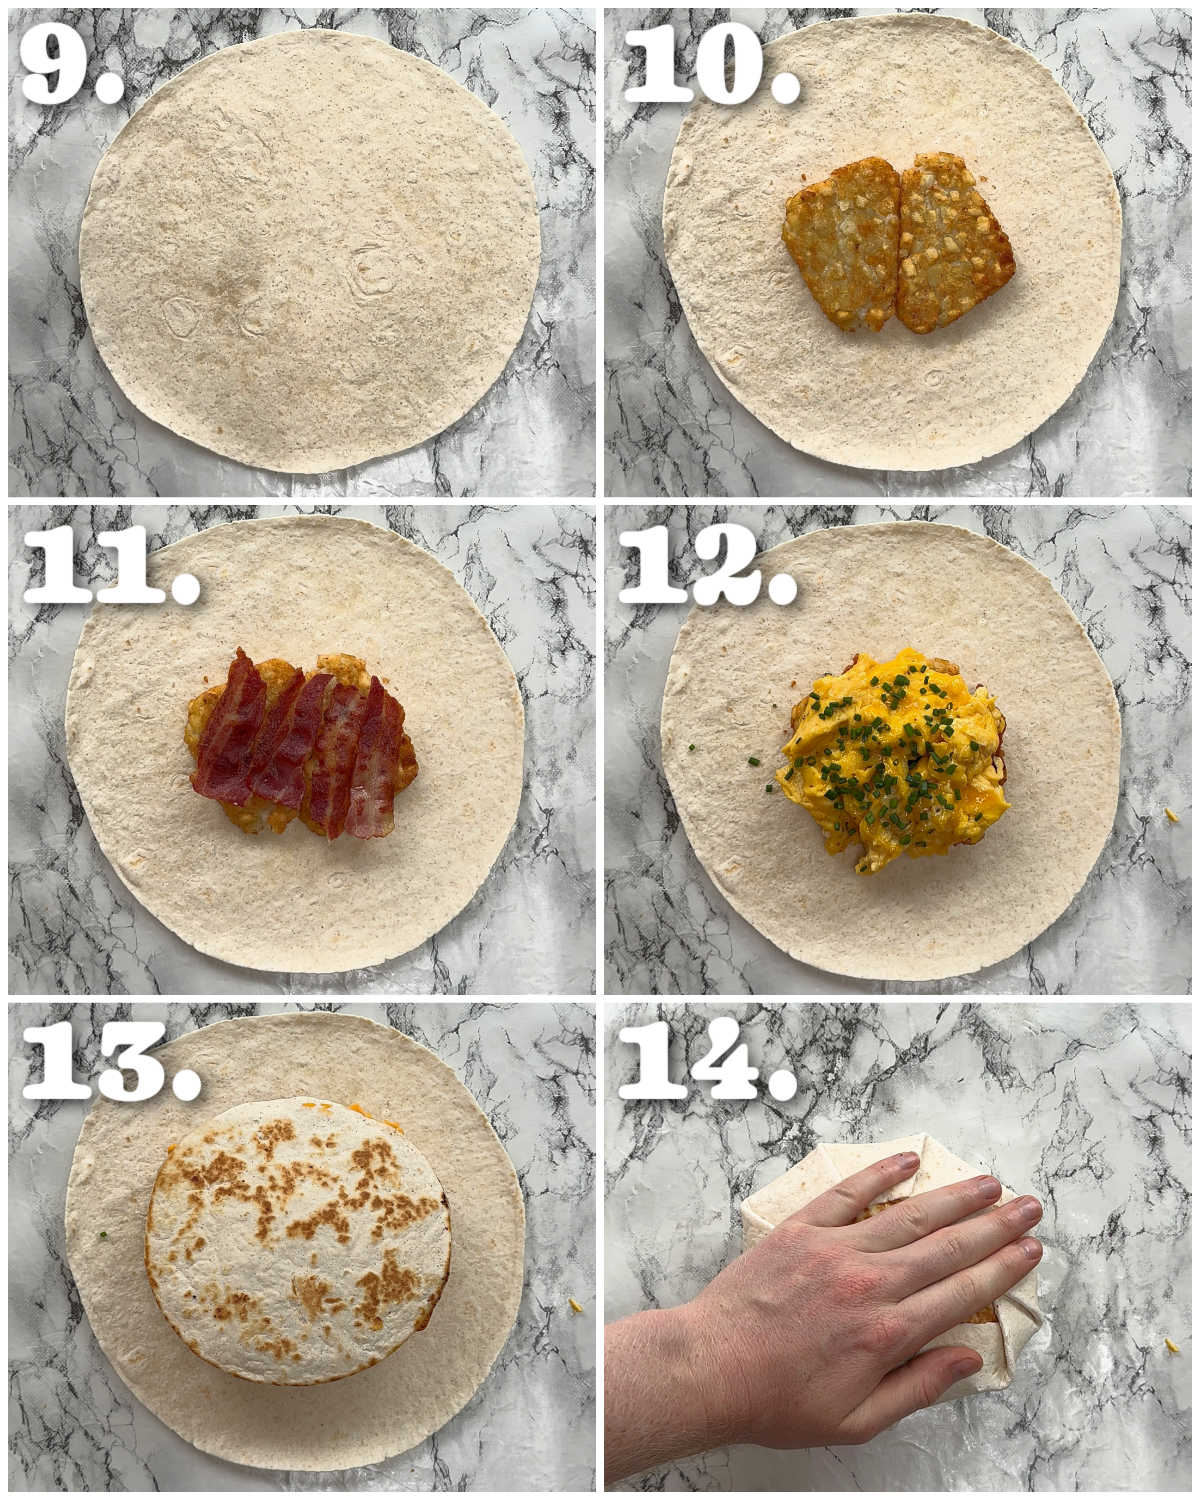
Create a sturdy base by flattening the hash browns a little (just with a fork is fine).
If the wraps are looking a little dry, just give them a quick blast in the microwave to loosen them up.
Keep them seam-side-down once folded, just to prevent them from unravelling.
Process shots: lay out large tortilla (photo 9), add hash browns and press down a little (photo 10), add bacon (photo 11), add eggs and chives (photo 12), add sausage tortilla sausage-side-down (photo 13), fold in the outside to make the crunchwrap (photo 14).
To cook the crunchwraps, you simply need to fry both sides in a dry pan until crisp. Everything inside will be cooked, or at least will finish cooking very quickly, so just focus on getting a nice crunch on the outside.
To serve, you could tuck straight in, but I love some sriracha. You could also use ketchup, brown sauce, or any sauce you fancy.
Cook the hash browns in the oven or air fryer until crisp.
Meanwhile, add the bacon to a large pan with the heat off. Turn the heat to medium and fry until the bacon is crisp with the fat rendered down.
During this time, spread the sausage meat over one side of each of the small tortillas, ensuring you spread it right to the outside. Season with a pinch of salt and pepper.
Once the bacon is cooked, remove and place to one side, leaving any excess fat behind. Raise the heat to medium-high and place a small tortilla sausage-side-down in the pan. Leave to fry for 3-4mins until it builds up a nice crust and is just about cooked through (you can lift the tortilla to check – keep in mind it'll carry on cooking in the crunchwrap). Remove and cover the sausage with the cheese. Repeat with the second small tortilla.
Lower the heat to medium-low and melt the butter. In a small bowl or jug, beat the eggs with a pinch of salt and pepper until smooth. Pour it into the pan and gently run a spatula across the pan to make long ribbons of scrambled egg. Remove from the heat when it's just about cooked, but still a little runny (it will carry on cooking in the crunchwrap). Wipe out the pan if needed.
Add the hash browns in the centre of the large wraps. Squash them down a little to increase the surface area. Top with bacon, then eggs, then chives. Place the small tortilla on top cheese-side-down. Gently press down and fold in the large tortilla like a crunchwrap (see video for reference).
One by one, place them seam-side-down in the pan (no oil) over medium heat and fry both sides until golden brown and crisp. Slice in half and enjoy!
Video
Notes
a) Sausages – I recommend using a ‘neutral’ flavoured sausage. Here I use Cumberland sausages. For reference, 4 pork sausages should weigh around 260g/9.5oz, so if you only have ground meat then use that much. If you’re in the US I recommend using breakfast sausage.
b) Tortillas – Different brands might be different sizes, but just work to those measurements as best you can. If the wraps are looking a little dry (namely the large ones) just pop them in the microwave to loosen them up before you fold them.
c) Serving – These are deceivingly filling! I typically have one for a very hearty breakfast and serve alongside some Sriracha (serve with any sauce you fancy).


 Also no, this isn’t a sandwich either, but that’s beside the point.